Tag Archives: Mediapipe

AI on the Edge LESSON 48: Hand Detection in OpenCV and MediaPipe on the Raspberry Pi

In Lesson 48 we’re taking a huge step forward — we’re bringing real-time hand detection to the Raspberry Pi using the incredible power of MediaPipe combined with OpenCV and the Pi Camera. This is one of those projects that feels like pure magic when you see it working: the camera picks up your hands instantly, tracks all 21 landmarks on each hand, draws beautiful connections in real time, and does it all right on the edge with no cloud required.
You’ll learn how to set up MediaPipe’s Hands solution for reliable multi-hand tracking, how to efficiently process frames from the Picamera2 library, flip and convert images for proper display, and draw professional-looking landmarks and connections with custom styling. We also keep a smooth FPS counter running so you can see exactly how well your Pi is performing.
This lesson is exciting because hand tracking is the foundation for so many advanced gesture-control projects — think touchless interfaces, sign language recognition, robotic control, virtual instruments, and interactive art installations. Once you have solid hand detection running smoothly on your Raspberry Pi, the creative possibilities are almost endless.
So grab your Raspberry Pi, fire up the camera, and let’s get those hands dancing on the screen! As always, the full code is waiting for you below. Watch the video, follow along, and then start experimenting — I can’t wait to see what you build with this!
Let’s make something awesome!


AI on the Edge LESSON 47: Emotion Detector Using MediaPipe, OpenCV and Raspberry Pi

In this exciting lesson, we build a real-time Emotion Detector that can recognize basic human emotions using just a Raspberry Pi, a camera, and the power of MediaPipe. The system watches your face and identifies whether you look Neutral, Smiling, Surprised, or Angry — and then reacts instantly by changing the color of a NeoPixel ring and displaying the detected emotion on both the camera preview and a small OLED display.Using MediaPipe’s Face Mesh solution, the program tracks 468 facial landmarks in real time. From these points, we carefully calculate key facial ratios — such as eye openness, mouth width, and mouth height relative to head width. These measurements allow us to create simple but effective rules that distinguish between different emotional expressions. For example, a wide mouth combined with raised cheeks indicates a smile, while a small mouth opening and narrowed eyes suggests anger.The project beautifully integrates several powerful technologies:

  • Picamera2 for high-performance camera capture
  • OpenCV for image processing and on-screen text display
  • MediaPipe Face Mesh for accurate facial landmark detection
  • NeoPixel RGB ring that lights up in different colors depending on the detected emotion
  • SSD1306 OLED display that shows both the emotion name and a simplified wireframe of your face

One of the most satisfying parts of this project is seeing the NeoPixel ring instantly change color to match your emotion — green for happy, cyan for surprised, red for angry, and yellow for neutral. The OLED also mirrors the detected emotion, making the entire system feel alive and responsive.This lesson is a fantastic step forward in understanding how to combine computer vision with physical outputs on the edge. You will learn how to extract meaningful measurements from facial landmarks, build rule-based emotion logic, and synchronize visual feedback across multiple devices (camera preview, NeoPixel, and OLED).By the end of Lesson 47, you will have a working real-time emotion recognition system running entirely on a Raspberry Pi — a great foundation for more advanced projects like mood-reactive lights, interactive robots, or even assistive technology.

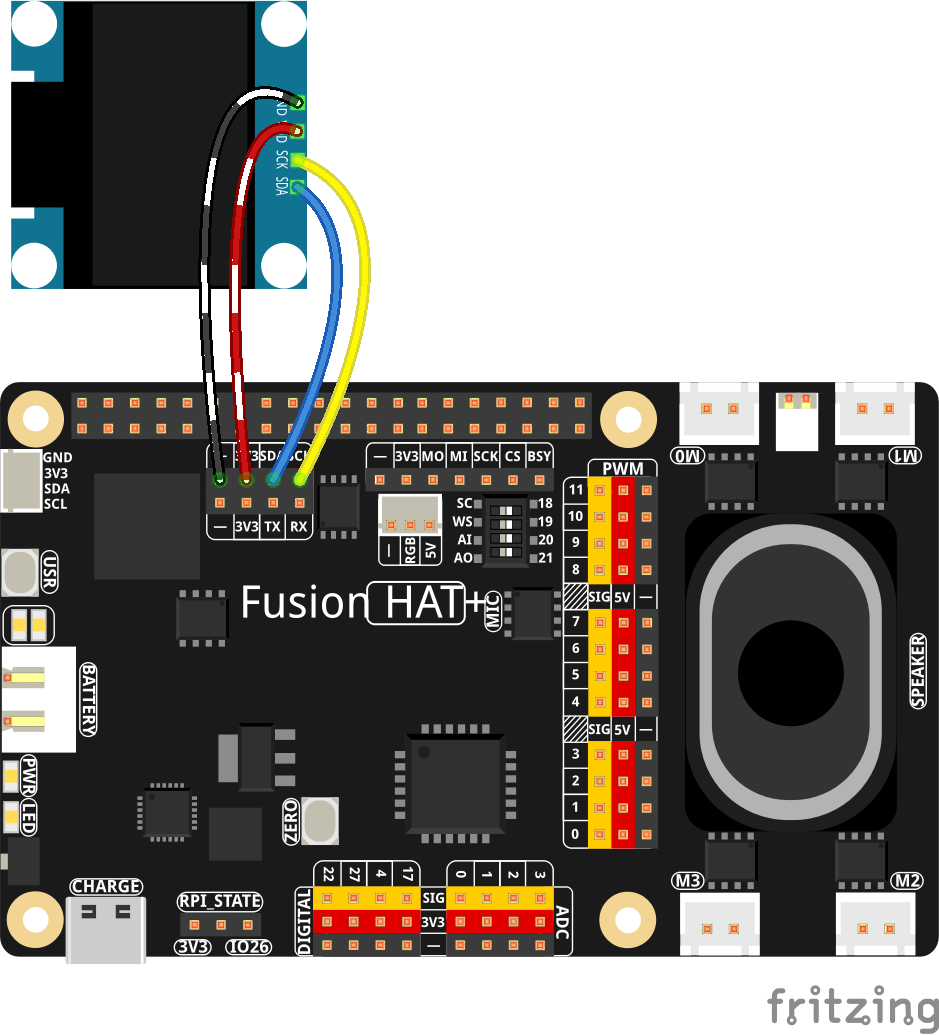
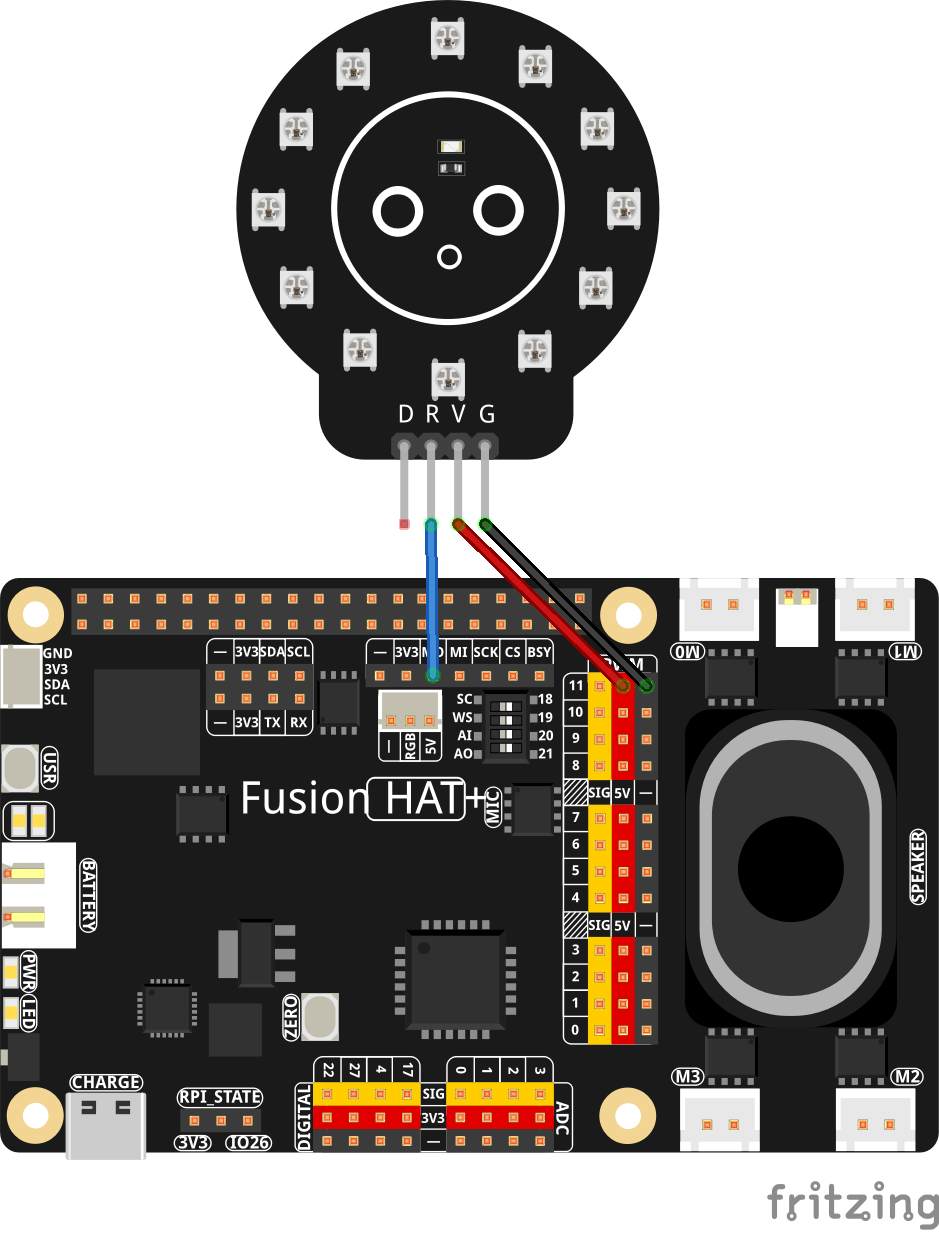
These are the schematics we are using for todays project. If you are taking the class, you should already have these components connected:

Fusion Hat Circuit Diagram
This is the circuit we will use moving forward in the class
OLED
SSD1306 OLED Connected to the Fusion AI Hat
NeoPixel
NeoPixel Schematic

AI on the Edge LESSON 44: Displaying Live MediaPipe FaceMesh Avatar on SSD1306 OLED in OpenCV

This is Getting Crazy Cool!

Hey guys, welcome back to the Fusion AI Lab series, AI on the Edge! In Lesson 44 we just took things up another notch. We’re now running MediaPipe Face Mesh on our Raspberry Pi 5, pulling all 468 facial landmarks in real time, and then drawing a clean, smooth face contour directly onto a tiny 128×64 OLED display!

That’s right — your face is now living on that little monochrome OLED in real time! Every eyebrow raise, smile, head tilt, and eye movement gets faithfully reproduced on the display. We’re pulling the camera feed with picamera2, processing it with MediaPipe’s powerful face mesh, scaling the landmarks down to OLED resolution, and then drawing the official FACEMESH_CONTOURS connections using PIL. The result is surprisingly smooth and fun to watch! This project really shows the power of combining modern AI vision tools with simple embedded hardware. Watching your own face rendered in real time on a tiny OLED is just plain awesome — it feels like sci-fi stuff from just a few years ago, and now we’re doing it on the Edge with our Fusion AI Lab kit!

If you’ve been following along, you’re starting to see how powerful these tools are becoming. We’re no longer just detecting faces — we’re understanding the structure of the face and visualizing it however we want. And we’re just getting started!

So fire up your Raspberry Pi, grab that OLED, and let’s keep pushing the limits. You’re doing some seriously cool stuff!

In this lesson we are still using our standard Fusion AI Lab Kit cirtuit from the earlier lessons:

Fusion Hat Circuit Diagram
This is the circuit we will use moving forward in the class

We have also connected the OLED to the above circuit according to this diagram:

OLED
SSD1306 OLED Connected to the Fusion AI Hat

AI on the Edge LESSON 42: Create Composite Images Using Masks in OpenCV and MediaPipe

In this exciting project, we combine a Raspberry Pi 5, the Fusion AI Lab Kit, a Pi Camera, and a remote IP camera to generate a stunning real-time composite video. Watch as a glowing, translucent MediaPipe face mesh of my face hovers magically over live video of the Mighty River Nice scenery captured by an IP camera. The effect looks futuristic and professional — perfect for creative video effects, interactive installations, or just blowing your mind with computer vision! Using Picamera2 for high-frame-rate local capture and OpenCV with an RTSP stream from the river camera, we process everything in real time. MediaPipe’s Face Mesh detects and tracks facial landmarks, which we draw as beautiful cyan/teal contours with glowing irises. Then we create a clean mask, separate the mesh foreground from the river background, and blend them seamlessly into one composite frame. You’ll see every debugging layer live on screen too — meshLayer, mask, inverted mask, riverBG, and meshFG — so you can understand exactly how the magic happens.This tutorial is beginner-to-intermediate friendly and packed with practical OpenCV + MediaPipe techniques you can adapt for your own augmented reality projects. Whether you’re a longtime follower of the Paul McWhorter channel or new to the Fusion AI Kit, you’ll walk away inspired and ready to build your own hovering effects, overlays, or interactive displays.Grab the full code from the video description, fire up your Pi 5, and start creating jaw-dropping computer vision projects today. Drop a comment and let me know what you’d like to overlay next — another face mesh, hand tracking, or something completely different? Let’s keep pushing the limits of what we can do with affordable AI hardware!


AI on the Edge LESSON 41: Creating FaceMesh Using MediaPipe in OpenCV

In this project, I demonstrate how to create a smooth, real-time face mesh overlay using the Raspberry Pi 5, the official Pi Camera, MediaPipe, and OpenCV. The program captures live video from the camera and draws a detailed, colorful mesh that follows every movement of the face with high accuracy. The result is a visually appealing augmented reality-style effect that runs efficiently even on a single-board computer.

The goal of this project is to build a responsive face tracking system that detects and draws 468 facial landmarks in real time. This creates a striking mesh that highlights the contours of the face, eyes, lips, and jawline, making it an excellent foundation for more advanced computer vision projects like virtual filters, AR effects, or interactive installations.

The program follows a straightforward but efficient real-time vision pipeline. First, it initializes the Raspberry Pi Camera using the modern picamera2 library, configured for 1280×720 resolution at 60 frames per second. It then sets up MediaPipe’s Face Mesh solution with landmark refinement enabled for better eye tracking.

In the main loop, the program continuously grabs a frame from the camera, corrects its orientation, and converts it from BGR to RGB format since MediaPipe expects RGB input. The frame is then passed to the Face Mesh model for processing. When a face is detected, the program draws multiple layers of graphics on top of the image: a fine tesselation mesh across the entire face, thick and vibrant contours around the major facial features, and special highlighting on the irises. Finally, the processed frame is displayed in an OpenCV window, creating a smooth and engaging real-time visualization.

This approach works particularly well on the Raspberry Pi 5 because it balances visual quality with performance. By limiting detection to a single face and using efficient drawing methods, the application maintains high frame rates while producing a professional-looking result. The multi-layer drawing technique (tesselation + contours + irises) gives the mesh depth and visual appeal that single-pass drawings often lack.

The project makes use of several powerful technologies: picamera2 for fast camera access, Google’s MediaPipe for high-speed machine learning-based landmark detection, OpenCV for image handling and display, and NumPy for efficient array operations.

This face mesh project serves as an excellent stepping stone into real-time AI and computer vision on embedded hardware. Once you have the basic mesh working, it becomes much easier to expand into creative applications such as face filters, gesture recognition, or overlaying the mesh onto other video sources.

The code developed in the video lesson is presented below: