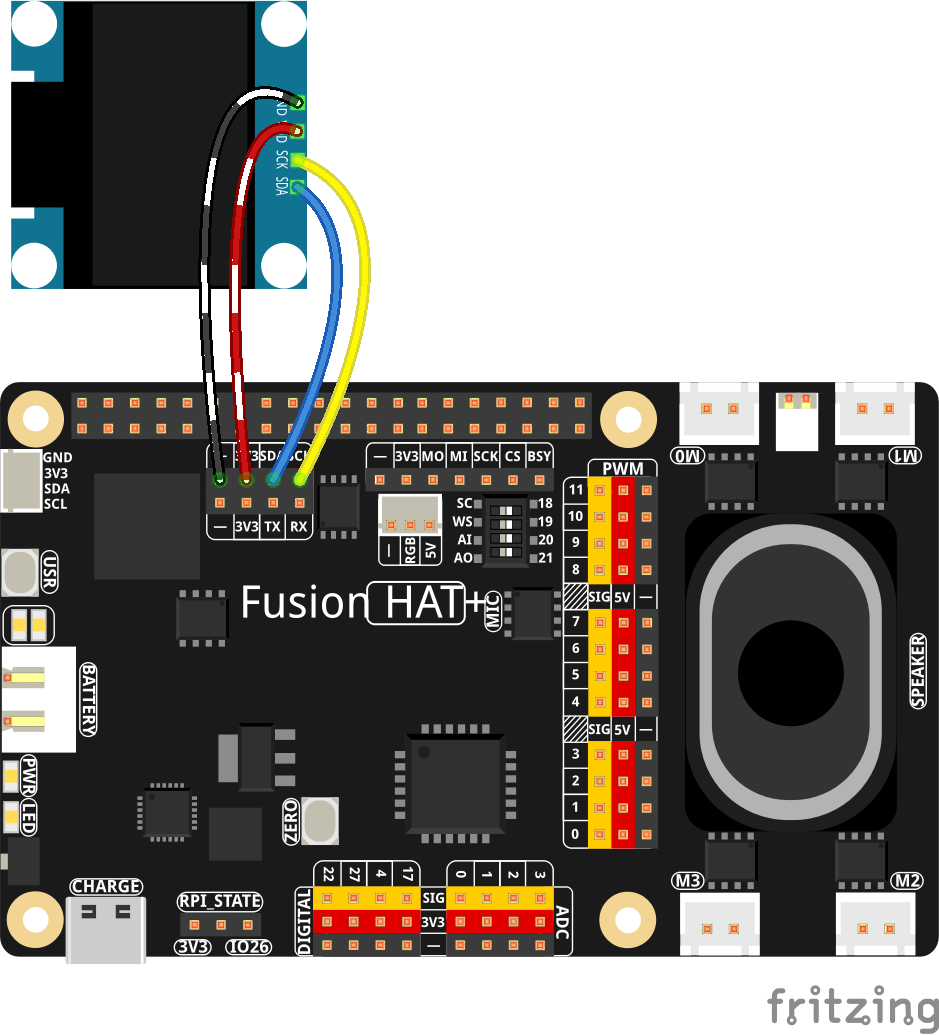
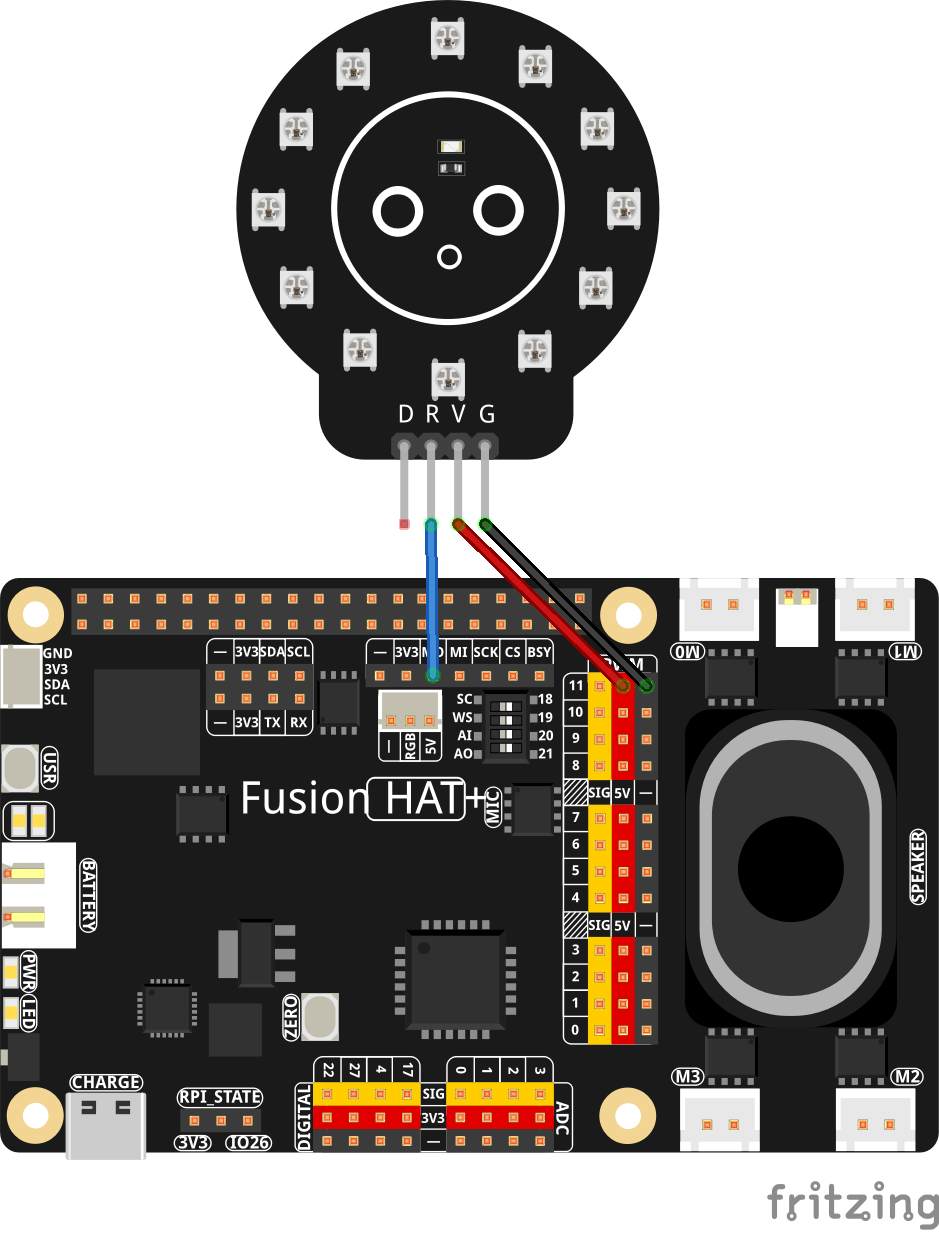
Hey everybody! Welcome back to the AI on the Edge series!
In Lesson 49, we’re doing something that’s just plain cool — we’re turning that tiny little SSD1306 OLED into a live animated avatar that follows your face and hands in real time!
That’s right — no more static images, and no more being tethered to your desktop and monitor. This time your OLED is alive! Move your head, smile, raise your eyebrows, wave your hands… and the little display instantly mirrors your movements like a miniature digital twin. It’s like having a tiny version of yourself living on that 128×64 screen!
What You’ll Learn in This Lesson:
- How to use MediaPipe Face Mesh to track 468 facial landmarks
- How to combine it with Hand Tracking at the same time
- The trick to projecting those landmarks onto a tiny OLED in real time
- How to draw both points and connecting lines to create smooth, animated avatars
- How to keep everything running fast on the Raspberry Pi
This is one of those projects that makes people stop and say “Wait… how is that even possible on that little screen?!”
By the end of this lesson, you’ll have a foundation for building all kinds of fun real-time avatar projects — everything from simple face mirrors to gesture-controlled characters and beyond.
Why This Is Awesome:
We’re not just displaying video on the big screen anymore — we’re compressing all that AI power down onto a cheap little OLED. This is real AI on the Edge stuff, and it looks incredibly impressive for how simple the hardware is.
Whether you want to build interactive displays, robot faces, wearable tech, or just blow your friends’ minds, this lesson gives you the core technique to make it happen.
Ready to make your OLED come alive?
Fire up the code, run it, and watch your tiny digital self start moving with you. Then start experimenting! Try drawing just the eyes and mouth, or just the hands, or maybe even turn it into a little stick figure avatar.
As always, I want to see what you create with this! Drop your versions in the comments or tag me — I love seeing the creative stuff you guys come up with. Don’t just copy and paste my code. Show you really understand the video by making the code yout own.
Enough talk, lets get this party started!
|
1 2 3 4 5 6 7 8 9 10 11 12 13 14 15 16 17 18 19 20 21 22 23 24 25 26 27 28 29 30 31 32 33 34 35 36 37 38 39 40 41 42 43 44 45 46 47 48 49 50 51 52 53 54 55 56 57 58 59 60 61 62 63 64 65 66 67 68 69 70 71 72 73 74 75 76 77 78 79 80 81 82 83 84 85 86 87 88 89 90 91 92 93 94 95 96 97 98 99 100 101 102 103 104 105 106 107 108 109 110 111 112 113 114 115 116 117 118 119 120 121 122 123 124 125 126 127 128 129 130 131 132 |
# ==================================================================== # DISCLAIMER: # This code is provided as-is for educational and experimental # purposes only. The author makes no representations or warranties of # any kind concerning the safety, suitability, or accuracy of this # code. Use at your own risk. The author assumes no liability for any # damages, system failures, security breaches, or network issues # resulting from the use or implementation of this script. # ==================================================================== import cv2 import time from picamera2 import Picamera2 import mediapipe as mp import numpy as np import board import adafruit_ssd1306 from PIL import Image, ImageDraw, ImageFont import time wOLED = 128 hOLED = 64 I2C_ADDRESS = 0x3C i2c = board.I2C() oled = adafruit_ssd1306.SSD1306_I2C(wOLED, hOLED, i2c, addr = I2C_ADDRESS) W=1280 H=720 tStart = time.time() fps = 0 piCam = Picamera2(1) piCam.preview_configuration.main.size = (W, H) piCam.preview_configuration.main.format = "RGB888" piCam.preview_configuration.controls.FrameRate = 60 piCam.preview_configuration.align() piCam.configure("preview") piCam.start() textLowerLeft = (int(W*.01),int(H*.05)) fontFace = cv2.FONT_HERSHEY_SIMPLEX fontThickness = int(W/425) fontScale = H*.0015 fontColor = (0,0,255) faceMesh = mp.solutions.face_mesh.FaceMesh( max_num_faces=1, refine_landmarks=True, min_detection_confidence=0.5, min_tracking_confidence=0.5) hands = mp.solutions.hands.Hands( model_complexity = 0, min_detection_confidence = .5, min_tracking_confidence = .5, max_num_hands=2 ) cv2.namedWindow('Camera',cv2.WINDOW_GUI_NORMAL) cv2.moveWindow('Camera',0,65) cv2.resizeWindow('Camera',W,H) while True: deltaT = time.time() - tStart tStart=time.time() fps = fps*.95 + (1/deltaT)*.05 frame = piCam.capture_array() frame = cv2.flip(frame, -1) rgb = cv2.cvtColor(frame, cv2.COLOR_BGR2RGB) faceResults = faceMesh.process(rgb) handResults = hands.process(rgb) image = Image.new("1",(wOLED,hOLED)) draw = ImageDraw.Draw(image) if handResults.multi_hand_landmarks: for myHands in handResults.multi_hand_landmarks: landMarks = myHands.landmark lmAll =[] for lm in landMarks: x = int(lm.x*W) y = int(lm.y*H) cv2.circle(frame,(x,y),10,(255,0,0),-1) xOLED = int(lm.x*wOLED) yOLED = int(lm.y*hOLED) draw.point((xOLED,yOLED), fill =255) lmAll.append((xOLED,yOLED)) #Uncomment out these lines if you want #Lines between the finger joints # for idx in mp.solutions.hands.HAND_CONNECTIONS: # lineStart = idx[0] # lineEnd = idx[1] # pt1 = lmAll[lineStart] # pt2 = lmAll[lineEnd] # draw.line((pt1[0],pt1[1],pt2[0],pt2[1]),width=1,fill=255) # if faceResults.multi_face_landmarks: for faceLandMarks in faceResults.multi_face_landmarks: #print(faceLandmarks) lmAll = [] for lm in faceLandMarks.landmark: xOLED = int(lm.x*wOLED) yOLED = int(lm.y*hOLED) draw.point((xOLED,yOLED), fill = 255) #print(xOLED,yOLED) lmAll.append((xOLED,yOLED)) for idx in mp.solutions.face_mesh.FACEMESH_CONTOURS: #print(idx) lineStart = idx[0] lineEnd = idx[1] pt1 = lmAll[lineStart] pt2 = lmAll[lineEnd] draw.line((pt1[0],pt1[1],pt2[0],pt2[1]), width=1, fill = 255) oled.image(image) oled.show() myText = "FPS: "+str(round(fps,1)) cv2.putText(frame,myText,textLowerLeft,fontFace,fontScale,fontColor,fontThickness) cv2.imshow("Camera", frame) if cv2.waitKey(1) == ord('q'): break cv2.destroyAllWindows() piCam.stop() oled.fill(0) oled.show() |