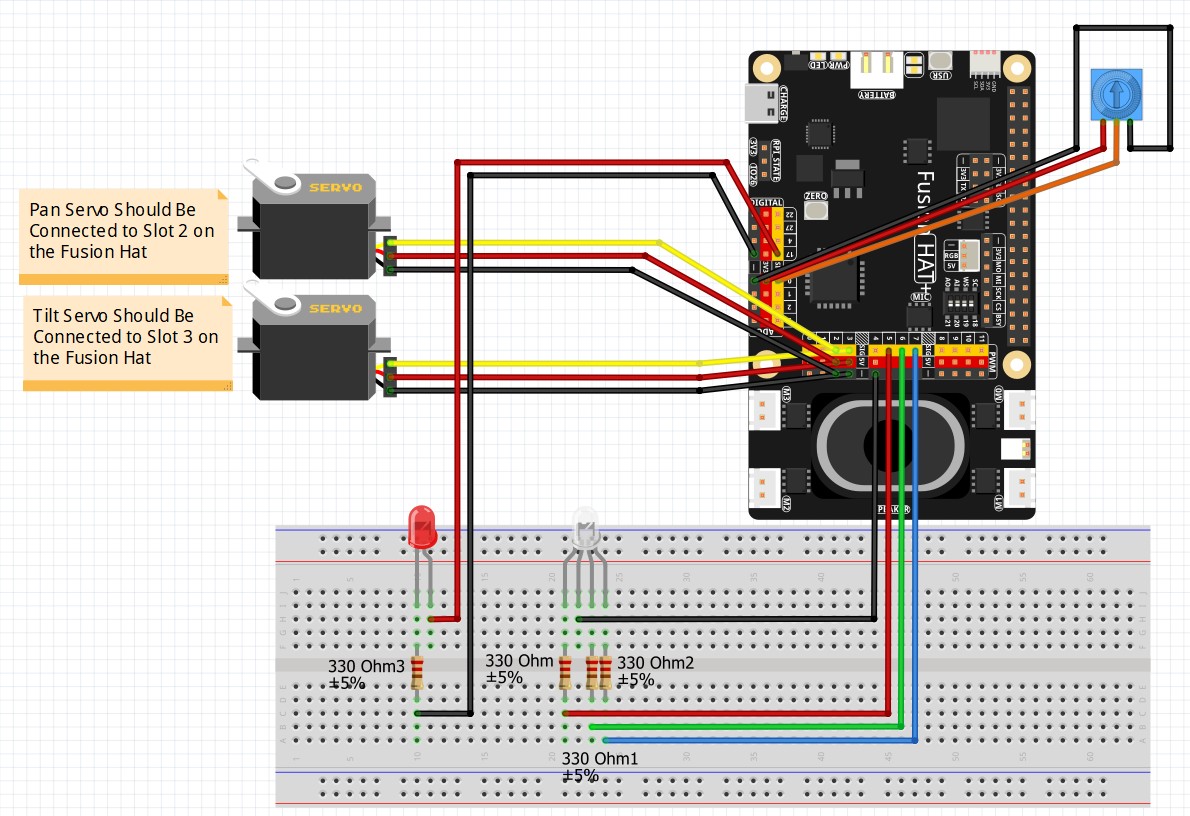
AI on the Edge LESSON 30: Tune Object Tracker with Mouse Selected ROI
Welcome, Makers!
Well, hello there! It is absolutely fantastic to have you back. I’m Paul McWhorter, and today, we are taking a massive step forward in our AI on the Edge journey.
Up until now, we’ve been hard-coding our color thresholds (those pesky Lower Color and Upper Color values) to tell our camera what to look for. That’s fine for a science experiment, but it’s not exactly “smart,” is it? If the lighting changes, or if we want to track a different colored object, we have to go back into the code and manually edit those numbers.
Not anymore!
In today’s lesson, we are building a tool that lets us teach the AI. We’re going to use the mouse to draw a Region of Interest (ROI) right on our camera feed. The system will look at the pixels inside that box, calculate the average Hue, Saturation, and Value, and automatically set our tracking range for us.
This is the kind of professional-level functionality that turns a hobby project into a true, intelligent machine.
The Concept: From Hard-Coding to Dynamic Learning
The magic happens in our mouseAction function. Instead of just reading pixel values, we are now implementing a “click-and-drag” system:
-
Click and Hold: We capture the
startXandstartYcoordinates. -
Drag: We draw a rectangle in real-time so we can see exactly what area we are selecting.
-
Release: We take that specific slice of the image, convert it to the HSV color space, and use the
cv2.mean()function to find the average color properties. -
Auto-Tune: We set our
LC(Lower Color) andUC(Upper Color) based on that average.
By doing this, the system learns what “object” we want to track on the fly. It’s elegant, it’s powerful, and it feels like real magic when you see those servos snap onto your target after a quick mouse drag.
What We’ve Accomplished
By the end of this lesson, you will have a system that:
-
Visually selects an object using the mouse.
-
Automatically calculates the optimal HSV thresholds for that specific object.
-
Updates the tracking behavior immediately without needing to stop or re-run the code.
-
Maintains that professional “Edge” feel, giving you real-time feedback on your FPS and mouse position data.
A Note on the “Edge”
Remember, we aren’t just running code; we are running on hardware. When we calculate the mean of the ROI, we are doing real image processing on the fly. You’ll notice the Composite and Mask windows updated immediately, giving you a visual confirmation that your “teacher” (you!) has successfully guided the “student” (the AI).
This is the power of working with OpenCV and the Raspberry Pi. You are building a system that observes, thinks, and reacts—all in real-time.
Get Ready to Build
Grab your Pi, make sure your servos are ready to go, and let’s get that camera calibrated. You’ve put in the work to get this far, and today is where all that effort starts to feel really rewarding.
I’m incredibly proud of how far you’ve come. Let’s dive in and start building!
Are you ready to see how accurately your Pi can “see” once you’ve given it the ability to learn from your selections?
In the video lesson we developed the following code.
|
1 2 3 4 5 6 7 8 9 10 11 12 13 14 15 16 17 18 19 20 21 22 23 24 25 26 27 28 29 30 31 32 33 34 35 36 37 38 39 40 41 42 43 44 45 46 47 48 49 50 51 52 53 54 55 56 57 58 59 60 61 62 63 64 65 66 67 68 69 70 71 72 73 74 75 76 77 78 79 80 81 82 83 84 85 86 87 88 89 90 91 92 93 94 95 96 97 98 99 100 101 102 103 104 105 106 107 108 109 110 111 112 113 114 115 116 117 118 119 120 121 122 123 124 125 126 127 128 129 130 131 132 133 134 135 136 137 138 139 140 141 142 143 144 145 146 147 148 149 150 151 152 153 154 155 156 157 158 159 160 161 162 163 164 165 166 167 168 169 170 171 172 173 174 175 176 177 178 179 180 181 182 183 184 |
import cv2 import time from picamera2 import Picamera2 from fusion_hat.pwm import PWM from fusion_hat.servo import Servo panPin = 2 tiltPin = 3 panServo = Servo(panPin) tiltServo = Servo(tiltPin) panAngle = 0 tiltAngle = 0 panServo.angle(panAngle) tiltServo.angle(tiltAngle) piCam = Picamera2() W=1280 H=720 tStart = time.time() fps = 0 xFrameC = int((W-1)/2) yFrameC = int((H-1)/2) xBoxC = xFrameC yBoxC = yFrameC redPin = 5 greenPin = 6 bluePin = 7 redLED = PWM(redPin) greenLED = PWM(greenPin) blueLED = PWM(bluePin) RES = (W,H) piCam.preview_configuration.main.size = RES piCam.preview_configuration.main.format = "RGB888" piCam.preview_configuration.controls.FrameRate=60 piCam.preview_configuration.align() piCam.configure("preview") piCam.start() textLowerLeft = (int(W*.01),int(H*.06)) fontFace = cv2.FONT_HERSHEY_SIMPLEX fontThickness = int(W/425) fontScale = H*.0015 fontColor = (0,0,255) xPos = 0 textLowerLeft1 = (int(W*.01),int(H*.06)*2) textLowerLeft2 = (int(W*.01),int(H*.06)*3) yPos = 0 valR = 0 valG = 0 valB = 0 Hue = 0 Sat = 0 Val = 0 LC = (25,100,90) UC = (35,255,255) frame = None track = False drawing = False makeROI = False boxColor = (255,255,0) boxThick = 3 def mouseAction(event, x, y, flags, param): global frame, xPos, yPos, Hue, Sat, Val global track,startX,startY,endX,endY,makeROI,drawing if event == 0: xPos = x yPos = y if frame is not None: valB, valG, valR = frame[y,x] redLED.pulse_width_percent(int(valR/255*100)) greenLED.pulse_width_percent(int(valG/255*100/2)) blueLED.pulse_width_percent(int(valB/255*100/4)) frameHSV = cv2.cvtColor(frame,cv2.COLOR_BGR2HSV) Hue, Sat, Val =frameHSV[y,x] if Hue == 60: track = True if Hue == 0: track = False if drawing == True: endX = x endY = y if event == 1: drawing = True makeROI = False startX = x startY = y endX = x endY = y if event == 4: drawing = False makeROI = True endX = x endY = y cv2.namedWindow('Camera',cv2.WINDOW_GUI_NORMAL) cv2.moveWindow('Camera',0,65) cv2.resizeWindow('Camera',W,H) cv2.namedWindow('Mask',cv2.WINDOW_GUI_NORMAL) cv2.moveWindow('Mask',W,65) cv2.resizeWindow('Mask',int(W/2),int(H/2)) cv2.namedWindow('Composite',cv2.WINDOW_GUI_NORMAL) cv2.moveWindow('Composite',W,65+int(H/2)+25) cv2.resizeWindow('Composite',int(W/2),int(H/2)) cv2.setMouseCallback('Camera',mouseAction) while True: deltaT = time.time() - tStart tStart=time.time() fps = fps*.95 + (1/deltaT)*.05 frame= piCam.capture_array() frame=cv2.flip(frame,-1) if drawing == True: cv2.rectangle(frame,(startX,startY),(endX,endY),boxColor,boxThick) if makeROI == True: ROI = frame[startY:endY,startX:endX] ROIhsv = cv2.cvtColor(ROI,cv2.COLOR_BGR2HSV) AVGhsv = cv2.mean(ROIhsv) print(AVGhsv) LC = (AVGhsv[0]-15,AVGhsv[1]-50,AVGhsv[2]-50) UC = (AVGhsv[0]+15,255,255) cv2.imshow("ROI",ROI) cv2.moveWindow("ROI",W,65) makeROI = False cv2.circle(frame,(int(.9*W),int(.1*H)),20,(0,255,0),-1) cv2.circle(frame,(int(.95*W),int(.1*H)),20,(0,0,255),-1) frameHSV = cv2.cvtColor(frame,cv2.COLOR_BGR2HSV) mask=cv2.inRange(frameHSV,LC,UC) composite = cv2.bitwise_and(frame, frame, mask=mask) contours, _ =cv2.findContours(mask,cv2.RETR_EXTERNAL,cv2.CHAIN_APPROX_SIMPLE) if contours: #cv2.drawContours(frame,contours,-1,(255,0,0),3) largestContour = max(contours, key = cv2.contourArea) area = cv2.contourArea(largestContour) if area>100: #cv2.drawContours(frame,largestContour,-1,(255,0,0),3) x, y, w, h = cv2.boundingRect(largestContour) cv2.rectangle(frame, (x,y),(x+w,y+h),(0,255,255),3) xBoxC = x + int(w/2) yBoxC = y + int(h/2) xError = xBoxC - xFrameC yError = yBoxC - yFrameC cv2.circle(frame,(xFrameC,yFrameC),10,(255,0,0),-1) cv2.circle(frame,(xBoxC,yBoxC), 30,(0,0,255),3) if track == True: panAngle = panAngle - xError/50/2 panServo.angle(int(panAngle)) time.sleep(.02) tiltAngle=tiltAngle + yError/50/2 tiltServo.angle(int(tiltAngle)) time.sleep(.02) myText = "FPS: "+str(round(fps,1)) cv2.putText(frame,myText,textLowerLeft,fontFace,fontScale,fontColor,fontThickness) text1 = "Mouse Pos: "+str((xPos,yPos)) text2 = "Pixel Color: "+str((Hue,Sat,Val)) cv2.putText(frame,text1,textLowerLeft1,fontFace,fontScale,fontColor,fontThickness) cv2.putText(frame,text2,textLowerLeft2,fontFace,fontScale,fontColor,fontThickness) cv2.imshow("Camera", frame) cv2.imshow("Composite",composite) cv2.imshow("Mask",mask) if cv2.waitKey(1)==ord('q'): break cv2.destroyAllWindows() redLED.pulse_width_percent(0) greenLED.pulse_width_percent(0) blueLED.pulse_width_percent(0) print('Program Terminated') |