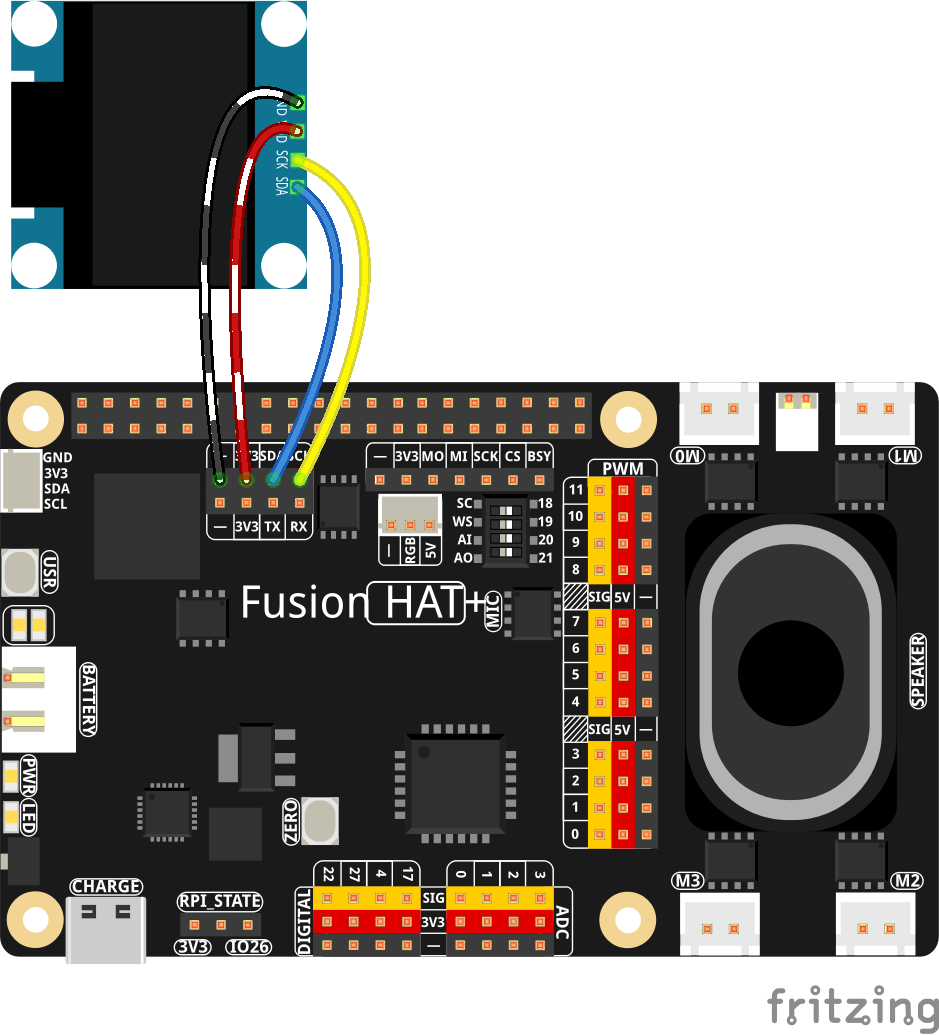
Welcome back, everyone! In this lesson, we take edge AI interactivity to the next level. Up until now, we have learned how to track hand landmarks, extract pixel coordinates, and calculate distances using MediaPipe. Today, we put all those building blocks together into a self-contained, real-time hand gesture recognition system running on the Raspberry Pi 5.
We are not relying on a black-box pre-trained gesture model. Instead, we write our own mathematical feature extractor, train our custom hand poses on the fly, save those gesture profiles directly to disk, and map each gesture to a non-blocking lighting animation on a NeoPixel LED ring driven over SPI.
System Architecture Overview
The system operates in three distinct phases running simultaneously inside our main loop:
-
Normalized Feature Extraction: MediaPipe extracts 3D hand landmark coordinates. To make gesture detection scale-invariant and distance-invariant, we normalize the distances between the fingertips and the wrist against a reference palm dimension.
-
Nearest-Neighbor Gesture Matching: Live distance vectors are compared against stored gesture profiles using a mean absolute error algorithm. If the error falls below our maximum threshold, the gesture is identified; otherwise, it defaults to “Unknown.”
-
Non-Blocking Hardware Animation Dispatch: The recognized gesture string triggers corresponding pattern functions on the 12-LED NeoPixel ring via
neopixel_spi. Animations use non-blocking time delta checks to preserve high camera preview frame rates.
Gesture-to-Hardware Animation Mapping
Our script contains predefined animation routines mapped to recognized gesture strings. Here is how each pose controls the LED ring:
| Recognized Gesture | LED Animation Pattern | Visual Effect |
fist |
Red Pulse | Sinusoidal breathing effect fading in and out |
palm |
Solid Beacon | Full brightness white ring |
peace |
Dual Spinner | Dual green and blue dots rotating over a dim red background |
thumbsup |
Solid Success | Constant green feedback |
point |
Radar Sweep | A green trailing dot chasing around a red ring |
rock |
Cyan Flame | Sinusoidal green-cyan intensity modulation |
ok |
Rainbow Wheel | Rotating HSV spectrum cycle |
Unknown / Unmatched |
Clear | LEDs turn completely off |
Interactive Keyboard Controls
While the camera loop is active, you can interact with the system using your keyboard in the preview window:
-
Spacebar: Captures the current hand pose’s normalized distance vector, assigns it to the active target gesture name, and saves the updated dataset togestureNEOPIXEL.pkl. -
t: Prompts the terminal to add a new custom gesture name to your training queue dynamically. -
d: Prompts the terminal to delete a specific gesture profile from the saved dataset. -
q: Clears the NeoPixel ring, closes the camera pipeline, saves training data, and terminates the program cleanly.
Hardware Wiring Reference
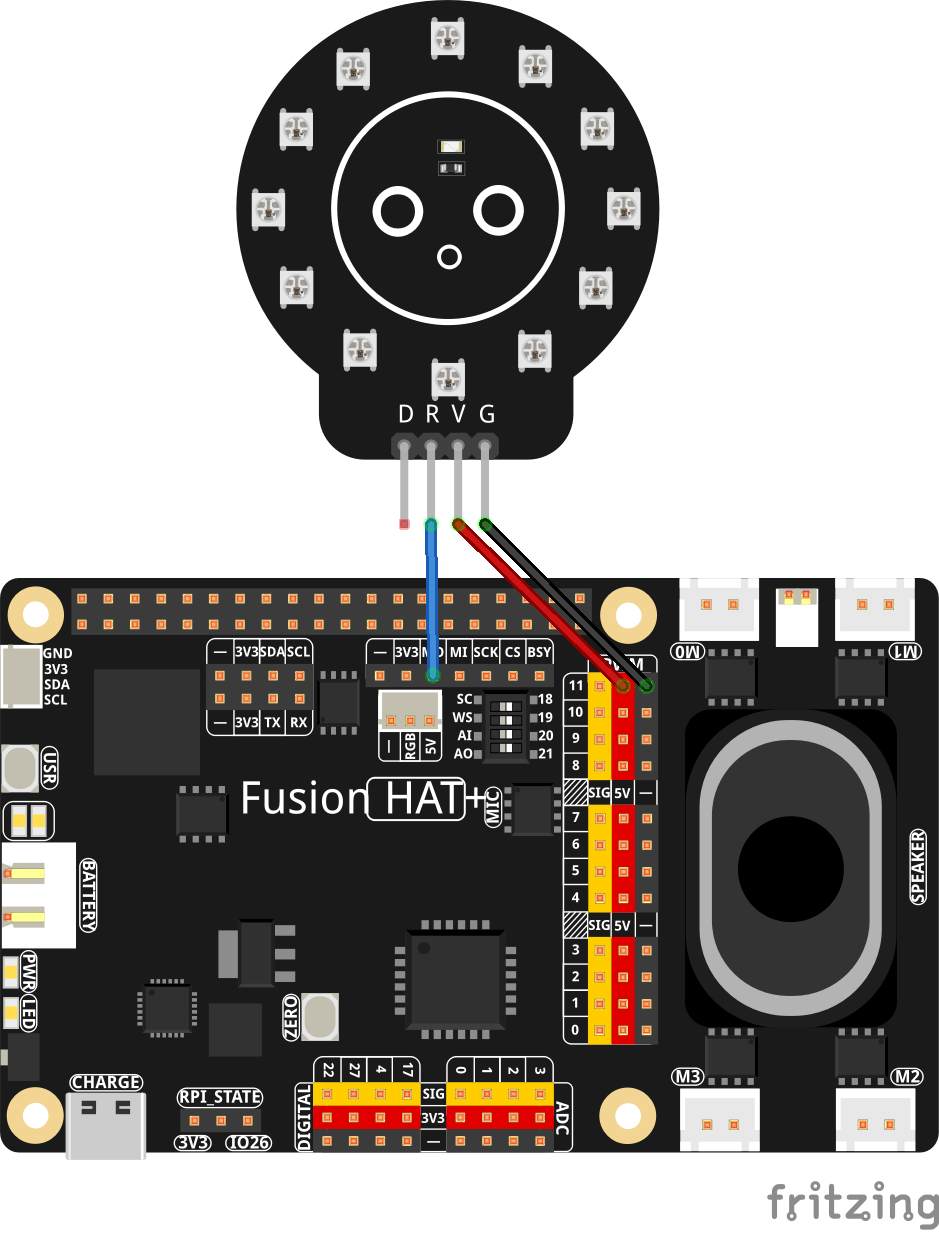
Ensure your Raspberry Pi 5 SPI interface is enabled before running the code (sudo raspi-config -> Interface Options -> SPI).
-
NeoPixel Data Input (DIN): Connect to GPIO 10 (SPI0 MOSI / Pin 19).
-
NeoPixel Ground: Connect to any GND pin on the Pi expansion header.
-
NeoPixel Power: Connect to an external 5V power supply (ensure a shared ground with the Raspberry Pi).
Homework Challenge
Now that you have a working gesture recognition system linked to hardware animations, try adding your own custom gestures! Train a brand-new gesture pose (like a “three-finger count”), write a corresponding non-blocking animation function in updateNeoPixels(), and share your video results.
Here is the code we developed in the video lesson:
|
1 2 3 4 5 6 7 8 9 10 11 12 13 14 15 16 17 18 19 20 21 22 23 24 25 26 27 28 29 30 31 32 33 34 35 36 37 38 39 40 41 42 43 44 45 46 47 48 49 50 51 52 53 54 55 56 57 58 59 60 61 62 63 64 65 66 67 68 69 70 71 72 73 74 75 76 77 78 79 80 81 82 83 84 85 86 87 88 89 90 91 92 93 94 95 96 97 98 99 100 101 102 103 104 105 106 107 108 109 110 111 112 113 114 115 116 117 118 119 120 121 122 123 124 125 126 127 128 129 130 131 132 133 134 135 136 137 138 139 140 141 142 143 144 145 146 147 148 149 150 151 152 153 154 155 156 157 158 159 160 161 162 163 164 165 166 167 168 169 170 171 172 173 174 175 176 177 178 179 180 181 182 183 184 185 186 187 188 189 190 191 192 193 194 195 196 197 198 199 200 201 202 203 204 205 206 207 208 209 210 211 212 213 214 215 216 217 218 219 220 221 222 223 224 225 226 227 228 229 230 231 232 233 234 235 236 237 238 239 240 241 242 243 244 245 246 247 248 249 250 251 252 253 254 255 256 257 258 259 260 261 262 263 264 265 266 267 268 269 270 271 272 273 274 275 276 277 278 279 280 281 282 283 284 285 286 287 288 289 290 291 292 293 294 295 296 297 298 299 300 301 302 303 304 305 306 307 308 309 310 311 312 313 314 315 316 317 318 319 320 321 322 323 324 325 326 327 328 |
# ==================================================================== # DISCLAIMER: # This code is provided as-is for educational and experimental # purposes only. The author makes no representations or warranties of # any kind concerning the safety, suitability, or accuracy of this # code. Use at your own risk. The author assumes no liability for any # damages, system failures, security breaches, or network issues # resulting from the use or implementation of this script. # ==================================================================== import cv2 import time from picamera2 import Picamera2 import mediapipe as mp import math import pickle import os import colorsys # ==================================================================== # NEOPIXEL CONTROL INITIALIZATION (Adafruit neopixel_spi via SPI) # ==================================================================== import board import neopixel_spi as neopixel NUM_LEDS = 12 # Set to match your NeoPixel ring size (e.g., 12) PO = neopixel.GRB # Initialize NeoPixel ring using SPI spi = board.SPI() strip = neopixel.NeoPixel_SPI( spi, NUM_LEDS, pixel_order=PO, auto_write=False ) # Turn off all LEDs on startup strip.fill(0) strip.show() NEOPIXEL_ENABLED = True print("[INFO] NeoPixel SPI initialized successfully.") # Animation state variables (non-blocking updates) animation_step = 0 lastAnimUpdate = time.time() # ==================================================================== DATA_FILE = "gestureNEOPIXEL.pkl" # Function to save the trained gesture dictionary to a file using pickle def saveTrainedData(filename, data): with open(filename, 'wb') as f: pickle.dump(data, f) print("[INFO] Saved gesture data to " + str(filename)) # Function to load previously saved gesture data from a file def loadTrainedData(filename): if os.path.exists(filename): with open(filename, 'rb') as f: data = pickle.load(f) print("[INFO] Loaded " + str(len(data)) + " gesture(s) from " + str(filename)) return data return {} # --- SETUP & INITIAL TRAINING --- trainedData = loadTrainedData(DATA_FILE) gestureNames = [] if not trainedData: print("HAND GESTURE TRAINING SETUP") numGestures = int(input("Enter Number of Gestures to Train On: ")) for idx in range(numGestures): name = input("Enter Name for Gesture #" + str(idx + 1) + ": ") gestureNames.append(name) def findDistance(pt1, pt2): dX = pt1.x - pt2.x dY = pt1.y - pt2.y dZ = pt1.z - pt2.z return math.sqrt(dX*dX + dY*dY + dZ*dZ) def getTipDistances(handLm): lm = handLm.landmark wrist = lm[0] indexBase = lm[5] scaleFactor = findDistance(wrist, indexBase) tips = [lm[4], lm[8], lm[12], lm[16], lm[20]] tipDistances = [] for tip in tips: dist = findDistance(wrist, tip) / scaleFactor tipDistances.append(dist) for startTip in range(len(tips)): for endTip in range(startTip + 1, len(tips)): dist = findDistance(tips[startTip], tips[endTip]) / scaleFactor tipDistances.append(dist) return tipDistances def calculateError(tipDist, trainDist): totalError = 0 for idx in range(len(tipDist)): diff = tipDist[idx] - trainDist[idx] totalError += abs(diff) return totalError def findGesture(tipLive, trainedData, maxAllowedError): bestMatch = "Unknown" lowestError = 999999999 for gestureName, trainedDist in trainedData.items(): error = calculateError(tipLive, trainedDist) if error < lowestError: lowestError = error bestMatch = gestureName if lowestError > maxAllowedError: return "Unknown" return bestMatch # ==================================================================== # NEOPIXEL CONTROL (COLOR HELPER & ANIMATION DISPATCHER) # ==================================================================== def hsv2rgb(h): """ Converts HSV float (0.0-1.0) to RGB integer tuple (0-255) """ r, g, b = colorsys.hsv_to_rgb(h, 1, 1) return (int(r * 255), int(g * 255), int(b * 255)) def updateNeoPixels(gesture): """ Non-blocking LED pattern update based on the current detected gesture """ global animation_step, lastAnimUpdate if not NEOPIXEL_ENABLED: return now = time.time() gestureClean = gesture.lower() pattern_matched = False # 1. FIST / CHARGE (Red pulse) if gestureClean == "fist": pulse = int(127 + 127 * math.sin(now * 5.0)) strip.fill((pulse, 0, 0)) strip.show() pattern_matched = True # 2. OPEN PALM / BEACON (Solid Bright White) if gestureClean == "palm": strip.fill((255, 255, 255)) strip.show() pattern_matched = True # 3. PEACE SIGN / DUAL SPINNER (Rotating Blue/Cyan dots) if gestureClean == "peace": if now - lastAnimUpdate > 0.08: animation_step = (animation_step + 1) % NUM_LEDS lastAnimUpdate = now strip.fill((40, 0, 0)) # Background red pos1 = animation_step pos2 = (animation_step + (NUM_LEDS // 2)) % NUM_LEDS strip[pos1] = (0, 255, 0) # Green spinner dot strip[pos2] = (0, 0, 255) # Blue spinner dot strip.show() pattern_matched = True # 4. THUMBS UP / SUCCESS (Solid Green) if gestureClean == "thumbsup": strip.fill((0, 255, 0)) strip.show() pattern_matched = True # 5. POINTING / CHASER (Radar sweep) if gestureClean in "point": if now - lastAnimUpdate > 0.06: animation_step = (animation_step + 1) % NUM_LEDS lastAnimUpdate = now strip.fill((255, 0, 0)) strip[animation_step] = (0, 255, 0) strip.show() pattern_matched = True # 6. ROCK / FIRE (Sinusoidal Green-Cyan pulse) if gestureClean == "rock": step = int((now * 100) % 360) brightness = (math.sin(step * math.pi / 180) + 1) / 2 g = int(255 * brightness) b = int(50 * brightness) strip.fill((0, g, b)) strip.show() pattern_matched = True # 7. OK SIGN / RAINBOW WHEEL (Rotating RGB spectrum) if gestureClean in "ok": if now - lastAnimUpdate > 0.03: animation_step = (animation_step + 1) % 100 lastAnimUpdate = now hue = animation_step / 100.0 strip.fill(hsv2rgb(hue)) strip.show() pattern_matched = True # DEFAULT / UNKNOWN (LEDs OFF) if not pattern_matched: strip.fill((0, 0, 0)) strip.show() # ==================================================================== W, H = 1280, 720 tStart = time.time() fps = 15 RES = (W, H) piCam = Picamera2(1) piCam.preview_configuration.main.size = RES piCam.preview_configuration.main.format = "RGB888" piCam.preview_configuration.controls.FrameRate = 60 piCam.preview_configuration.align() piCam.configure("preview") piCam.start() textLowerLeft = (int(W * .01), int(H * .07)) fontFace = cv2.FONT_HERSHEY_SIMPLEX fontThickness = int(W / 425) fontScale = H * .002 fontColor = (0, 0, 255) textFps = (int(W * .01), int(H * .07)) textGesture = (int(W * .01), int(H * .14)) textGesturePrompt = (int(W * .01), int(H * .21)) maxErrorThreshold = 3.5 hands = mp.solutions.hands.Hands( model_complexity=0, min_detection_confidence=.5, min_tracking_confidence=.5, max_num_hands=2 ) trainIdx = 0 while True: deltaT = time.time() - tStart tStart = time.time() fps = fps * .95 + (1 / deltaT) * .05 frame = piCam.capture_array() frame = cv2.flip(frame, -1) rgbFrame = cv2.cvtColor(frame, cv2.COLOR_BGR2RGB) results = hands.process(rgbFrame) if results.multi_hand_landmarks: frameHeight, frameWidth, _ = frame.shape for handLm in results.multi_hand_landmarks: for idx, landmark in enumerate(handLm.landmark): pixelX = int(landmark.x * frameWidth) pixelY = int(landmark.y * frameHeight) cv2.putText( frame, str(idx), (pixelX, pixelY), cv2.FONT_HERSHEY_SIMPLEX, .6 * fontScale, (255, 0, 0), fontThickness ) if trainIdx < len(gestureNames): targetName = gestureNames[trainIdx] promptText = "show " + targetName + " & Press Space" cv2.putText(frame, promptText, textGesturePrompt, fontFace, fontScale, (0, 255, 255), fontThickness) detectGesture = "Unknown" if results.multi_hand_landmarks: liveDistances = getTipDistances(results.multi_hand_landmarks[0]) detectGesture = findGesture(liveDistances, trainedData, maxErrorThreshold) # ==================================================================== # EXECUTE HARDWARE PATTERN UPDATE # ==================================================================== updateNeoPixels(detectGesture) # ==================================================================== labelText = "Gesture: " + detectGesture cv2.putText(frame, labelText, textGesture, fontFace, fontScale, (0, 255, 0), fontThickness) myText = "FPS: " + str(round(fps, 1)) cv2.putText(frame, myText, textLowerLeft, fontFace, fontScale, fontColor, fontThickness) cv2.imshow("Camera", frame) #cv2.moveWindow("Camera", 0, 60) key = cv2.waitKey(1) # Save landmark measurements when Space is pressed if key == ord(' '): if results.multi_hand_landmarks: if trainIdx < len(gestureNames): targetHand = results.multi_hand_landmarks[0] targetName = gestureNames[trainIdx] trainedData[targetName] = getTipDistances(targetHand) saveTrainedData(DATA_FILE, trainedData) trainIdx += 1 # 't' key allows adding a NEW gesture dynamically during runtime if key == ord('t'): newGestureName = input("Enter name for new gesture to train: ").strip() if newGestureName: gestureNames.append(newGestureName) # 'd' key deletes a gesture if key == ord('d'): delName = input("Enter name of gesture to remove: ").strip() if delName in trainedData: del trainedData[delName] saveTrainedData(DATA_FILE, trainedData) print("[INFO] Removed " + delName + " from trained data.") if delName in gestureNames: gestureNames.remove(delName) if delName not in trainedData: print("[WARNING] Gesture: " + delName + " not found in trained data.") trainIdx=min(trainIdx,len(gestureNames)) if key == ord('q'): break # Clean up hardware and exit # ==================================================================== # CLEAR LEDS ON SHUTDOWN # ==================================================================== if NEOPIXEL_ENABLED: strip.fill((0, 0, 0)) strip.show() # ==================================================================== cv2.destroyAllWindows() saveTrainedData(DATA_FILE, trainedData) print('Program Terminated') |
Homework & Next Steps
Try setting up the circuit and running the code on your Raspberry Pi 5. Observe how the frame rate behaves when driving both the camera preview, the hand-tracking model, and the I2C OLED display simultaneously. For your homework, extend this script to include a dynamic color slider or gesture-based brightness control!