In this exciting lesson, we build a real-time Emotion Detector that can recognize basic human emotions using just a Raspberry Pi, a camera, and the power of MediaPipe. The system watches your face and identifies whether you look Neutral, Smiling, Surprised, or Angry — and then reacts instantly by changing the color of a NeoPixel ring and displaying the detected emotion on both the camera preview and a small OLED display.Using MediaPipe’s Face Mesh solution, the program tracks 468 facial landmarks in real time. From these points, we carefully calculate key facial ratios — such as eye openness, mouth width, and mouth height relative to head width. These measurements allow us to create simple but effective rules that distinguish between different emotional expressions. For example, a wide mouth combined with raised cheeks indicates a smile, while a small mouth opening and narrowed eyes suggests anger.The project beautifully integrates several powerful technologies:
- Picamera2 for high-performance camera capture
- OpenCV for image processing and on-screen text display
- MediaPipe Face Mesh for accurate facial landmark detection
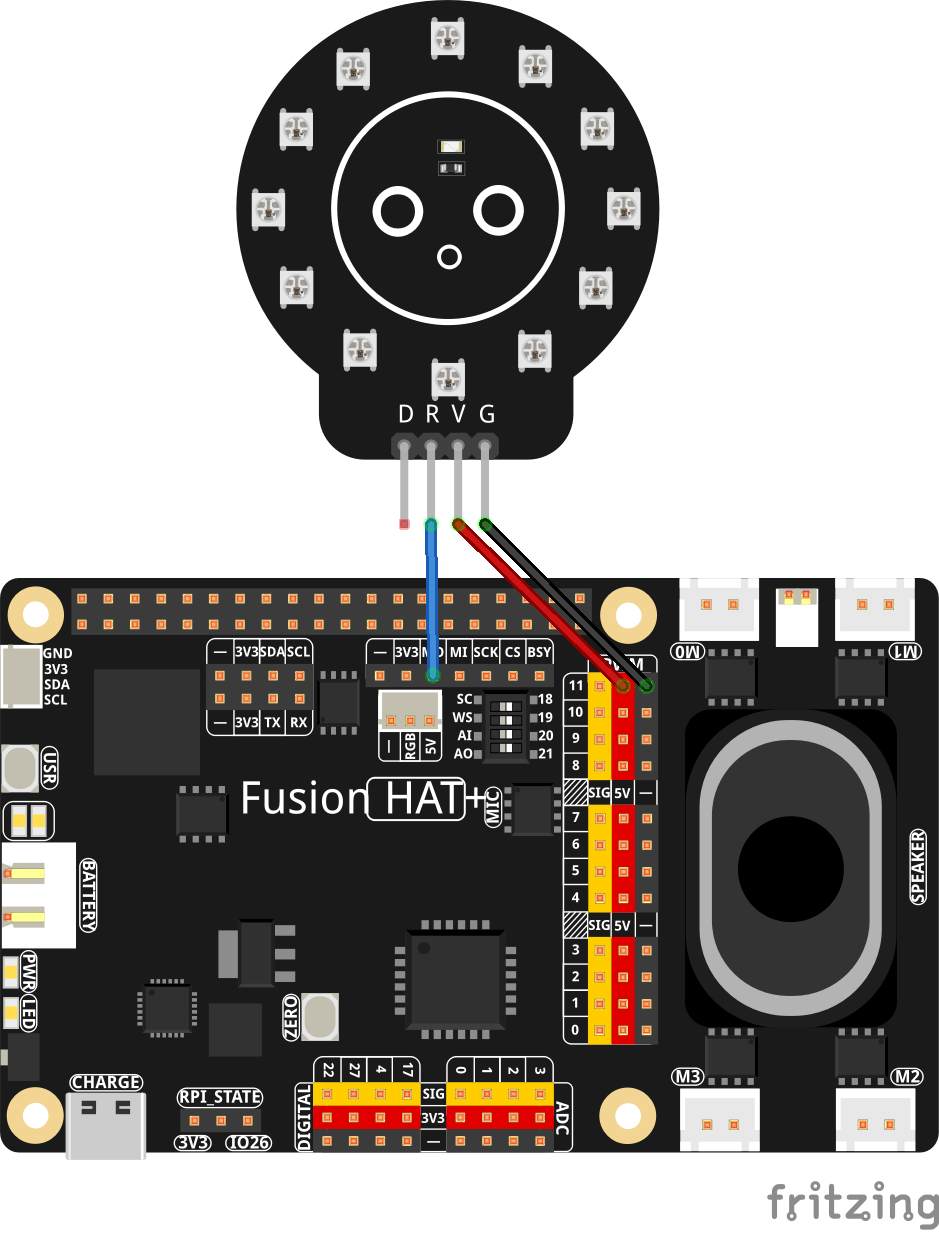
- NeoPixel RGB ring that lights up in different colors depending on the detected emotion
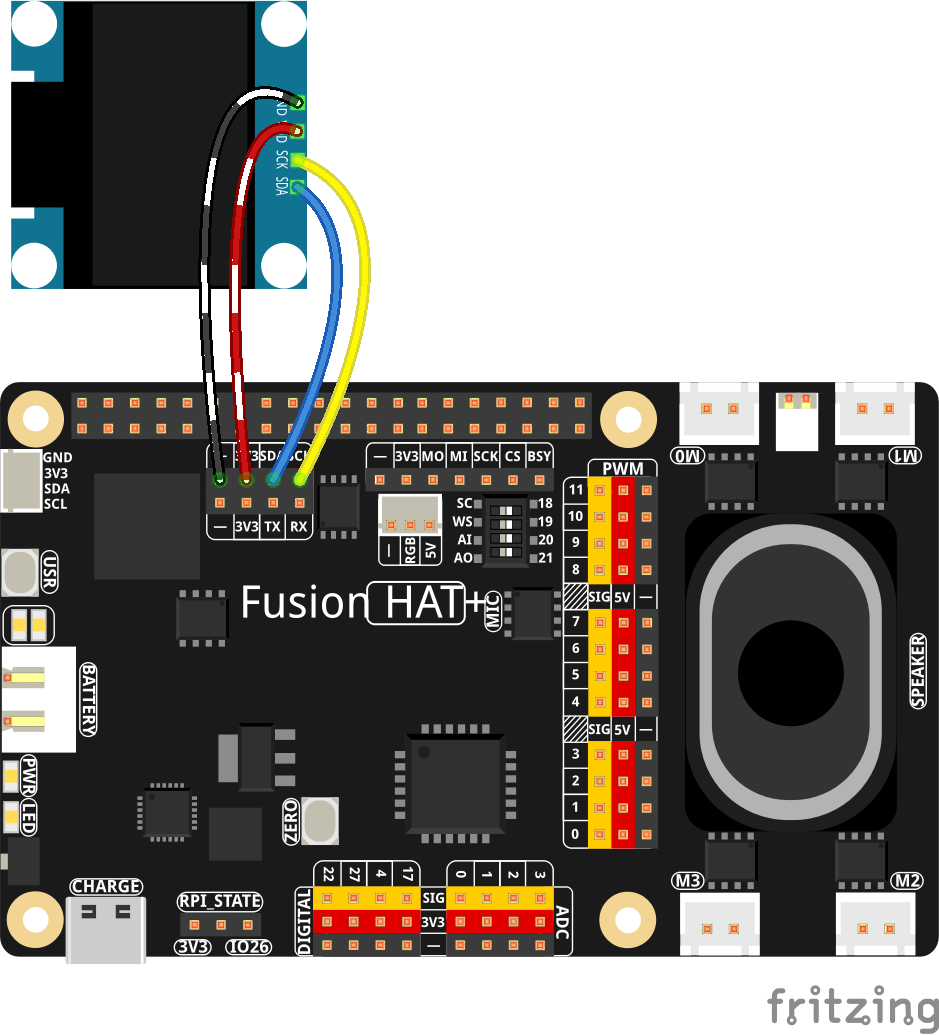
- SSD1306 OLED display that shows both the emotion name and a simplified wireframe of your face
One of the most satisfying parts of this project is seeing the NeoPixel ring instantly change color to match your emotion — green for happy, cyan for surprised, red for angry, and yellow for neutral. The OLED also mirrors the detected emotion, making the entire system feel alive and responsive.This lesson is a fantastic step forward in understanding how to combine computer vision with physical outputs on the edge. You will learn how to extract meaningful measurements from facial landmarks, build rule-based emotion logic, and synchronize visual feedback across multiple devices (camera preview, NeoPixel, and OLED).By the end of Lesson 47, you will have a working real-time emotion recognition system running entirely on a Raspberry Pi — a great foundation for more advanced projects like mood-reactive lights, interactive robots, or even assistive technology.
|
1 2 3 4 5 6 7 8 9 10 11 12 13 14 15 16 17 18 19 20 21 22 23 24 25 26 27 28 29 30 31 32 33 34 35 36 37 38 39 40 41 42 43 44 45 46 47 48 49 50 51 52 53 54 55 56 57 58 59 60 61 62 63 64 65 66 67 68 69 70 71 72 73 74 75 76 77 78 79 80 81 82 83 84 85 86 87 88 89 90 91 92 93 94 95 96 97 98 99 100 101 102 103 104 105 106 107 108 109 110 111 112 113 114 115 116 117 118 119 120 121 122 123 124 125 126 127 128 129 130 131 132 133 134 135 136 137 138 139 140 141 142 143 144 145 146 147 148 149 150 151 152 153 154 155 156 157 158 159 160 161 162 163 164 165 166 167 168 169 170 171 172 173 174 175 176 177 178 179 180 181 182 183 184 185 186 187 188 189 190 191 192 193 194 195 196 197 198 199 200 201 202 203 204 205 206 207 208 209 210 |
# ==================================================================== # DISCLAIMER: # This code is provided as-is for educational and experimental # purposes only. The author makes no representations or warranties of # any kind concerning the safety, suitability, or accuracy of this # code. Use at your own risk. The author assumes no liability for any # damages, system failures, security breaches, or network issues # resulting from the use or implementation of this script. # ==================================================================== import cv2 import time from picamera2 import Picamera2 import mediapipe as mp import numpy as np ################################# import board import adafruit_ssd1306 from PIL import Image, ImageDraw, ImageFont import time import neopixel_spi as neopixel import colorsys spi=board.SPI() LC = 12 PO = neopixel.GRB strip = neopixel.NeoPixel_SPI(spi, LC, pixel_order=PO,auto_write=False) strip.fill(0) strip.show() wOLED = 128 hOLED = 64 I2C_ADDRESS = 0x3C i2c = board.I2C() oled = adafruit_ssd1306.SSD1306_I2C(wOLED, hOLED, i2c, addr = I2C_ADDRESS) fontLarge = ImageFont.truetype("/usr/share/fonts/truetype/dejavu/DejaVuSans-Bold.ttf",14) ################################# W=1280 H=720 tStart = time.time() fps = 0 piCam = Picamera2(1) piCam.preview_configuration.main.size = (W, H) piCam.preview_configuration.main.format = "RGB888" piCam.preview_configuration.controls.FrameRate = 60 piCam.preview_configuration.align() piCam.configure("preview") piCam.start() textLowerLeft = (int(W*.01),int(H*.05)) fontFace = cv2.FONT_HERSHEY_SIMPLEX fontThickness = int(W/425) fontScale = H*.0015 fontColor = (0,0,255) faceMesh = mp.solutions.face_mesh.FaceMesh( max_num_faces=1, refine_landmarks=True, min_detection_confidence=0.5, min_tracking_confidence=0.5) cv2.namedWindow('Camera',cv2.WINDOW_GUI_NORMAL) cv2.moveWindow('Camera',0,65) cv2.resizeWindow('Camera',W,H) while True: deltaT = time.time() - tStart tStart=time.time() fps = fps*.95 + (1/deltaT)*.05 frame = piCam.capture_array() frame = cv2.flip(frame, -1) rgb = cv2.cvtColor(frame, cv2.COLOR_BGR2RGB) results = faceMesh.process(rgb) if results.multi_face_landmarks: for faceLandMarks in results.multi_face_landmarks: #print(faceLandmarks) image = Image.new("1",(wOLED,hOLED)) draw = ImageDraw.Draw(image) lmAll = [] j=0 for lm in faceLandMarks.landmark: xOLED = int(lm.x*wOLED) yOLED = int(lm.y*hOLED) draw.point((xOLED,yOLED), fill = 255) #print(xOLED,yOLED) lmAll.append((xOLED,yOLED)) x = int(lm.x*W) y = int(lm.y*H) #cv2.putText(frame,str(j),(x,y),fontFace, .3, (0,255,0),1) j = j+1 for idx in mp.solutions.face_mesh.FACEMESH_CONTOURS: #print(idx) lineStart = idx[0] lineEnd = idx[1] pt1 = lmAll[lineStart] pt2 = lmAll[lineEnd] draw.line((pt1[0],pt1[1],pt2[0],pt2[1]), width=1, fill = 255) keyLM = faceLandMarks.landmark headRight = 323 headLeft = 93 headWidth = keyLM[headRight].x -keyLM[headLeft].x cv2.putText(frame,str(headRight),(int(keyLM[headRight].x*W),int(keyLM[headRight].y*H)),fontFace, .3, (0,255,0),1) cv2.putText(frame,str(headLeft),(int(keyLM[headLeft].x*W),int(keyLM[headLeft].y*H)),fontFace, .3, (0,255,0),1) leftEyeTop = 159 leftEyeBottom = 145 leftEyeHeight =keyLM[leftEyeBottom].y -keyLM[leftEyeTop].y leftEyeLeft = 130 leftEyeRight = 154 leftEyeWidth = keyLM[leftEyeRight].x -keyLM[leftEyeLeft].x leftEyeRatio = leftEyeHeight/leftEyeWidth*100 rightEyeTop = 385 rightEyeBottom = 253 rightEyeHeight = keyLM[rightEyeBottom].y -keyLM[rightEyeTop].y rightEyeLeft = 465 rightEyeRight = 249 rightEyeWidth = keyLM[rightEyeRight].x -keyLM[rightEyeLeft].x rightEyeRatio = rightEyeHeight/rightEyeWidth*100 eyeRatio = (rightEyeRatio +leftEyeRatio)/2 mouthLeft = 61 mouthRight = 291 mouthTop = 13 mouthBottom = 15 mouthWidth = keyLM[mouthRight].x-keyLM[mouthLeft].x mouthHeight = keyLM[mouthBottom].y-keyLM[mouthTop].y mouthWidthRatio = mouthWidth/headWidth *100 mouthHeightRatio = mouthHeight/headWidth*100 print(round(mouthWidthRatio,1),round(mouthHeightRatio,1),round(eyeRatio,1)) color = (255,255,0) emotion = 'NEUTRAL' if mouthWidthRatio >37 and mouthHeightRatio>4 and eyeRatio<74: emotion = 'SMILE' color = (0,255,0) if mouthWidthRatio <37 and mouthHeightRatio>10 and eyeRatio>70: emotion = 'SURPRISED' color = (0,255,255) if mouthWidthRatio <32 and mouthHeightRatio<4 and eyeRatio<57: emotion = 'ANGRY' color = (0,0,255) cv2.putText(frame, emotion, (int(W*.1),int(H*.15)), fontFace, 2.2, color, 4) strip.fill((color[2],color[1],color[0])) strip.show() #print('XXXXXXXXXXXXXXXXXXx') draw.text((0,0),emotion,font=fontLarge,fill=255) oled.image(image) oled.show() #print() # if results.multi_face_landmarks: # for faceLandmarks in results.multi_face_landmarks: # # Optional second pass for glow effect # mp.solutions.drawing_utils.draw_landmarks( # image=frame, # landmark_list=faceLandmarks, # connections=mp.solutions.face_mesh.FACEMESH_TESSELATION, # landmark_drawing_spec=None, # connection_drawing_spec=mp.solutions.drawing_utils.DrawingSpec( # color=(100, 100, 100), # thickness=1 # ) # ) # # === Best looking translucent mesh === # mp.solutions.drawing_utils.draw_landmarks( # image=frame, # landmark_list=faceLandmarks, # connections=mp.solutions.face_mesh.FACEMESH_CONTOURS, # landmark_drawing_spec=None, # Hide dots # connection_drawing_spec=mp.solutions.drawing_utils.DrawingSpec( # color=(0, 0, 180), # Bright cyan/teal # thickness=7 # ) # ) # # # Optional: Extra detail on irises (makes eyes look better) # mp.solutions.drawing_utils.draw_landmarks( # image=frame, # landmark_list=faceLandmarks, # connections=mp.solutions.face_mesh.FACEMESH_IRISES, # landmark_drawing_spec=None, # connection_drawing_spec=mp.solutions.drawing_utils.DrawingSpec( # color=(255, 0, 0), # thickness=7 # ) # ) myText = "FPS: "+str(round(fps,1)) cv2.putText(frame,myText,textLowerLeft,fontFace,fontScale,fontColor,fontThickness) cv2.imshow("Camera", frame) if cv2.waitKey(1) == ord('q'): break cv2.destroyAllWindows() piCam.stop() oled.fill(0) oled.show() strip.fill(0) strip.show() |
These are the schematics we are using for todays project. If you are taking the class, you should already have these components connected: