In this video lesson we learn how to track our object of interest using the Pan Tilt camera. The camera will constantly adjust position to keep the Object of Interest in the center of the camera frame. We identify the Object of Interest based on Color, as we learned in earlier lessons. In this video, we developed the code below:
|
1 2 3 4 5 6 7 8 9 10 11 12 13 14 15 16 17 18 19 20 21 22 23 24 25 26 27 28 29 30 31 32 33 34 35 36 37 38 39 40 41 42 43 44 45 46 47 48 49 50 51 52 53 54 55 56 57 58 59 60 61 62 63 64 65 66 67 68 69 70 71 72 73 74 75 76 77 78 79 80 81 82 83 84 85 86 87 88 89 90 91 92 93 94 95 96 97 98 99 100 101 102 103 104 105 106 107 108 109 110 111 112 113 114 115 116 117 118 119 120 121 122 123 124 125 126 127 128 129 130 131 132 133 134 135 136 137 138 139 140 141 142 143 144 145 146 147 148 149 150 151 152 153 |
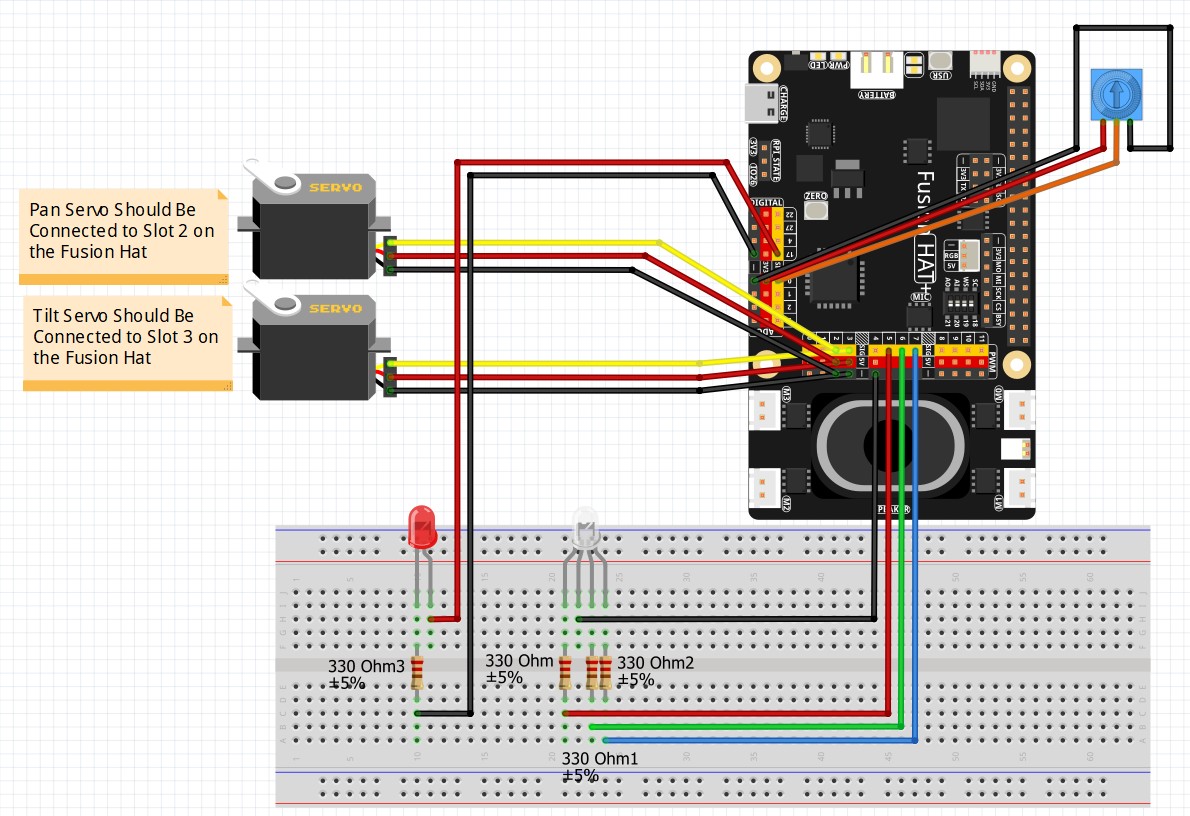
import cv2 import time from picamera2 import Picamera2 from fusion_hat.pwm import PWM from fusion_hat.servo import Servo panPin = 2 tiltPin = 3 panServo = Servo(panPin) tiltServo = Servo(tiltPin) panAngle = 0 tiltAngle = 0 panServo.angle(panAngle) tiltServo.angle(tiltAngle) piCam = Picamera2() W=1280 H=720 tStart = time.time() fps = 0 xFrameC = int((W-1)/2) yFrameC = int((H-1)/2) xBoxC = xFrameC yBoxC = yFrameC redPin = 5 greenPin = 6 bluePin = 7 redLED = PWM(redPin) greenLED = PWM(greenPin) blueLED = PWM(bluePin) RES = (W,H) piCam.preview_configuration.main.size = RES piCam.preview_configuration.main.format = "RGB888" piCam.preview_configuration.controls.FrameRate=60 piCam.preview_configuration.align() piCam.configure("preview") piCam.start() textLowerLeft = (int(W*.01),int(H*.06)) fontFace = cv2.FONT_HERSHEY_SIMPLEX fontThickness = int(W/425) fontScale = H*.0015 fontColor = (0,0,255) xPos = 0 textLowerLeft1 = (int(W*.01),int(H*.06)*2) textLowerLeft2 = (int(W*.01),int(H*.06)*3) yPos = 0 valR = 0 valG = 0 valB = 0 Hue = 0 Sat = 0 Val = 0 LC = (25,100,90) UC = (35,255,255) frame = None def mouseAction(event, x, y, flags, param): global frame, xPos, yPos, Hue, Sat, Val if event == 0: xPos = x yPos = y if frame is not None: valB, valG, valR = frame[y,x] redLED.pulse_width_percent(int(valR/255*100)) greenLED.pulse_width_percent(int(valG/255*100/2)) blueLED.pulse_width_percent(int(valB/255*100/4)) frameHSV = cv2.cvtColor(frame,cv2.COLOR_BGR2HSV) Hue, Sat, Val =frameHSV[y,x] cv2.namedWindow('Camera',cv2.WINDOW_GUI_NORMAL) cv2.moveWindow('Camera',0,65) cv2.resizeWindow('Camera',W,H) cv2.namedWindow('Mask',cv2.WINDOW_GUI_NORMAL) cv2.moveWindow('Mask',W,65) cv2.resizeWindow('Mask',int(W/2),int(H/2)) cv2.namedWindow('Composite',cv2.WINDOW_GUI_NORMAL) cv2.moveWindow('Composite',W,65+int(H/2)+25) cv2.resizeWindow('Composite',int(W/2),int(H/2)) cv2.setMouseCallback('Camera',mouseAction) while True: deltaT = time.time() - tStart tStart=time.time() fps = fps*.95 + (1/deltaT)*.05 frame= piCam.capture_array() frame=cv2.flip(frame,-1) frameHSV = cv2.cvtColor(frame,cv2.COLOR_BGR2HSV) mask=cv2.inRange(frameHSV,LC,UC) composite = cv2.bitwise_and(frame, frame, mask=mask) contours, _ =cv2.findContours(mask,cv2.RETR_EXTERNAL,cv2.CHAIN_APPROX_SIMPLE) if contours: #cv2.drawContours(frame,contours,-1,(255,0,0),3) largestContour = max(contours, key = cv2.contourArea) area = cv2.contourArea(largestContour) if area>100: #cv2.drawContours(frame,largestContour,-1,(255,0,0),3) x, y, w, h = cv2.boundingRect(largestContour) cv2.rectangle(frame, (x,y),(x+w,y+h),(0,255,0),3) xBoxC = x + int(w/2) yBoxC = y + int(h/2) xError = xBoxC - xFrameC yError = yBoxC - yFrameC cv2.circle(frame,(xFrameC,yFrameC),10,(255,0,0),-1) cv2.circle(frame,(xBoxC,yBoxC), 40,(0,0,255),3) if abs(xError) >40: if xError >0: panAngle = panAngle -1 panServo.angle(panAngle) time.sleep(.02) if xError <0: panAngle = panAngle + 1 panServo.angle(panAngle) time.sleep(.02) if abs(yError) >40: if yError >0: tiltAngle = tiltAngle +1 tiltServo.angle(tiltAngle) time.sleep(.02) if yError <0: tiltAngle = tiltAngle - 1 tiltServo.angle(tiltAngle) time.sleep(.02) myText = "FPS: "+str(round(fps,1)) cv2.putText(frame,myText,textLowerLeft,fontFace,fontScale,fontColor,fontThickness) text1 = "Mouse Pos: "+str((xPos,yPos)) text2 = "Pixel Color: "+str((Hue,Sat,Val)) cv2.putText(frame,text1,textLowerLeft1,fontFace,fontScale,fontColor,fontThickness) cv2.putText(frame,text2,textLowerLeft2,fontFace,fontScale,fontColor,fontThickness) cv2.imshow("Camera", frame) cv2.imshow("Composite",composite) cv2.imshow("Mask",mask) if cv2.waitKey(1)==ord('q'): break cv2.destroyAllWindows() redLED.pulse_width_percent(0) greenLED.pulse_width_percent(0) blueLED.pulse_width_percent(0) print('Program Terminated') |