This is Getting Crazy Cool!
Hey guys, welcome back to the Fusion AI Lab series, AI on the Edge! In Lesson 44 we just took things up another notch. We’re now running MediaPipe Face Mesh on our Raspberry Pi 5, pulling all 468 facial landmarks in real time, and then drawing a clean, smooth face contour directly onto a tiny 128×64 OLED display!
That’s right — your face is now living on that little monochrome OLED in real time! Every eyebrow raise, smile, head tilt, and eye movement gets faithfully reproduced on the display. We’re pulling the camera feed with picamera2, processing it with MediaPipe’s powerful face mesh, scaling the landmarks down to OLED resolution, and then drawing the official FACEMESH_CONTOURS connections using PIL. The result is surprisingly smooth and fun to watch! This project really shows the power of combining modern AI vision tools with simple embedded hardware. Watching your own face rendered in real time on a tiny OLED is just plain awesome — it feels like sci-fi stuff from just a few years ago, and now we’re doing it on the Edge with our Fusion AI Lab kit!
If you’ve been following along, you’re starting to see how powerful these tools are becoming. We’re no longer just detecting faces — we’re understanding the structure of the face and visualizing it however we want. And we’re just getting started!
So fire up your Raspberry Pi, grab that OLED, and let’s keep pushing the limits. You’re doing some seriously cool stuff!
|
1 2 3 4 5 6 7 8 9 10 11 12 13 14 15 16 17 18 19 20 21 22 23 24 25 26 27 28 29 30 31 32 33 34 35 36 37 38 39 40 41 42 43 44 45 46 47 48 49 50 51 52 53 54 55 56 57 58 59 60 61 62 63 64 65 66 67 68 69 70 71 72 73 74 75 76 77 78 79 80 81 82 83 84 85 86 87 88 89 90 91 92 93 94 95 96 97 98 99 100 101 102 103 104 105 106 107 108 109 110 111 112 113 114 115 116 117 118 119 120 121 122 123 124 125 126 127 128 129 130 131 132 133 134 135 136 137 138 139 140 141 142 |
# ==================================================================== # DISCLAIMER: # This code is provided as-is for educational and experimental # purposes only. The author makes no representations or warranties of # any kind concerning the safety, suitability, or accuracy of this # code. Use at your own risk. The author assumes no liability for any # damages, system failures, security breaches, or network issues # resulting from the use or implementation of this script. # ==================================================================== import cv2 import time from picamera2 import Picamera2 import mediapipe as mp import numpy as np ################################# import board import adafruit_ssd1306 from PIL import Image, ImageDraw, ImageFont import time wOLED = 128 hOLED = 64 I2C_ADDRESS = 0x3C i2c = board.I2C() oled = adafruit_ssd1306.SSD1306_I2C(wOLED, hOLED, i2c, addr = I2C_ADDRESS) ################################# W=1280 H=720 tStart = time.time() fps = 0 piCam = Picamera2(1) piCam.preview_configuration.main.size = (W, H) piCam.preview_configuration.main.format = "RGB888" piCam.preview_configuration.controls.FrameRate = 60 piCam.preview_configuration.align() piCam.configure("preview") piCam.start() textLowerLeft = (int(W*.01),int(H*.05)) fontFace = cv2.FONT_HERSHEY_SIMPLEX fontThickness = int(W/425) fontScale = H*.0015 fontColor = (0,0,255) faceMesh = mp.solutions.face_mesh.FaceMesh( max_num_faces=1, refine_landmarks=True, min_detection_confidence=0.5, min_tracking_confidence=0.5) cv2.namedWindow('Camera',cv2.WINDOW_GUI_NORMAL) cv2.moveWindow('Camera',0,65) cv2.resizeWindow('Camera',W,H) while True: deltaT = time.time() - tStart tStart=time.time() fps = fps*.95 + (1/deltaT)*.05 frame = piCam.capture_array() frame = cv2.flip(frame, -1) rgb = cv2.cvtColor(frame, cv2.COLOR_BGR2RGB) results = faceMesh.process(rgb) if results.multi_face_landmarks: for faceLandMarks in results.multi_face_landmarks: #print(faceLandmarks) image = Image.new("1",(wOLED,hOLED)) draw = ImageDraw.Draw(image) lmAll = [] for lm in faceLandMarks.landmark: xOLED = int(lm.x*wOLED) yOLED = int(lm.y*hOLED) draw.point((xOLED,yOLED), fill = 255) #print(xOLED,yOLED) lmAll.append((xOLED,yOLED)) for idx in mp.solutions.face_mesh.FACEMESH_CONTOURS: #print(idx) lineStart = idx[0] lineEnd = idx[1] pt1 = lmAll[lineStart] pt2 = lmAll[lineEnd] draw.line((pt1[0],pt1[1],pt2[0],pt2[1]), width=1, fill = 255) #print('XXXXXXXXXXXXXXXXXXx') oled.image(image) oled.show() #print() # if results.multi_face_landmarks: # for faceLandmarks in results.multi_face_landmarks: # # Optional second pass for glow effect # mp.solutions.drawing_utils.draw_landmarks( # image=frame, # landmark_list=faceLandmarks, # connections=mp.solutions.face_mesh.FACEMESH_TESSELATION, # landmark_drawing_spec=None, # connection_drawing_spec=mp.solutions.drawing_utils.DrawingSpec( # color=(100, 100, 100), # thickness=1 # ) # ) # # === Best looking translucent mesh === # mp.solutions.drawing_utils.draw_landmarks( # image=frame, # landmark_list=faceLandmarks, # connections=mp.solutions.face_mesh.FACEMESH_CONTOURS, # landmark_drawing_spec=None, # Hide dots # connection_drawing_spec=mp.solutions.drawing_utils.DrawingSpec( # color=(0, 0, 180), # Bright cyan/teal # thickness=7 # ) # ) # # # Optional: Extra detail on irises (makes eyes look better) # mp.solutions.drawing_utils.draw_landmarks( # image=frame, # landmark_list=faceLandmarks, # connections=mp.solutions.face_mesh.FACEMESH_IRISES, # landmark_drawing_spec=None, # connection_drawing_spec=mp.solutions.drawing_utils.DrawingSpec( # color=(255, 0, 0), # thickness=7 # ) # ) myText = "FPS: "+str(round(fps,1)) cv2.putText(frame,myText,textLowerLeft,fontFace,fontScale,fontColor,fontThickness) cv2.imshow("Camera", frame) if cv2.waitKey(1) == ord('q'): break cv2.destroyAllWindows() piCam.stop() oled.fill(0) oled.show() |
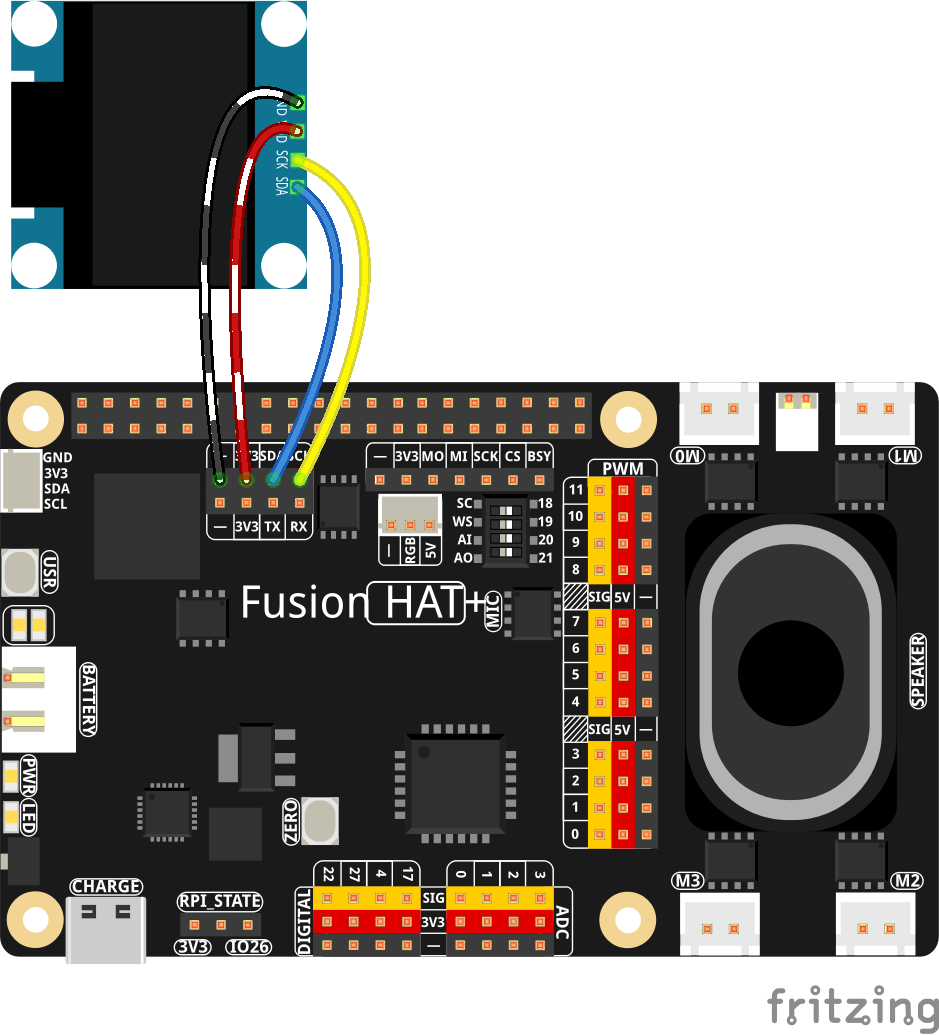
In this lesson we are still using our standard Fusion AI Lab Kit cirtuit from the earlier lessons:

We have also connected the OLED to the above circuit according to this diagram: