Tag Archives: Artificial Intelligenge

AI on the Edge LESSON 11: Control LED on Raspberry Pi With Voice Commands

In today’s lesson, we’re taking our first exciting step into giving our Raspberry Pi the ability to understand and respond to our voice. That’s right — we’re going to control a physical LED using nothing but spoken commands! This is a huge milestone in the class because it marks the beginning of building truly interactive AI projects that can listen to us and take action in the real world.

Using the SunFounder Fusion AI Hat’s built-in microphone and the excellent STT (Speech-to-Text) library, we create a simple but powerful voice assistant that can turn an LED on and off with commands like “on”, “off”, and “quit”. I walk you through every single line of the code so you can clearly see how we capture voice input, process the command, and control real hardware.

This lesson is intentionally straightforward because I want you to build a strong foundation. Once you understand how to take a voice command and turn it into physical action, we can start adding more complexity — like controlling multiple devices, adjusting brightness, or even combining voice control with computer vision in future lessons.

One of the things I love most about this project is how it makes the Raspberry Pi feel “alive.” Instead of clicking buttons or typing commands, you can now talk directly to your project. This is the kind of interaction that makes edge AI projects so much fun and so powerful.

By the end of this lesson, you’ll have a working voice-controlled LED and the confidence to start expanding your voice control skills. This is exactly the kind of capability we need as we move forward in the AI on the Edge journey — giving our intelligent systems natural, human-friendly ways to interact with us.

So grab your Fusion AI Hat, hook up that LED, and let’s turn your Raspberry Pi into a voice-controlled device! As always, I strongly encourage you to code along with me in the video and then play around with the program. Try adding more commands, control multiple LEDs, or even have it say something back to you.

This is where things start getting really fun. Let’s get that LED responding to your voice!

This is the schematic of the circuit we are using for our AI class. We go into great detail on this schematic in LESSON #5 if you want to learn more about it.

Fusion Hat Circuit Diagram
This is the circuit we will use moving forward in the class

Now this is the code we developed in this lesson:


AI on the Edge LESSON 10: Make Your Raspberry Pi Listen to You with Voice Commands

In this video lesson you will learn how to train the Raspberry Pi to take voice commands from you. We do this through the Fusion AI+ hat’s microphone, and a Speech to Text (STT) model. Our goal is to develop the ability to interact with our projects through spoken words. We give commands to the project, and then it responds intelligently with words.

Remember these lessons depend on you using the AI Educational OS, a special version of bookworm that has all the libraries, modules, and models already installed for you. See LESSON #2 in this class for instructions on flashing that OS.

Below is the simple demonstration code we developed to give simple voice commands:

Similar to our Speech to Text example, the first time you run this program you will get a permissions error. You need to open a terminal, and put these commands in one at a time to enable permissions. This only has to be done once, and after that this and all STT programs should run properly.


AI on the Edge LESSON 8: Text to Speech (TTS) on the Raspberry Pi

In this video lesson I will show you how to get the Raspberry Pi to speak to you in plain English. This is our first dabbling with AI. In earlier lessons we have discussed that one of our first objectives will be to begin to audibly interact with our project through speech. The first step will be to get the Pi to talk to us. Then in future lessons we will show how to get the Pi to listen to us.

In this lesson we demonstrated simple Text to Speech (TTS) with this code.

Remember this program requires use of the AI Educational OS we flashed in LESSON #2.

As we say in the video, the first time you run the program you will get a permission error. This is because the model folders are inside a system folder and must be created as a ‘superuser’ using ‘sudo’. As shown in the video, you need to open a terminal window, and type in these commands at the command prompt (Put them in one at a time):

You only need to do that one time. Next time you run the program, all will work properly.

Then, in order to hear all the different voice models Piper offers, you can run this program, and each voice will introduce itself to you.


Remember in these early lessons we are using this circuit to demo our programs. Please leave this circuit put together.

Fusion Hat Circuit Diagram
This is the circuit we will use moving forward in the class

AI on the Edge LESSON 7: Homework Solution for Dimmable LED

In Lesson 6, I gave you a homework challenge: build a dimmable LED using a potentiometer. In today’s Lesson 7, we go through the solution together step-by-step.

This lesson is all about taking analog input from a potentiometer and converting it into smooth PWM output to control the brightness of an LED. It’s a very practical project because it teaches you how to read real-world analog values and turn them into useful control signals — skills we’ll use again and again as we build smarter AI-powered projects.

In the video, I walk you through the complete working code. You’ll see how we read the potentiometer value (0 to 4095), convert that raw number into a proper brightness percentage using a bit of math (with a nice logarithmic curve so the brightness feels natural to the human eye), and then send that value to the LED using PWM. The result is a very smooth, responsive dimmer that feels professional.

Even though this seems like a simple project, it’s actually an important stepping stone. Understanding how to read sensors and smoothly control outputs is fundamental to building real AI on the Edge systems — whether you’re controlling motors, adjusting screen brightness, or varying the speed of a robot based on sensor input.

By the end of this lesson, you should have a solid understanding of how to combine the ADC (Analog to Digital Converter) with PWM output, and more importantly, how to think about mapping real-world inputs to useful outputs.

So if you did the homework, great job! If you got stuck, don’t worry — we go through the full solution together. And as always, I strongly encourage you to take the code and make it your own. Try changing the response curve, add multiple LEDs with different colors, or combine it with things we’ve learned in earlier lessons.

This is the kind of foundational hardware skill that will serve you well as we continue moving deeper into the AI on the Edge class. You’re doing great — keep going!

We are still using the schematic from our earlier project.

Fusion Hat Circuit Diagram
This is the circuit we will use moving forward in the class

In this lesson, this is the code which we came up with:


AI on the Edge LESSON 5: Understanding Fusion AI Hat+ For Raspberry Pi

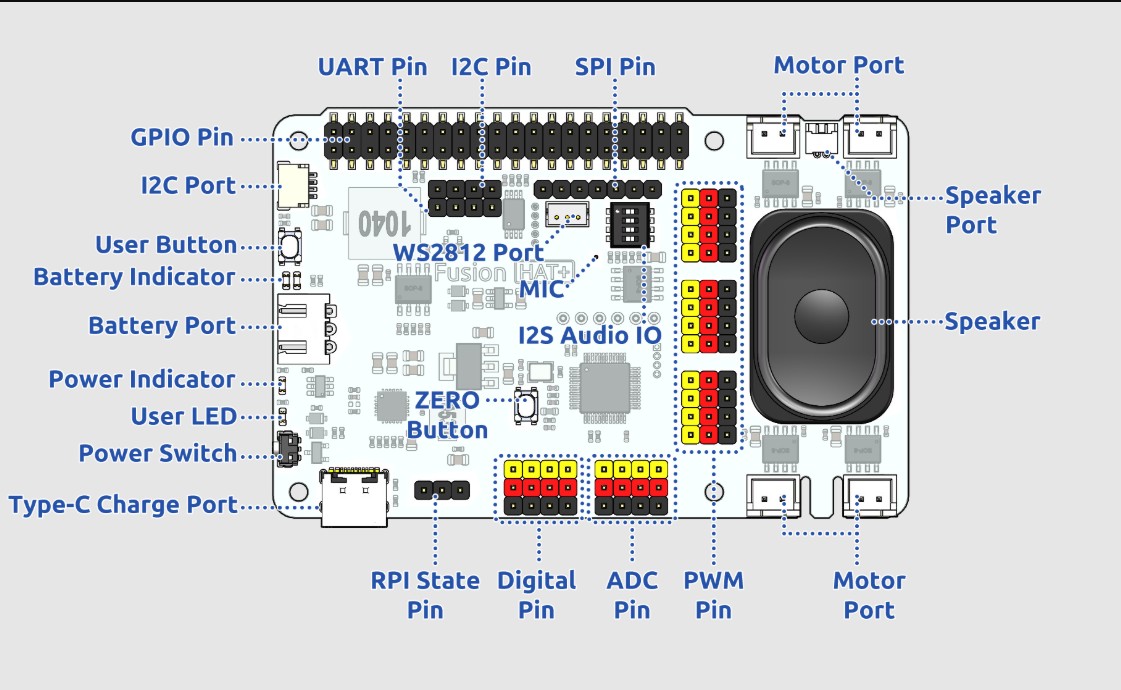
In today’s lesson we will become familiar with the capabilities of the Fusion AI Hat+ for the Raspberry Pi. This hat will be a core part of our class moving forward. The hat makes it easy to get data from the outside world, and to control things in the outside would. We will get an understanding of the core capabilities of the board, and your homework will be to build the first circuit with the board.  This schematic shows the various parts of the board:

Fusion AI Hat for Raspberry Pi Schematic

Then for the homework, we need you to go ahead and build this circuit. This circuit will allow us to learn how to make Digital Output commands, PWM commands, and how to read analog inputs.

Fusion Hat Circuit Diagram
This is the circuit we will use moving forward in the class