
In Lesson 6, I gave you a homework challenge: build a dimmable LED using a potentiometer. In today’s Lesson 7, we go through the solution together step-by-step.
This lesson is all about taking analog input from a potentiometer and converting it into smooth PWM output to control the brightness of an LED. It’s a very practical project because it teaches you how to read real-world analog values and turn them into useful control signals — skills we’ll use again and again as we build smarter AI-powered projects.
In the video, I walk you through the complete working code. You’ll see how we read the potentiometer value (0 to 4095), convert that raw number into a proper brightness percentage using a bit of math (with a nice logarithmic curve so the brightness feels natural to the human eye), and then send that value to the LED using PWM. The result is a very smooth, responsive dimmer that feels professional.
Even though this seems like a simple project, it’s actually an important stepping stone. Understanding how to read sensors and smoothly control outputs is fundamental to building real AI on the Edge systems — whether you’re controlling motors, adjusting screen brightness, or varying the speed of a robot based on sensor input.
By the end of this lesson, you should have a solid understanding of how to combine the ADC (Analog to Digital Converter) with PWM output, and more importantly, how to think about mapping real-world inputs to useful outputs.
So if you did the homework, great job! If you got stuck, don’t worry — we go through the full solution together. And as always, I strongly encourage you to take the code and make it your own. Try changing the response curve, add multiple LEDs with different colors, or combine it with things we’ve learned in earlier lessons.
This is the kind of foundational hardware skill that will serve you well as we continue moving deeper into the AI on the Edge class. You’re doing great — keep going!
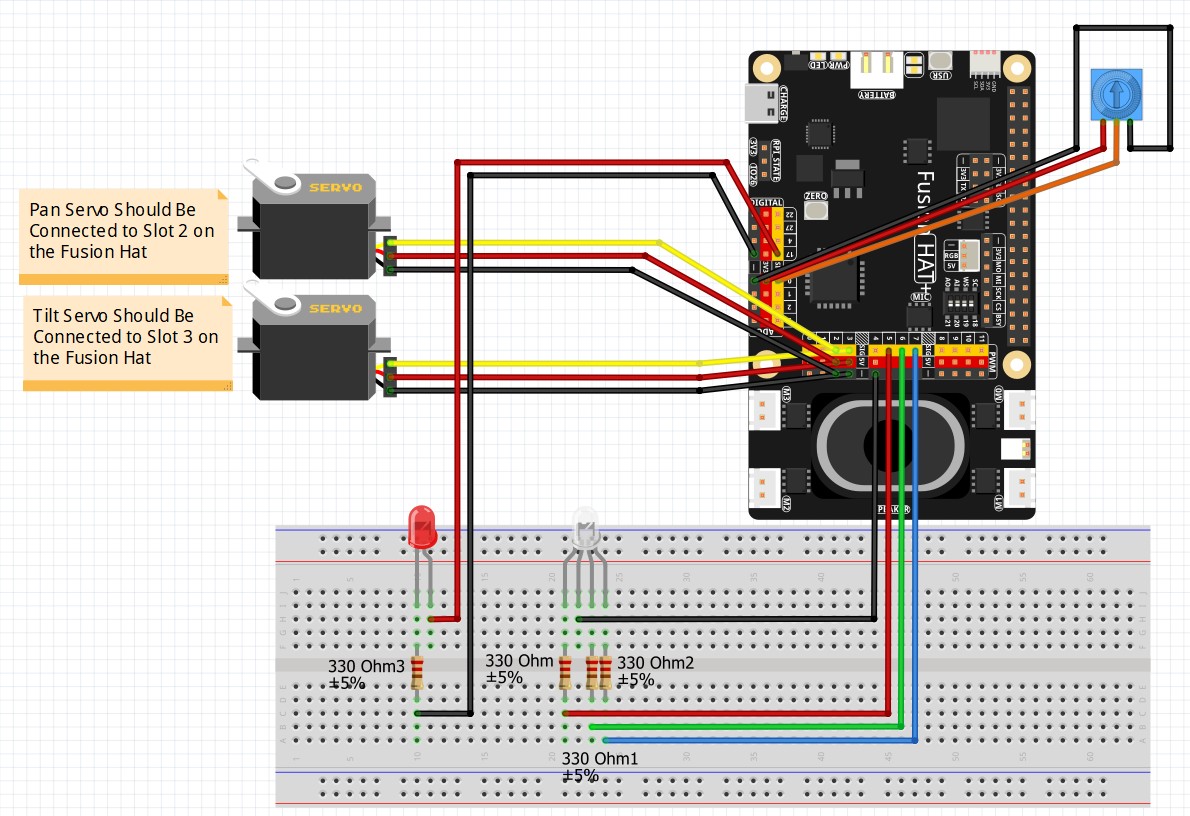
We are still using the schematic from our earlier project.
In this lesson, this is the code which we came up with:
|
1 2 3 4 5 6 7 8 9 10 11 12 13 14 15 16 |
#!/usr/bin/env python3 from fusion_hat.adc import ADC from fusion_hat.pwm import PWM from time import sleep import math potPin=0 myPot = ADC(0) redPin=5 redLED=PWM(redPin) while True: potVal = myPot.read() # 0 to 4095 writeVal=100**(potVal/4095)-.005 redLED.pulse_width_percent(int(writeVal)) print(potVal,writeVal) sleep(0.1) |