
The major challenge we face in this AI on the Edge class is getting a Raspberry Pi 5 configures where you have all the AI Models, Libraries, Modules and Methods installed, and where they all play nicely together. Often, when you add a new model, the old model becomes broken. This is because when you install something new, it often times updates the dependencies. That means it updates a library already on your system. For example, lets say you have numpy 14, working with YOLO 11. Now you install mediapipe, and it updates numpy 14 to numpy 15. This then ‘Breaks’ your YOLO, as it wanted a different version of numpy. Likely you will get frustrated and quit before you get the dependency problems solved. In order to get around this, you can use a special education version of the Bookworm OS, which has all the needed libraries installed already and working nicely with each other. The video above shows you how to install this OS. Once you do, no not update it, do not upgrade it, do not touch it. Use it to develop your programs and projects for this class. If you want to do something else with your pi, have a separate SD card.
All posts by admin
AI on the Edge LESSON 1: Introduction and Class Overview
Welcome to our all new AI on the Edge class! I will need you to buckle up, get your hardware together, and get ready to teach AI who is boss! We will be using a Pi 5, and the Fusion AI Lab kit. I will show links to the hardware below. In today’s lesson I describe the Class Introduction, and will show you some demos of the types of projects we will be doing. You will either Drive AI or your will be Destroyed by AI. Don’t be one of the ones who will be eaten by it

Guys, get your gear, and make sure you end up on the right side of the Dystopian future that awaits the world.
I have provided Amazon links, so you can order everything in the same place
You Will need a Raspberry Pi 5
Order Pi 5
You will need a heat sink and fan
Order Heat Sink and Fan
You Will Need the Fusion AI Lab Kit
Order Fusion AI Lab Kit
You Will Need a 25 Watt Power Supply
Order Power Supply
You Will Need a Micro HDMI Cable
Order Micro HDMI Cable
You Will Need a Keyboard and Mouse
Order Wireless Keyboard and Mouse
This isn’t just another Raspberry Pi class. This is a complete journey where we’re going to take the powerful Raspberry Pi 5, combine it with the SunFounder Fusion AI Lab kit, and build real, practical, intelligent systems that run completely on the edge — no cloud, no internet required.
In this class, you’re not going to just learn how to blink an LED or run someone else’s pre-made script. You’re going to learn how to build smart machines that can see, listen, speak, think, and act in the real world. We’re going to combine computer vision, voice recognition, speech synthesis, sensor reading, motor control, and modern AI techniques — all running locally on your Raspberry Pi 5.
Over the course of this series, you will learn how to:
- Capture and process live video from the Raspberry Pi Camera
- Detect faces and track objects in real time using MediaPipe and OpenCV
- Control hardware with voice commands
- Make your Raspberry Pi speak with natural-sounding Text-to-Speech
- Build smooth, responsive control systems using threading
- Use displays like the SSD1306 OLED to show live information
- Combine everything into impressive AI-powered projects
This class is designed for makers, students, hobbyists, and engineers who want to move beyond basic tutorials and start building real intelligent edge devices. Whether you dream of building smart robots, autonomous monitoring systems, interactive AI companions, or just want to gain serious skills in modern embedded AI, this class is for you.
I’m going to teach this the way I always do — step by step, clearly, and with lots of hands-on projects. We’ll start with the fundamentals and gradually build up to more advanced and exciting projects as the class progresses.
If you’ve ever wanted to move from “playing with the Raspberry Pi” to “building truly intelligent systems,” then you’re in the right place. This is going to be a fun, challenging, and incredibly rewarding journey.
So if you’re ready to stop just watching AI videos and start building your own AI on the edge… then buckle up, because we’re about to do exactly that.
Welcome to the class! I’m really glad you’re here. Let’s get started!
Object Detection Using YOLO and RTSP Camera on Raspberry Pi 5
OK guys, you spoke, and I listened. You all are asking for a lesson on how to do object detection on a Pi 5 using YOLO and an IP Camera. Well, you are about to get what you asked for. We will make this work, or we will DIE TRYING. Never fear, once you watch the video you will both understand and be able to do it on your own. First, I am assuming you watched our previous lesson where I showed you how to do the basic install and setup of YOLO. If not, never fear, I have the commands below. NOTE: This tutorial is geared towards bookworm OS. I strongly suggest you start with a fresh bookworm SC card, as there are many dependencies, and it is most likely to work if you start exactly where I am starting . . . with a fresh OS. Thes these are the commands I shared last week to get YOLO up and working: (just open a terminal, and paste these commands one at a time)
|
1 2 3 4 5 6 7 8 9 10 11 12 13 14 15 16 17 18 19 20 21 22 23 24 25 26 27 28 29 30 31 32 33 34 35 |
# 1. Configure X11 (manual steps required) sudo raspi-config # → Go to Advanced Options → X11 → Enable X11 # → Finish and reboot when prompted # 5. Update system and install OpenCV sudo apt update sudo apt full-upgrade -y sudo apt install python3-opencv -y # Verify OpenCV python3 -c "import cv2; print('OpenCV version:', cv2.__version__)" # Expected output: something like "OpenCV version: 4.6.0" or higher # Create and activate virtual environment for YOLO11 (Ultralytics) python3 -m venv --system-site-packages YOLO source YOLO/bin/activate # You are now inside the (YOLO) virtual environment # Install Ultralytics YOLO11 inside it pip install "numpy<2.0" ultralytics # Now create a Pi friendly YOLO11 model yolo export model=yolo11n.pt format=ncnn # Optional: Verify YOLO installation python -c "from ultralytics import YOLO; print('Ultralytics YOLO ready')" # When finished working with YOLO, you can deactivate with: # deactivate #Now open Thonny, and you need to point thonny to the virtual environment you #just created. Open tools- options, select 'interpreter' tab, then click they Python #executable, selecting ... and navigate from home directory, #to YOLO, to bin, and then select python |
Now, I will explain this code, and will help you configure it for your cameras, but you will need to open up thonny, and paste in the following code as a start. IMPORTANT, as mentioned above, you need to set interpreter in thonny to the virtual environment set up in the process above. If this is not familiar to you, go back and watch last weeks lesson (click previous at the bottom of this post). Without further adue, here is the code we will work with today:
|
1 2 3 4 5 6 7 8 9 10 11 12 13 14 15 16 17 18 19 20 21 22 23 24 25 26 27 28 29 30 31 32 33 34 35 36 37 38 39 40 41 42 43 44 45 46 47 48 49 50 51 52 53 54 55 56 57 58 59 60 61 62 63 64 65 66 67 |
import cv2 from ultralytics import YOLO #import secret import threading import time W=1280 H=720 #Now, as eplained in the video, edit the line below where #you put your wifi user name in place of user, and your #wifi password in place of password, and you put in your #IP address RTSP_URL = "rtsp://user:password@192.168.88.44:554/cam/realmonitor?channel=1&subtype=0" #RTSP_URL = secret.RTSP_URL1 #I have put my wifi credentials in a secret file so no #one sees my credentials. You will just use the RTSP_URL line above. # Load the exported NCNN model (replace with your model path) model = YOLO("/home/pjm/yolo11n_ncnn_model/", task="detect") lock = threading.Lock() running = True def frameGrabber(url): global ipFrame, running cap = cv2.VideoCapture(url, cv2.CAP_FFMPEG) cap.set(cv2.CAP_PROP_BUFFERSIZE, 1) cap.set(cv2.CAP_PROP_POS_FRAMES, 0) # Reset frame position while running: ret, frame = cap.read() if ret: with lock: #frame = cv2.resize(frame, (W, H)) ipFrame = frame.copy() cap.release() print("Thread Terminated") thread = threading.Thread(target=frameGrabber, args=(RTSP_URL,), daemon=True) thread.start() tStart=time.time() time.sleep(2) fps=0 cnt=0 # Set resolution for faster processing (optional, adjust based on your needs) while True: deltaT=time.time()-tStart fps= fps*.9 + .1/deltaT tStart=time.time() with lock: ipFrameShow=ipFrame.copy() results = model(ipFrameShow, conf=0.25, verbose=False)[0] # conf: confidence threshold; adjust as needed # Annotate the frame with detections (boxes, labels, scores) annotatedFrame = results.plot() annotatedFrame=cv2.resize(annotatedFrame, (W,H)) cv2.putText(annotatedFrame, "FPS: "+str(round(fps,1)), (int(W*.01), int(H*.075)), cv2.FONT_HERSHEY_SIMPLEX, H*.002, (0, 0, 255), 3) cv2.imshow("IP Camera", annotatedFrame) #cv2.moveWindow("IP Camera",100,100) if cv2.waitKey(1)==ord('q'): break running=False thread.join() # Wait for thread to fully exit time.sleep(1) cv2.destroyAllWindows() import gc gc.collect() # Force garbage collection to reclaim memory/connections #Make Extra sure all processes are killed import os os._exit(0) print("Program Terminated") |
The video explains everything, please watch it!
AI on the Edge: Install and Run YOLO Object Detection on the Raspberry Pi 5
In today’s Lesson we will see just how far we can push things on the Raspberry Pi 5. I will show you how to install YOLO11 on the Pi . I will show you a simple program that will run YOLO11 under Python and openCV. The objective in today’s lesson is to see if the Pi5, without a Hailo accelerator hat, has sufficient power to do useful object detection. We will not use an accelerator hat, but the work is computationally intensive, so you must use active cooling. This is the low cost cooling fan we are using. It is sufficient to do the job, low cost and is a thin form factor that allows other hats to still fit on the Raspberry Pi 5. You can pick up the fan I am using HERE. Also, we are using an 8GB Pi 5. If you already have a Pi 5, it will probably work. The Pi 5 we are using is available HERE. These appliations are power hungry, so make sure you are using an official Pi Power supply.
In this lesson, I assume you are already familiar with the Pi 5. Note we are using Bookworm OS. Not all the dependencies work yet on Trixie, so I strongly recommend starting by flashing a fresh bookworm SD card.
YOLO11 is a powerful AI object detection model that runs well on the Raspberry Pi 5. The model below:
|
1 2 3 4 5 6 7 8 9 10 11 12 13 14 15 16 17 18 19 20 21 22 23 24 25 26 27 28 29 30 31 32 33 34 35 36 37 38 39 40 41 |
# 1. Configure X11 (manual steps required) sudo raspi-config # → Go to Advanced Options → X11 → Enable X11 # → Finish and reboot when prompted # 5. Update system and install OpenCV sudo apt update sudo apt full-upgrade -y sudo apt install python3-opencv -y # Verify OpenCV python3 -c "import cv2; print('OpenCV version:', cv2.__version__)" # Expected output: something like "OpenCV version: 4.6.0" or higher # 6. Install MediaPipe pip install mediapipe --break # Verify MediaPipe python3 -c "import mediapipe as mp; print('MediaPipe version:', mp.__version__)" # 7. Create and activate virtual environment for YOLO11 (Ultralytics) python3 -m venv --system-site-packages YOLO source YOLO/bin/activate # You are now inside the (YOLO) virtual environment # Install Ultralytics YOLO11 inside it pip install "numpy<2.0" ultralytics # Now create a Pi friendly YOLO11 model yolo export model=yolo11n.pt format=ncnn # Optional: Verify YOLO installation python -c "from ultralytics import YOLO; print('Ultralytics YOLO ready')" # When finished working with YOLO, you can deactivate with: # deactivate #Now open Thonny, and you need to point thonny to the virtual environment you #just created. Open tools- options, select 'interpreter' tab, then click they Python #executable, selecting ... and navigate from home directory, #to YOLO, to bin, and then select python |
Now you should be set up to use YOLO11 on the Raspberry Pi 5!
We will start with this program, which is a simple grab a frame and show a frame openCV Program
|
1 2 3 4 5 6 7 8 9 10 11 12 13 14 15 16 17 18 19 20 21 22 23 24 25 26 27 28 29 |
import cv2 from picamera2 import Picamera2 import time piCam = Picamera2() W=1280 H=720 RES = (W,H) piCam.preview_configuration.main.size = RES piCam.preview_configuration.main.format = "RGB888" piCam.preview_configuration.controls.FrameRate=60 piCam.preview_configuration.align() piCam.configure("preview") piCam.start() fps=0 tStart=time.time() while True: frame= piCam.capture_array() #frame=cv2.flip(frame,-1) deltaT=time.time()-tStart tStart=time.time() fps= fps*.9 + .1/deltaT cv2.putText(frame, "FPS: "+str(round(fps,1)), (int(W*.01), int(H*.075)), cv2.FONT_HERSHEY_SIMPLEX, H*.002, (0, 0, 255), 2) cv2.imshow("Camera", frame) cv2.moveWindow("Camera",100,100) if cv2.waitKey(1)==ord('q'): break cv2.destroyAllWindows() |
In the video, we show how to use YOLO11 object detection in this simple program.
|
1 2 3 4 5 6 7 8 9 10 11 12 13 14 15 16 17 18 19 20 21 22 23 24 25 26 27 28 29 30 31 32 33 34 35 36 37 38 39 40 41 42 43 44 |
import cv2 from ultralytics import YOLO from picamera2 import Picamera2 import time piCam = Picamera2() W=1280 H=720 RES = (W,H) piCam.preview_configuration.main.size = RES piCam.preview_configuration.main.format = "RGB888" piCam.preview_configuration.controls.FrameRate=60 piCam.preview_configuration.align() piCam.configure("preview") piCam.start() # Load the exported NCNN model (replace with your model path) model = YOLO("/home/pjm/yolo11n_ncnn_model", task = 'detect') fps=0 tStart=time.time() # Set resolution for faster processing (optional, adjust based on your needs) while True: frame= piCam.capture_array() results = model(frame, conf=0.25, verbose=False) frame = results[0].plot() # Plots old boxes on new frame! deltaT=time.time()-tStart tStart=time.time() fps= fps*.8 + .2/deltaT cv2.putText(frame, "FPS: "+str(round(fps,1)), (int(W*.01), int(H*.075)), cv2.FONT_HERSHEY_SIMPLEX, H*.002, (0, 0, 255), 2) # Display the result cv2.imshow("YOLO11 Detection", frame) # Exit on 'q' key if cv2.waitKey(1) == ord('q'): break # Cleanup cv2.destroyAllWindows() import gc gc.collect() # Force garbage collection to reclaim memory/connections #Make Extra sure all processes are killed import os os._exit(0) print("Program Terminated") |
Arduino IMU Project with Complete Avionics Display for Roll, Pitch and Yaw on a SSD1306 OLED
In this video lesson we wrap up our project to create an Arduino IMU using the GY-87 IMU module, with an MPU6050 chip and a QMC5883L Magnetometer. In this lesson we complete the avionics display, creating an accurate graphical output for Roll, Pitch, and Yaw. This is the schematic we are using for this project:
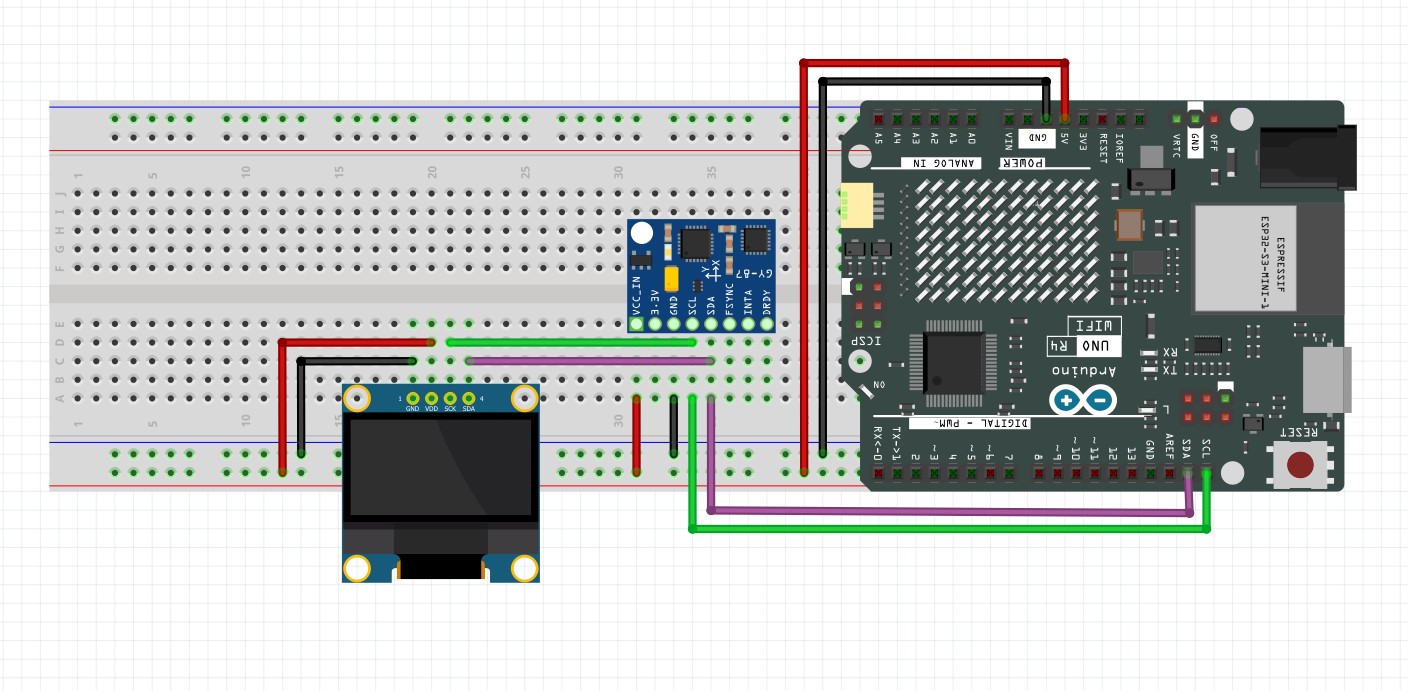
This is the code we develop in the video. Remember, you have to calibrate your sensors, and put your calibration numbers into the code below. I showed you how to do the calibration in THIS LESSON.
|
1 2 3 4 5 6 7 8 9 10 11 12 13 14 15 16 17 18 19 20 21 22 23 24 25 26 27 28 29 30 31 32 33 34 35 36 37 38 39 40 41 42 43 44 45 46 47 48 49 50 51 52 53 54 55 56 57 58 59 60 61 62 63 64 65 66 67 68 69 70 71 72 73 74 75 76 77 78 79 80 81 82 83 84 85 86 87 88 89 90 91 92 93 94 95 96 97 98 99 100 101 102 103 104 105 106 107 108 109 110 111 112 113 114 115 116 117 118 119 120 121 122 123 124 125 126 127 128 129 130 131 132 133 134 135 136 137 138 139 140 141 142 143 144 145 146 147 148 149 150 151 152 153 154 155 156 157 158 159 160 161 162 163 164 165 166 167 168 169 170 171 172 173 174 175 176 177 178 179 180 181 182 183 184 185 186 187 188 189 190 191 192 193 194 195 196 197 198 199 200 201 |
#include <Adafruit_MPU6050.h> #include <Adafruit_Sensor.h> #include <Wire.h> #include <QMC5883LCompass.h> #include <Adafruit_GFX.h> #include <Adafruit_SSD1306.h> #include <math.h> int screenWidth=128; int screenHeight=64; int rst = -1; Adafruit_SSD1306 dsp(screenWidth, screenHeight, &Wire, rst); float AxRaw,AyRaw,AzRaw,GxRaw,GyRaw,GzRaw,MxRaw,MyRaw,MzRaw; float AxCal,AyCal,AzCal,GxCal,GyCal,GzCal,MxCal,MyCal,MzCal; float rollA,pitchA,yawM,rollC,pitchC,yawC; float rollG = 0; float pitchG =0 ; float yawG = 0; float deltaRoll = 0; float deltaPitch = 0; float deltaYaw = 0; float alpha = .1; float rollCrad; float pitchCrad; float MxCalH; float MyCalH; int tStart =millis(); Adafruit_MPU6050 mpu; QMC5883LCompass compass; void setup() { // put your setup code here, to run once: Serial.begin(115200); dsp.begin(SSD1306_SWITCHCAPVCC,0x3C); dsp.clearDisplay(); dsp.display(); mpu.begin(); mpu.setI2CBypass(true); compass.init(); mpu.setGyroRange(MPU6050_RANGE_1000_DEG); delay(100); } void calibrateSensors() { const float axOffset = 0.45407887789180545; const float ayOffset = 0.09432915233553185; const float azOffset = -0.4614157209191969; const float axScale = 0.10141341897341144; const float ayScale = 0.10141341897341144; const float azScale = 0.10141341897341144; const float gxOffset = -2.277507235645022; const float gyOffset = 0.8794902155258137; const float gzOffset = -0.5729577951308232; const float mxOffset = -103.48885017294003; const float myOffset = -96.80085481152321; const float mzOffset = 923.8042898128733; const float mxScale = 0.001156333898601669; const float myScale = 0.001012882116988885; const float mzScale = 0.0009400860982065997; AxCal = (AxRaw - axOffset) * axScale; AyCal = (AyRaw - ayOffset) * ayScale; AzCal = (AzRaw - azOffset) * azScale; GxCal = GxRaw*180/PI - gxOffset; GyCal = GyRaw*180/PI - gyOffset; GzCal = GzRaw*180/PI - gzOffset; MxCal = (MxRaw - mxOffset) * mxScale; MyCal = (MyRaw - myOffset) * myScale; MzCal = (MzRaw - mzOffset) * mzScale; } void updateDial(){ int radius=20; int offset=3; int x1Center = radius; int y1Center = 63 - radius; int x2Center = x1Center+2*radius+offset; int y2Center = 63-radius; int x3Center = x2Center + 2*radius +offset; int y3Center = 63-radius; int x1; int y1; int x2; int y2; float angleRad; float tickScale; dsp.drawCircle(x1Center,y1Center,radius, WHITE); for (int i=0; i<=360; i=i+30){ angleRad = i*PI/180; tickScale=.9; if (i%90==0){ tickScale=.7; } x1 =x1Center + int(tickScale*radius*cos(angleRad)); y1 =y1Center + int(tickScale*radius*sin(angleRad)); x2 = x1Center + int(radius*cos(angleRad)); y2 = y1Center + int(radius*sin(angleRad)); dsp.drawLine(x1,y1,x2,y2,WHITE); } x1=x1Center; y1=y1Center; x2= x1Center + radius*cos(-(yawC+90)*PI/180); y2= y1Center + radius*sin(-(yawC+90)*PI/180); dsp.drawLine(x1,y1,x2,y2,WHITE); dsp.drawCircle(x2Center,y2Center,radius,WHITE); dsp.drawLine(x2Center-radius*cos(rollC*PI/180),y2Center-radius*sin(rollC*PI/180),x2Center+radius*cos(rollC*PI/180),y2Center+radius*sin(rollC*PI/180),WHITE); dsp.drawCircle(x3Center,y3Center,radius,WHITE); x1=x3Center-radius*cos(pitchC*PI/180); y1=y3Center-radius/90.*pitchC; x2=x3Center+radius*cos(pitchC*PI/180); y2=y3Center-radius/90.*pitchC; dsp.drawLine(x1,y1,x2,y2,WHITE); } void loop() { // put your main code here, to run repeatedly: compass.read(); sensors_event_t a, g, temp; mpu.getEvent(&a, &g, &temp); AxRaw = a.acceleration.x; AyRaw = a.acceleration.y; AzRaw = a.acceleration.z; GxRaw = g.gyro.x; GyRaw = g.gyro.y; GzRaw = g.gyro.z; MxRaw= compass.getX(); MyRaw= compass.getY(); MzRaw= compass.getZ(); calibrateSensors(); rollA = atan2(AyCal,sqrt(AzCal*AzCal + AxCal*AxCal))*180/PI; pitchA = atan2(AxCal,sqrt(AzCal*AzCal + AyCal*AyCal))*180/PI; deltaRoll = GxCal*(millis()-tStart)/1000.; deltaPitch = -GyCal*(millis()-tStart)/1000.; deltaYaw = -GzCal*(millis()-tStart)/1000.; tStart = millis(); rollG = rollG + deltaRoll; pitchG = pitchG + deltaPitch; yawG = yawG + deltaYaw; rollC = alpha*(rollA) + (1-alpha)*(rollC+deltaRoll); pitchC = alpha*(pitchA) + (1-alpha)*(pitchC+deltaPitch); rollCrad=rollC*PI/180; pitchCrad=pitchC*PI/180; MxCalH=MxCal*cos(pitchCrad)-MyCal*sin(rollCrad)*sin(pitchCrad)-MzCal*cos(rollCrad)*sin(pitchCrad); MyCalH=MyCal*cos(rollCrad) - MzCal*sin(rollCrad); yawM = atan2(MyCalH,MxCalH)*180./PI; yawM=int(yawM+360)%360; if (abs(yawM-yawC)>=180){ yawC=yawM; } if (abs(yawM-yawC)<180){ yawC = alpha*(yawM) + (1-alpha)*(yawC + deltaYaw); } // Serial.print("yawC:");Serial.print(yawC);Serial.print(','); // Serial.print("yawM:");Serial.print(yawM);Serial.print(','); // Serial.print("yawG:");Serial.print(yawG);Serial.print(','); // Serial.print("LL:");Serial.print(-90);Serial.print(','); // Serial.print("UL:");Serial.println(90); Serial.print("rollC:");Serial.print(rollC);Serial.print(','); Serial.print("pitchC:");Serial.print(pitchC);Serial.print(','); Serial.print("yawC:");Serial.print(yawC);Serial.print(','); Serial.print("LL:");Serial.print(-90);Serial.print(','); Serial.print("UL:");Serial.println(90); dsp.clearDisplay(); dsp.setTextColor(WHITE); dsp.setCursor(0,0); dsp.print("Ultimate Avionics"); dsp.setCursor(0,9); dsp.print("R: "); dsp.print(int(rollC)); dsp.setCursor(40,9); dsp.print("P: ");dsp.print(int(pitchC)); dsp.setCursor(80,9); dsp.print("Y: ");dsp.print(int(yawC)); updateDial(); dsp.display(); delay(100); } |