
Engineering Your Own Local Voice Assistant: No Cloud, No Compromise
Most “smart” voice assistants are just glorified remote controls for someone else’s server. Today, we’re changing that. We are going to build a local, offline voice command pipeline. This isn’t just about saving data; it’s about ownership. When you can control your hardware—like opening and closing a farm gate—without an internet connection, you have built a system that is robust, private, and yours to control forever. Today you are going to get Speech to Text up and running on your NVIDIA Jetson Orin Nano running under Jetpack 7.2.
The “Why” Behind the Setup
You might ask, “Why not just use a cloud API?” Because cloud APIs are fragile. They rely on internet stability, external servers, and privacy-invasive data logging. By running Vosk locally, we keep the processing on your hardware (like the NVIDIA Jetson). It’s faster, it works in the middle of a power-isolated homestead, and it’s 100% secure.
Part 1: Preparing the Environment
Before we can make the machine listen, we have to prepare the battlefield. We aren’t just downloading files; we are setting up a stable environment where your dependencies won’t conflict with your OS.
|
1 2 3 4 5 6 7 8 9 10 11 12 13 14 15 16 17 18 19 20 21 22 23 24 25 26 27 28 |
# Create a dedicated directory so our work stays organized mkdir -p ~/STT cd ~/STT # We need the PortAudio headers. Why? Because Python’s 'pyaudio' is just a wrapper. # Under the hood, it talks to the C-based PortAudio library. If the headers aren't there, # the library won't compile, and your microphone will never wake up. sudo apt update sudo apt install -y portaudio19-dev wget unzip # Download the lightweight, low-latency English model weights from Vosk wget https://alphacephei.com/vosk/models/vosk-model-small-en-us-0.15.zip # Unzip the archive and rename the folder cleanly to 'model' so the Python script finds it unzip vosk-model-small-en-us-0.15.zip mv vosk-model-small-en-us-0.15 model # Clean up the downloaded zip file to keep the folder pristine rm vosk-model-small-en-us-0.15.zip # Setting up a Virtual Environment (venv) is the hallmark of a pro. # It traps our project dependencies inside this folder so we don't break our system Python. python3 -m venv sttVenv source sttVenv/bin/activate pip install --upgrade pip # Vosk does the heavy lifting for speech recognition, and Pyaudio grabs the raw data. pip install vosk pyaudio |
This is IMPORTANT!
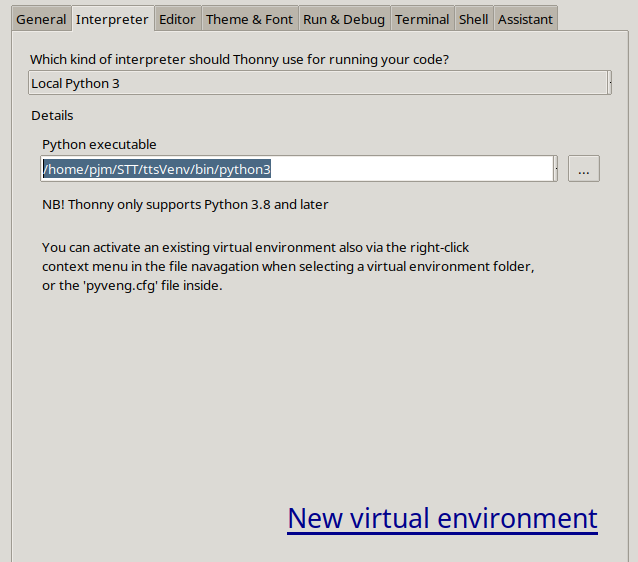
Now you can post the code below. You also have to point Thonny to run in the virtual environment. Open Thonny, and under run – select interpreter. Then you must point it to /home/yourUserName/STT/ttsVenv/bin/python3. For me, my username is pjm, but you put in your user name in path above. Here is what mine looked like:
 Part 2: Solving the PipeWire Challenge
The biggest headache in modern Linux audio is PipeWire. If you try to open a microphone stream using a hardcoded sample rate that doesn’t match your hardware, your program won’t just fail—it will segfault. We use the validation script below to programmatically query the hardware, asking it: “What sample rate are you running at?” before we even try to open a stream.
|
1 2 3 4 5 6 7 8 9 10 11 12 13 14 15 16 17 18 19 20 21 22 23 24 25 26 27 28 29 30 31 32 33 34 35 36 37 38 39 40 41 42 43 44 45 46 47 48 49 50 51 52 53 54 55 56 57 58 59 60 61 62 63 64 65 66 67 68 69 70 71 72 73 74 75 76 77 78 79 80 81 82 83 84 85 86 87 88 89 90 91 92 93 94 95 96 97 98 99 100 101 102 103 104 105 106 107 108 |
# Import the PyAudio library to handle real-time microphone recording and audio stream manipulation. import pyaudio # Import the built-in JSON module to parse the structured text results returned by the speech recognition engine. import json # Import the audioop library to perform real-time mathematical operations and downsampling on raw audio byte data. import audioop # Import the core Vosk objects: Model loads the AI brain/weights, and KaldiRecognizer handles the acoustic processing. from vosk import Model, KaldiRecognizer # Import the standard OS module to reliably build absolute system file paths across different user directories. import os state=None # Define a function to discover the specific hardware index and sample rate of the active system sound server. def get_pipewire_index(): # Instantiate a PyAudio session object to query the operating system's hardware configuration list. p = pyaudio.PyAudio() # Loop through every single available audio device reported by the operating system kernel. for i in range(p.get_device_count()): # Retrieve a descriptive configuration dictionary for the current audio device index. dev = p.get_device_info_by_index(i) # Check if the name of the device contains 'pipewire' to target the modern Linux audio subsystem. if "pipewire" in dev.get('name', '').lower(): # Return the valid device index integer and its hardware default sample rate, converted cleanly to an integer. return i, int(dev.get('defaultSampleRate')) # Return empty values if the loop completes without finding an active PipeWire sound server profile. return None, None # Execute the discovery function to capture both the correct system hardware device index and its native sample rate. dev_index, native_rate = get_pipewire_index() # Check if the hardware discovery handshake failed to locate an active PipeWire audio interface. if dev_index is None: # Alert the user on screen that the script cannot communicate with the system's active audio server layer. print("Error: Could not find 'pipewire' device.") # Stop the script execution immediately since it is impossible to record audio without a valid device hook. exit() # Instantiate a fresh PyAudio session specifically dedicated to opening our incoming recording channel. p = pyaudio.PyAudio() # Open the active system recording stream channel using explicit audio hardware parameter configurations. # PARAMETER MANUAL: # - format=pyaudio.paInt16: Sets 16-bit Signed Integer PCM format. (LEAVE ALONE - required by the Vosk engine). # - channels=1: Sets recording to Mono channel audio. (LEAVE ALONE - Vosk processes single-channel input). # - rate=native_rate: Sets the sample rate to match the mic exactly. (LEAVE ALONE - prevents driver hardware failure). # - input=True: Configures this stream as an audio capture device. (LEAVE ALONE - required to wake up the microphone). # - input_device_index=dev_index: Points to our discovered target device. (LEAVE ALONE - ensures we grab the right mic). # - frames_per_buffer=4096: Controls audio chunk size. (PLAY WITH: Lower values like 2048 reduce latency but risk buffer overflows; higher values like 8192 increase safety but introduce slight latency). stream = p.open(format=pyaudio.paInt16, channels=1, rate=native_rate, input=True, input_device_index=dev_index, frames_per_buffer=4096) # Generate an absolute directory path targeting the exact folder containing your extracted acoustic model weights. # PARAMETER MANUAL: # - "STT", "model": Represents folder names. (PLAY WITH: Change these only if your physical folder layout uses different names). model_path = os.path.join(os.path.expanduser("~"), "STT", "model") # Load the heavy machine learning weights into system memory to initialize the Vosk voice processing brain. model = Model(model_path) # Initialize the primary speech recognizer object using the loaded model weights and target processing frequency. # PARAMETER MANUAL: # - model: The initialized AI brain variable. (LEAVE ALONE). # - 16000: Specifies the target processing sample rate in Hertz. (LEAVE ALONE - Vosk models are mathematically trained for exactly 16000Hz). recognizer = KaldiRecognizer(model, 16000) # Print a status message to the terminal showing that the handshake succeeded and revealing the mic's operating frequency. print(f"Listening on PipeWire at {native_rate}Hz...") # Turn on the hardware recording valve to begin filling up the system input data buffers. stream.start_stream() # Set up an exception safety block to intercept manual user exits gracefully without leaving system resources locked up. try: # Launch the infinite real-time audio capture loop to continuously monitor the microphone stream. while True: # Pull raw binary audio frame bytes directly out of the incoming hardware stream buffer memory block. # PARAMETER MANUAL: # - 4096: The chunk size to read. (LEAVE ALONE - must perfectly match your stream's frames_per_buffer setting). # - exception_on_overflow=False: Prevents Python crashes if the Orin momentarily falls behind. (LEAVE ALONE). data = stream.read(4096, exception_on_overflow=False) # Downsample the raw audio bytes mathematically to 16000Hz using digital filtering algorithms. # PARAMETER MANUAL: # - data: Raw input audio byte string. (LEAVE ALONE). # - 2: Size of sample width in bytes for 16-bit sound. (LEAVE ALONE). # - 1: Input audio channel count. (LEAVE ALONE). # - native_rate: The native frequency of your mic. (LEAVE ALONE). # - 16000: The required downsampled output frequency. (LEAVE ALONE). # - state: The digital filtering conversion state history object. (LEAVE ALONE). # CRITICAL NOTE: The 'state' variable must be initialized as 'state = None' before entering this 'try:' block, # otherwise Python will throw a NameError on the very first loop iteration because 'state' does not exist yet. data_16k, state = audioop.ratecv(data, 2, 1, native_rate, 16000, state) # Feed the processed 16kHz audio data block into Vosk to evaluate if a complete spoken phrase has finished. if recognizer.AcceptWaveform(data_16k): # Parse the structured JSON text string returned by the acoustic model into a standard Python dictionary. res = json.loads(recognizer.Result()) # Check the parsed result dictionary to ensure that the detected text sequence is not completely blank. if res.get("text"): # Cleanly output the decoded text command straight to the standard system terminal display screen. print("Command: "+res['text']) # Intercept the user pressing Ctrl+C in the terminal to stop the continuous script loop cleanly. except KeyboardInterrupt: # Print a clean closing status notification on a new line to confirm the signal was intercepted. print("\nStopped.") # Execute mandatory clean up instructions that are guaranteed to run no matter how the script terminates or crashes. finally: # Turn off the active recording stream data valve to stop pulling raw information from the audio driver layer. stream.stop_stream() # Close the recording stream channel completely to drop the active hardware pointer binding handles. stream.close() # Terminate the parent PyAudio engine instance to release all allocated audio device resources back to the OS. p.terminate() |
Homework: Your Gate Controller
You now have a system that identifies audio input, resamples it to 16kHz, and outputs text. Your assignment: Transform this text output into an action.
I want you to add a conditional statement to the main loop. If the recognized text is “open”, print an ASCII art representation of an open gate. If it’s “close”, print the closed version. This is the first step in closing the loop between your AI and the physical world. Go get ’em, and don’t just copy the code—understand how the data flows from the microphone to your decision logic!