Hey everyone, Paul McWhorter here from TopTechBoy.com. Welcome back to our channel, where we don’t just write abstract software—we build real, physical, intelligent machines. Go ahead and grab yourself a nice hot cup of coffee or a big glass of iced tea, because today we are closing the loop between the digital world of computer vision and the physical world of robotics.
In our last lesson, we successfully taught OpenCV how to find a specific color, isolate the largest shape, and draw a beautiful green bounding box around it. That was great, but it had a massive limitation: if your object moved off the edge of the frame, it was gone forever. The camera just sat there, blind and helpless.
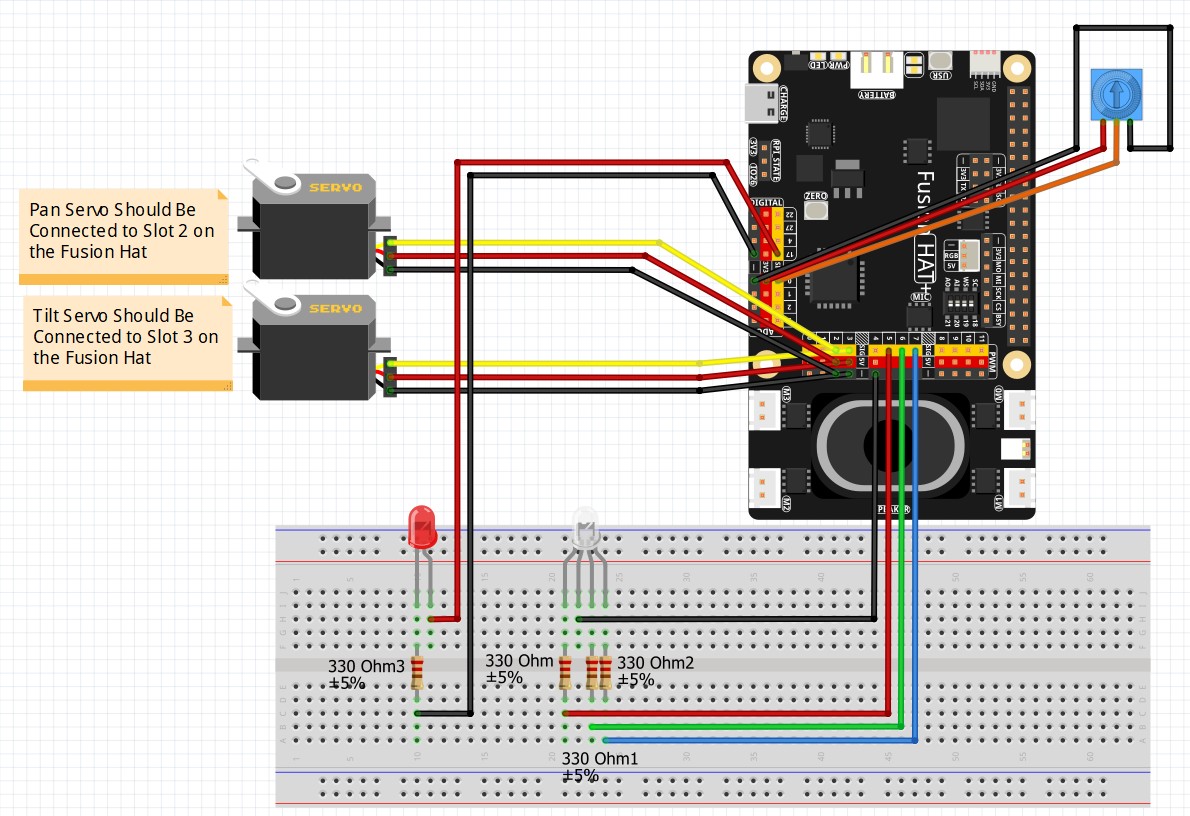
Today, we change that. We are taking that tracking data from our code and using it to command a physical pan-tilt mechanism powered by two servos on our Fusion Hat. By the time we finish today, your camera will physically turn, tilt, and hunt down your object, keeping it locked dead center in the middle of your video feed.
The Big Leap: Closing the Loop
What we are building today is a foundational concept in automation engineering known as a feedback control loop.
Up until now, your camera was an open-loop observer. It saw things, but it couldn’t react physically. To make an autonomous tracking system, we need to implement a simple pipeline:
-
Sense: The camera captures the image frame.
-
Think: OpenCV finds the target object and calculates its position.
-
Act: The script commands the hardware servos to move the camera mount to correct any positioning errors.
The Mathematics of the Target Error
To make a camera track an object, we have to define what “perfect tracking” looks like to a computer. Perfect tracking means the center of our tracked object is sitting exactly at the center of our video frame.
Because we are running our camera at a crisp resolution of 1280×720, the mathematical center of our universe is fixed. We calculate our frame’s horizontal and vertical centers by dividing our dimensions in half. This gives us a permanent anchor point right in the middle of our grid.
When an object appears on screen, our contour detection gives us its bounding box. We calculate the exact center of that box by taking its starting coordinate and adding half of its width and height. Now we have two sets of coordinates:
-
Where we want the object to be (The Frame Center).
-
Where the object actually is (The Box Center).
The difference between where the object is and where it belongs is called the Error Signal. We calculate an X Error and a Y Error by simply subtracting the frame center from the box center.
Managing Jitter with a Control Deadband
If our object is perfectly centered, our Error is zero. If the object moves to the right, the X Error becomes a positive number. If it moves to the left, it becomes a negative number. The same logic applies vertically to our Y Error.
Now, you might think we should tell the servos to move every single time the Error is anything other than zero. But remember what we learned about camera sensors: pixels dance, light fluctuates, and your calculations will always have a tiny amount of natural mathematical noise. If you try to correct for every single fractional pixel change, your servos will constantly buzz, twitch, and jitter themselves to death.
To fix this, we implement an engineering safety margin called a Deadband. In this lesson, we establish a 40-pixel safety zone around the center of the frame.
-
If the object is within 40 pixels of the center, the error is too small to care about, and we tell the servos to sit perfectly still.
-
The moment the object drifts outside that 40-pixel window, our control logic triggers.
If the X Error is greater than 40, we decrement our pan angle by one degree to turn the camera toward the target, pass that new angle to our servo handler, and pause for a tiny fraction of a second (20 milliseconds) to give the mechanical gears time to physically move. If it’s negative, we increment the angle. We apply the exact same behavioral logic to our tilt servo using the Y Error.
Visualizing the System Matrix
To help us calibrate and troubleshoot this system, we overlay clear visual indicators directly onto our live video feed:
-
The Reticle: We draw a solid blue dot directly at our fixed frame center. This acts as our tracking crosshair.
-
The Target: We draw a large red circle directly over the center of our moving object’s bounding box.
When your system is working properly, you can physically watch the machine think. As you move an object around, the red circle moves away from the blue dot, the error threshold trips, the servos kick in, and the camera moves until the red circle swallows the blue dot once again.
Your Homework Assignment
You guys know the drill: watching me build a tracking rig doesn’t make you an automation engineer. You have to write the logic, feel the hardware move, and tune it yourself.
|
1 2 3 4 5 6 7 8 9 10 11 12 13 14 15 16 17 18 19 20 21 22 23 24 25 26 27 28 29 30 31 32 33 34 35 36 37 38 39 40 41 42 43 44 45 46 47 48 49 50 51 52 53 54 55 56 57 58 59 60 61 62 63 64 65 66 67 68 69 70 71 72 73 74 75 76 77 78 79 80 81 82 83 84 85 86 87 88 89 90 91 92 93 94 95 96 97 98 99 100 101 102 103 104 105 106 107 108 109 110 111 112 113 114 115 116 117 118 119 120 121 122 123 124 125 126 127 128 129 130 131 132 133 134 135 136 137 138 139 140 141 142 143 144 145 146 147 148 149 150 151 152 153 |
import cv2 import time from picamera2 import Picamera2 from fusion_hat.pwm import PWM from fusion_hat.servo import Servo panPin = 2 tiltPin = 3 panServo = Servo(panPin) tiltServo = Servo(tiltPin) panAngle = 0 tiltAngle = 0 panServo.angle(panAngle) tiltServo.angle(tiltAngle) piCam = Picamera2() W=1280 H=720 tStart = time.time() fps = 0 xFrameC = int((W-1)/2) yFrameC = int((H-1)/2) xBoxC = xFrameC yBoxC = yFrameC redPin = 5 greenPin = 6 bluePin = 7 redLED = PWM(redPin) greenLED = PWM(greenPin) blueLED = PWM(bluePin) RES = (W,H) piCam.preview_configuration.main.size = RES piCam.preview_configuration.main.format = "RGB888" piCam.preview_configuration.controls.FrameRate=60 piCam.preview_configuration.align() piCam.configure("preview") piCam.start() textLowerLeft = (int(W*.01),int(H*.06)) fontFace = cv2.FONT_HERSHEY_SIMPLEX fontThickness = int(W/425) fontScale = H*.0015 fontColor = (0,0,255) xPos = 0 textLowerLeft1 = (int(W*.01),int(H*.06)*2) textLowerLeft2 = (int(W*.01),int(H*.06)*3) yPos = 0 valR = 0 valG = 0 valB = 0 Hue = 0 Sat = 0 Val = 0 LC = (25,100,90) UC = (35,255,255) frame = None def mouseAction(event, x, y, flags, param): global frame, xPos, yPos, Hue, Sat, Val if event == 0: xPos = x yPos = y if frame is not None: valB, valG, valR = frame[y,x] redLED.pulse_width_percent(int(valR/255*100)) greenLED.pulse_width_percent(int(valG/255*100/2)) blueLED.pulse_width_percent(int(valB/255*100/4)) frameHSV = cv2.cvtColor(frame,cv2.COLOR_BGR2HSV) Hue, Sat, Val =frameHSV[y,x] cv2.namedWindow('Camera',cv2.WINDOW_GUI_NORMAL) cv2.moveWindow('Camera',0,65) cv2.resizeWindow('Camera',W,H) cv2.namedWindow('Mask',cv2.WINDOW_GUI_NORMAL) cv2.moveWindow('Mask',W,65) cv2.resizeWindow('Mask',int(W/2),int(H/2)) cv2.namedWindow('Composite',cv2.WINDOW_GUI_NORMAL) cv2.moveWindow('Composite',W,65+int(H/2)+25) cv2.resizeWindow('Composite',int(W/2),int(H/2)) cv2.setMouseCallback('Camera',mouseAction) while True: deltaT = time.time() - tStart tStart=time.time() fps = fps*.95 + (1/deltaT)*.05 frame= piCam.capture_array() frame=cv2.flip(frame,-1) frameHSV = cv2.cvtColor(frame,cv2.COLOR_BGR2HSV) mask=cv2.inRange(frameHSV,LC,UC) composite = cv2.bitwise_and(frame, frame, mask=mask) contours, _ =cv2.findContours(mask,cv2.RETR_EXTERNAL,cv2.CHAIN_APPROX_SIMPLE) if contours: #cv2.drawContours(frame,contours,-1,(255,0,0),3) largestContour = max(contours, key = cv2.contourArea) area = cv2.contourArea(largestContour) if area>100: #cv2.drawContours(frame,largestContour,-1,(255,0,0),3) x, y, w, h = cv2.boundingRect(largestContour) cv2.rectangle(frame, (x,y),(x+w,y+h),(0,255,0),3) xBoxC = x + int(w/2) yBoxC = y + int(h/2) xError = xBoxC - xFrameC yError = yBoxC - yFrameC cv2.circle(frame,(xFrameC,yFrameC),10,(255,0,0),-1) cv2.circle(frame,(xBoxC,yBoxC), 40,(0,0,255),3) if abs(xError) >40: if xError >0: panAngle = panAngle -1 panServo.angle(panAngle) time.sleep(.02) if xError <0: panAngle = panAngle + 1 panServo.angle(panAngle) time.sleep(.02) if abs(yError) >40: if yError >0: tiltAngle = tiltAngle +1 tiltServo.angle(tiltAngle) time.sleep(.02) if yError <0: tiltAngle = tiltAngle - 1 tiltServo.angle(tiltAngle) time.sleep(.02) myText = "FPS: "+str(round(fps,1)) cv2.putText(frame,myText,textLowerLeft,fontFace,fontScale,fontColor,fontThickness) text1 = "Mouse Pos: "+str((xPos,yPos)) text2 = "Pixel Color: "+str((Hue,Sat,Val)) cv2.putText(frame,text1,textLowerLeft1,fontFace,fontScale,fontColor,fontThickness) cv2.putText(frame,text2,textLowerLeft2,fontFace,fontScale,fontColor,fontThickness) cv2.imshow("Camera", frame) cv2.imshow("Composite",composite) cv2.imshow("Mask",mask) if cv2.waitKey(1)==ord('q'): break cv2.destroyAllWindows() redLED.pulse_width_percent(0) greenLED.pulse_width_percent(0) blueLED.pulse_width_percent(0) print('Program Terminated') |
Here is your homework challenge for Lesson 28: Right now, our tracking logic uses what is called an incremental step controller. No matter how far away the object is from the center, the camera always moves at the exact same speed—one lazy degree at a time. If you move your target slowly, the camera keeps up. If you snap your target quickly across the room, the camera falls behind and loses it because it can’t accelerate.
Your assignment is to upgrade this control loop. Instead of stepping by a hardcoded value of 1, I want you to make the servo adjustment step proportional to the size of the error. If the object is close to the center, it should move gently by a fraction of a degree. If the object takes off like a rocket and creates a massive error signal, the camera should aggressively throw the servos open to catch up instantly.
Get your proportional tracking loops tuned, shoot a video showing your camera tracking a fast-moving object smoothly, upload it to YouTube, and share your link down in the comments below. See you guys in the next lesson!