In this Video Lesson we show how to calibrate a joystick to report Angular Position. We do this using MicroPython on a Raspberry Pi Pico W. For your convenience, the code is included below.
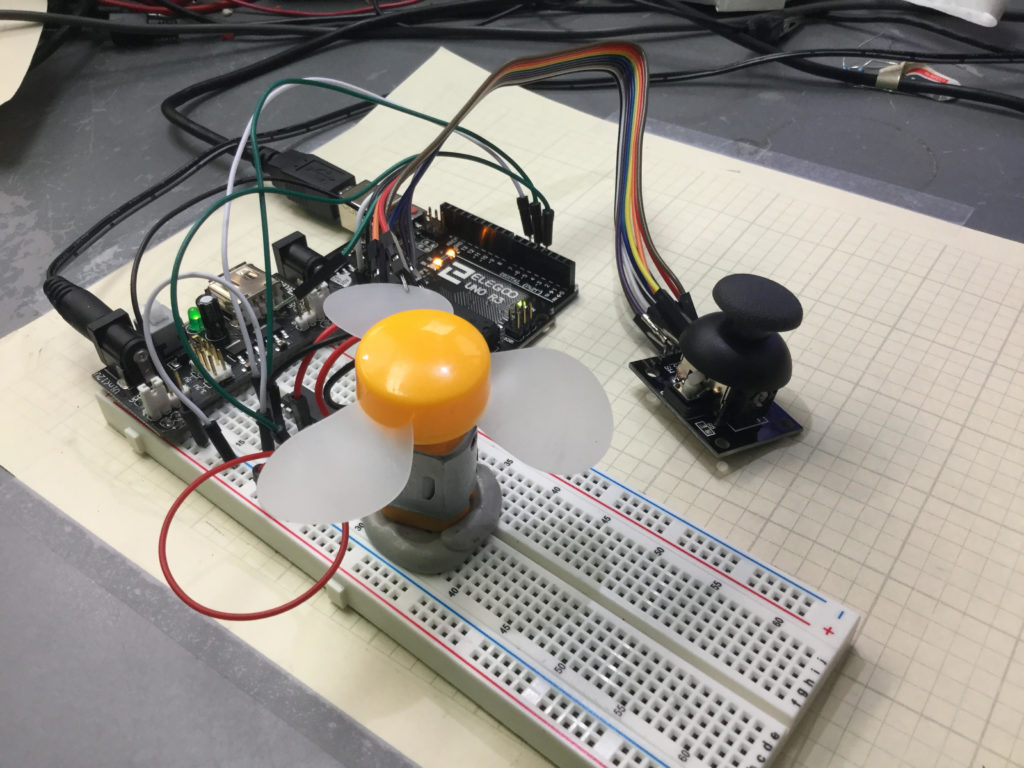
This is a simple example of how to control speed and direction of a DC motor with a joystick.
Lesson 37 and 38 showed some preliminary concepts in controlling a DC motor using an arduino and the L293D motor controller. In the video above we show how to control the speed and direction of a simple DC motor using a joystick. In the neutral position, the motor is stationary. Then the speed smoothly increases as you move the joystick forward, until you reach maximum speed.
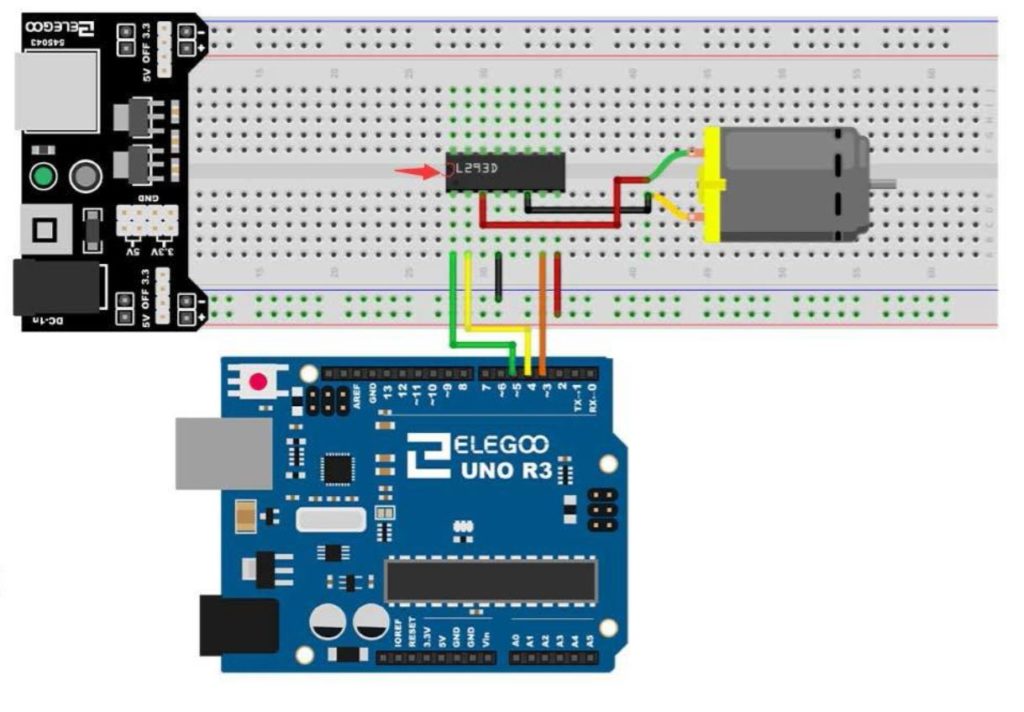
Lesson 37 and 38 showed some preliminary concepts in controlling a DC motor using an arduino and the L293D motor controller. In the video above we show how to control the speed and direction of a simple DC motor using a joystick. In the neutral position, the motor is stationary. Then the speed smoothly increases as you move the joystick forward, until you reach maximum speed. Similarly, in pulling the joystick back from the neutral position, the motor gradually increases speed in the reverse direction. The diagram below shows the basic motor control schematic we are working from.
Connection Diagram for a DC Motor Controller using the L293 Control Chip
In the circuit diagram above, we also add a wire to connect the arduino ground to the power supply ground. It is always good to have all components connected to a common ground rail. Of course, you also need to add the joystick controller as shown in the video.
This is the code we used in this
Arduino
1
2
3
4
5
6
7
8
9
10
11
12
13
14
15
16
17
18
19
20
21
22
23
24
25
26
27
28
29
30
31
32
33
34
35
intspeedPin=5;
intdir1=4;
intdir2=3;
intmSpeed;
intjPin=A1;
intjVal;
voidsetup(){
// put your setup code here, to run once:
pinMode(speedPin,OUTPUT);
pinMode(dir1,OUTPUT);
pinMode(dir2,OUTPUT);
pinMode(jPin,INPUT);
Serial.begin(9600);
}
voidloop(){
// put your main code here, to run repeatedly:
jVal=analogRead(jPin);
Serial.println(jVal);
if(jVal<512){
digitalWrite(dir1,LOW);
digitalWrite(dir2,HIGH);
mSpeed=-255./512.*jVal+255.;
analogWrite(speedPin,mSpeed);
}
if(jVal>=512){
digitalWrite(dir1,HIGH);
digitalWrite(dir2,LOW);
mSpeed=(255./512.)*jVal-255.;
analogWrite(speedPin,mSpeed);
}
}
An official Arduino Uno R3 is available HERE. In this new series of lessons, I will be using the sensor and other components found in this KIT.
In this lesson we show you how to precisely control the position of two servos using a joystick. We derive the math equations which will allow you to get smooth and precise control of the servo. We also add a buzzer to the project to create an audible alarm when the button the joystick is pressed.
If you want to follow along at home, an official Arduino Uno R3 is available HERE. In this new series of lessons, I will be using the sensor and other components found in this KIT.
Typically, the servos in electronics kits are not the best ones, but are suitable to learn with. If you want a more stable and better quality servo, this is the one I user in more of my projects: HiTEC
In this lesson we will explain how to hook up a Joystick. The easiest way to think of a joystick is to think of it as two independent potentiometer. Moving the joystick left and right changes one potentiometer, and moving the joystick up and down changes the other potentiometer. Also, pressing the knob on the joystick will activate a simple on/off switch. In this video we show you how to hook the joystick up, and then show you code that will allow you to read from the potentiometers and the switch.
If you want to follow along at home, an official Arduino Uno R3 is available HERE. In this new series of lessons, I will be using the sensor and other components found in this KIT.
Typically, the servos in electronics kits are not the best ones, but are suitable to learn with. Heads up that in Lesson 33 we will be using a joystick to control two servos. If you want to get ready for that lesson, go ahead and order your HiTEC Servos.
This is the code that we developed in the video above.
Arduino
1
2
3
4
5
6
7
8
9
10
11
12
13
14
15
16
17
18
19
20
21
22
23
24
25
26
27
28
intXpin=A0;
intYpin=A1;
intSpin=2;
intXval;
intYval;
intSval;
intdt=200;
voidsetup(){
// put your setup code here, to run once:
Serial.begin(9600);
pinMode(Xpin,INPUT);
pinMode(Ypin,INPUT);
pinMode(Spin,INPUT);
digitalWrite(Spin,HIGH);
}
voidloop(){
Xval=analogRead(Xpin);
Yval=analogRead(Ypin);
Sval=digitalRead(Spin);
delay(dt);
Serial.print("X Value = ");
Serial.print(Xval);
Serial.print(" Y Value = ");
Serial.print(Yval);
Serial.print(" Switch State is ");
Serial.println(Sval);
}
Making The World a Better Place One High Tech Project at a Time. Enjoy!
We use cookies to ensure that we give you the best experience on our website. If you continue to use this site we will assume that you are happy with it.