In this lesson we show how to write modular code in micropython. We demonstrate this with a simple example of how to calculate parameters of interest for a given rectangle. For your convenience, the code developed in the video is presented below. Enjoy!
Python
1
2
3
4
5
6
7
8
9
10
11
12
13
14
15
16
17
18
19
20
21
22
23
24
25
26
27
28
defrectSolve(len,wid):
#global area,perimeter,diagonal
area=rectArea(len,wid)
perimeter=rectPerimeter(len,wid)
diagonal=rectDiagonal(len,wid)
returnarea,perimeter,diagonal
defrectArea(len,wid):
area=len*wid
returnarea
defrectPerimeter(len,wid):
perimeter=2*len+2*wid
returnperimeter
defrectDiagonal(len,wid):
diag=(len**2+wid**2)**(1/2)
returndiag
whileTrue:
l=float(input("What is Length of your Rectangle? "))
w=float(input("what is the Width of your Rectuangle? "))
In this Video Lesson we show how to calibrate a joystick to report Angular Position. We do this using MicroPython on a Raspberry Pi Pico W. For your convenience, the code is included below.
In this lesson we show how to get intuitive calibrated results from a joystick, connected to a Raspberry Pi Pico W, using microPython. This lesson will make it easy to incorporate a joystick into Pico W projects.
For your convenience, the code we develop in the video above is included below.
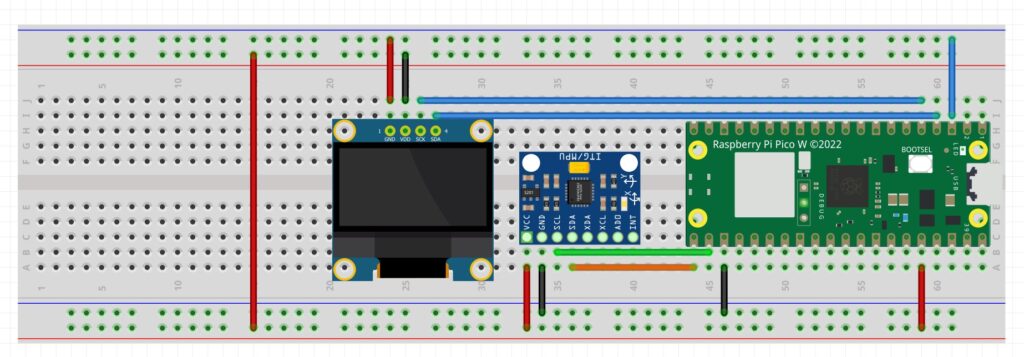
In this video lesson I show you how to remove long term steady state error from the tilt values calculated from the MPU6050 IMU. We are using the following schematic for our prototype.
Schematic for Creating a Tilt Meter
For your convenience, this is the code we developed in the video.
In this video lesson we show how to create a complimentary filter such we get pitch and roll data from the MPU6050 which is quick and responsive, accurate, and low noise. We are using the following schematic: