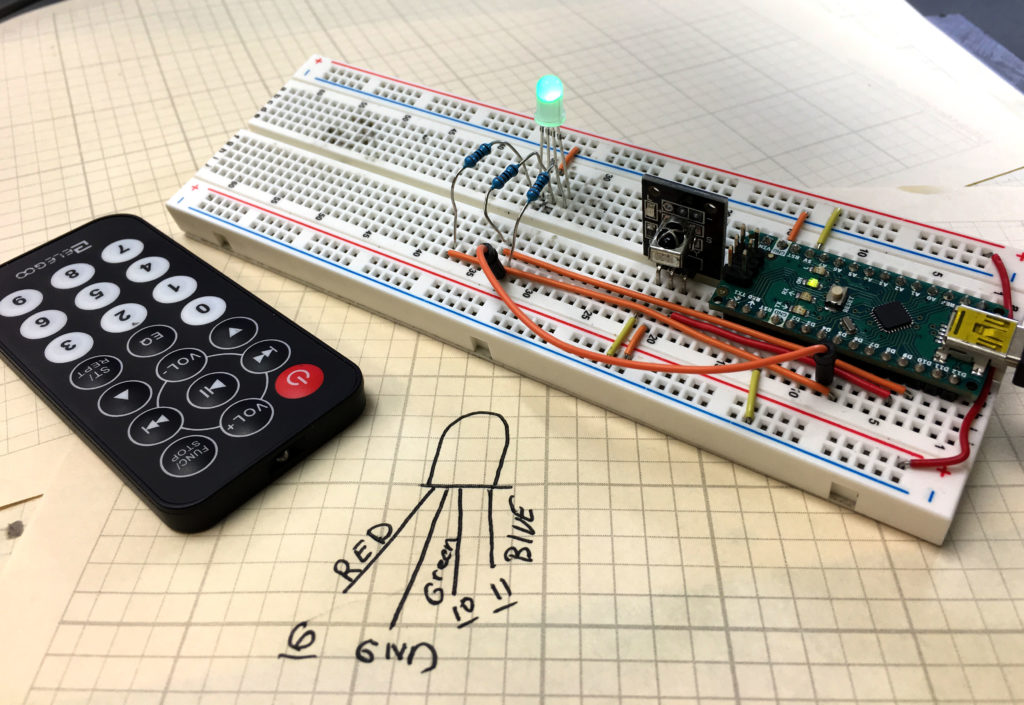
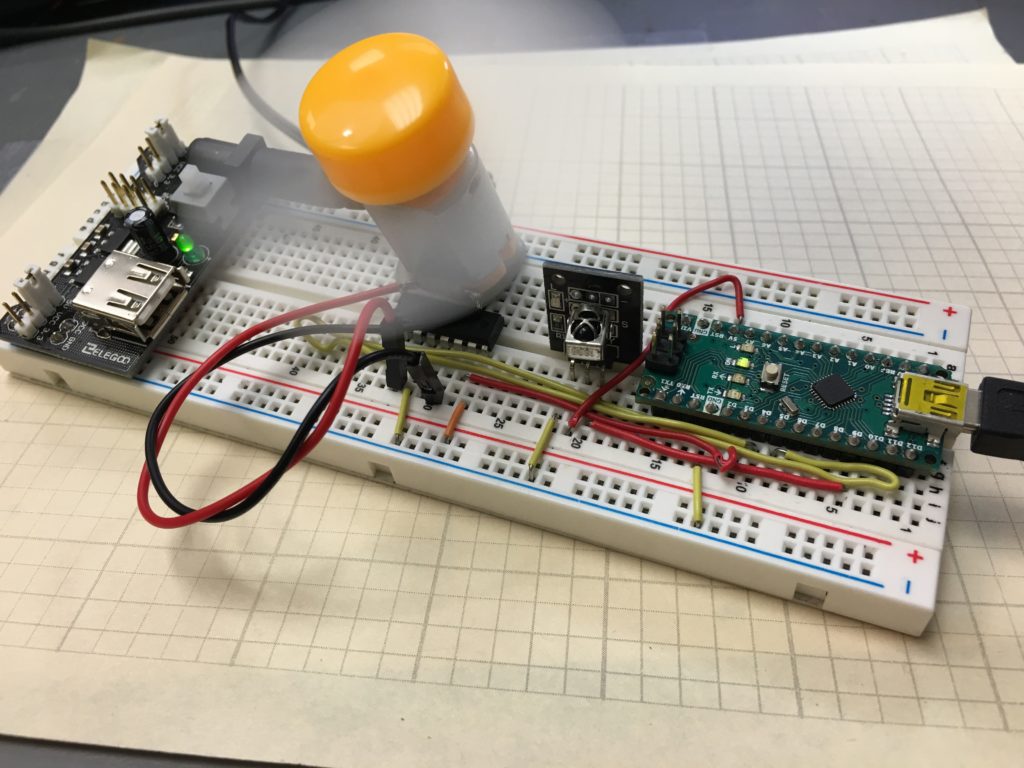
This is a quick lesson where we show you how to install Python on a Windows 10 machine. We have gone about as far as we can go on our 9-axis IMU project using only the arduino. What we want to do now is to pass the data we are taking from arduino to Python, and then use python to do animations and 3D renderings. So, to move forward, we will need to install Python, which is explained in the video.
Category Archives: Arduino
Arduino Tutorial 33: Understanding How to Control Servos with a Joystick
In this lesson we show you how to precisely control the position of two servos using a joystick. We derive the math equations which will allow you to get smooth and precise control of the servo. We also add a buzzer to the project to create an audible alarm when the button the joystick is pressed.
If you want to follow along at home, you can order the Arduino Kit we are using HERE.
Typically, the servos in electronics kits are not the best ones, but are suitable to learn with. If you want a more stable and better quality servo, this is the one I user in more of my projects: HiTEC
Below is the code we developed in this project.
1 2 3 4 5 6 7 8 9 10 11 12 13 14 15 16 17 18 19 20 21 22 23 24 25 26 27 28 29 30 31 32 33 34 35 36 37 38 39 40 41 42 43 44 45 46 47 48 49 50 51 52 53 54 55 56 57 58 59 60 | #include <Servo.h> Servo Xservo; Servo Yservo; int Xpin=A0; int Ypin=A1; int Spin=2; int XSpin=9; int YSpin=10; int buzzPin=7; int WVx; int WVy; int Xval; int Yval; int Sval; int dt=200; void setup() { // put your setup code here, to run once: Serial.begin(9600); pinMode(Xpin,INPUT); pinMode(Ypin,INPUT); pinMode(Spin,INPUT); pinMode(XSpin,OUTPUT); pinMode(YSpin,OUTPUT); pinMode(buzzPin,OUTPUT); Xservo.attach(XSpin); Yservo.attach(YSpin); digitalWrite(Spin,HIGH); } void loop() { Xval=analogRead(Xpin); WVx=(180./1023.)*Xval; Yval=analogRead(Ypin); WVy=(180./1023.)*Yval; Sval=digitalRead(Spin); Xservo.write(WVx); Yservo.write(WVy); if (Sval==0){ digitalWrite(buzzPin, HIGH); } else { digitalWrite(buzzPin, LOW); } delay(dt); Serial.print("X Value = "); Serial.print(Xval); Serial.print(" Y Value = "); Serial.print(Yval); Serial.print(" Switch State is "); Serial.println(Sval); } |
9-Axis IMU LESSON 10: Making a Tilt Compensated Compass with Arduino
In this lesson we show you how to build a demo tilt compensated compass using the BNO055 9-axis sensor. We go through some trigonometry to help you understand conceptually how the device works.
To play along at home, you will need an Arduino Nano, and an Adafruit BNO055 Inertial Measurement Sensor.
The code below is provided for your convenience. It is intended only for bench top demos, and should not be used in real applications. Just for fun, not for drones, or other actual control applications.
1 2 3 4 5 6 7 8 9 10 11 12 13 14 15 16 17 18 19 20 21 22 23 24 25 26 27 28 29 30 31 32 33 34 35 36 37 38 39 40 41 42 43 44 45 46 47 48 49 50 51 52 53 54 55 56 57 58 59 60 61 62 63 64 65 66 67 68 69 70 71 72 73 74 75 76 77 78 79 80 81 82 83 84 85 86 87 88 89 90 91 92 93 94 95 96 97 98 99 100 101 102 103 104 105 106 107 108 | #include <Wire.h> #include <Adafruit_Sensor.h> #include <Adafruit_BNO055.h> #include <utility/imumaths.h> #include <math.h> float thetaM; float phiM; float thetaFold=0; float thetaFnew; float phiFold=0; float phiFnew; float thetaG=0; float phiG=0; float theta; float phi; float thetaRad; float phiRad; float Xm; float Ym; float psi; float dt; unsigned long millisOld; #define BNO055_SAMPLERATE_DELAY_MS (100) Adafruit_BNO055 myIMU = Adafruit_BNO055(); void setup() { // put your setup code here, to run once: Serial.begin(115200); myIMU.begin(); delay(1000); int8_t temp=myIMU.getTemp(); myIMU.setExtCrystalUse(true); millisOld=millis(); } void loop() { // put your main code here, to run repeatedly: uint8_t system, gyro, accel, mg = 0; myIMU.getCalibration(&system, &gyro, &accel, &mg); imu::Vector<3> acc =myIMU.getVector(Adafruit_BNO055::VECTOR_ACCELEROMETER); imu::Vector<3> gyr =myIMU.getVector(Adafruit_BNO055::VECTOR_GYROSCOPE); imu::Vector<3> mag =myIMU.getVector(Adafruit_BNO055::VECTOR_MAGNETOMETER); thetaM=-atan2(acc.x()/9.8,acc.z()/9.8)/2/3.141592654*360; phiM=-atan2(acc.y()/9.8,acc.z()/9.8)/2/3.141592654*360; phiFnew=.95*phiFold+.05*phiM; thetaFnew=.95*thetaFold+.05*thetaM; dt=(millis()-millisOld)/1000.; millisOld=millis(); theta=(theta+gyr.y()*dt)*.95+thetaM*.05; phi=(phi-gyr.x()*dt)*.95+ phiM*.05; thetaG=thetaG+gyr.y()*dt; phiG=phiG-gyr.x()*dt; phiRad=phi/360*(2*3.14); thetaRad=theta/360*(2*3.14); Xm=mag.x()*cos(thetaRad)-mag.y()*sin(phiRad)*sin(thetaRad)+mag.z()*cos(phiRad)*sin(thetaRad); Ym=mag.y()*cos(phiRad)+mag.z()*sin(phiRad); psi=atan2(Ym,Xm)/(2*3.14)*360; Serial.print(acc.x()/9.8); Serial.print(","); Serial.print(acc.y()/9.8); Serial.print(","); Serial.print(acc.z()/9.8); Serial.print(","); Serial.print(accel); Serial.print(","); Serial.print(gyro); Serial.print(","); Serial.print(mg); Serial.print(","); Serial.print(system); Serial.print(","); Serial.print(thetaM); Serial.print(","); Serial.print(phiM); Serial.print(","); Serial.print(thetaFnew); Serial.print(","); Serial.print(phiFnew); Serial.print(","); Serial.print(thetaG); Serial.print(","); Serial.print(phiG); Serial.print(","); Serial.print(theta); Serial.print(","); Serial.print(phi); Serial.print(","); Serial.println(psi); phiFold=phiFnew; thetaFold=thetaFnew; delay(BNO055_SAMPLERATE_DELAY_MS); } |
Arduino Tutorial 32: Understanding and Using Joysticks in a Project
In this lesson we will explain how to hook up a Joystick. The easiest way to think of a joystick is to think of it as two independent potentiometer. Moving the joystick left and right changes one potentiometer, and moving the joystick up and down changes the other potentiometer. Also, pressing the knob on the joystick will activate a simple on/off switch. In this video we show you how to hook the joystick up, and then show you code that will allow you to read from the potentiometers and the switch.
If you want to follow along at home, you can order the Arduino Kit we are using HERE.
Typically, the servos in electronics kits are not the best ones, but are suitable to learn with. Heads up that in Lesson 33 we will be using a joystick to control two servos. If you want to get ready for that lesson, go ahead and order your HiTEC Servos.
This is the code that we developed in the video above.
1 2 3 4 5 6 7 8 9 10 11 12 13 14 15 16 17 18 19 20 21 22 23 24 25 26 27 28 | int Xpin=A0; int Ypin=A1; int Spin=2; int Xval; int Yval; int Sval; int dt=200; void setup() { // put your setup code here, to run once: Serial.begin(9600); pinMode(Xpin,INPUT); pinMode(Ypin,INPUT); pinMode(Spin,INPUT); digitalWrite(Spin,HIGH); } void loop() { Xval=analogRead(Xpin); Yval=analogRead(Ypin); Sval=digitalRead(Spin); delay(dt); Serial.print("X Value = "); Serial.print(Xval); Serial.print(" Y Value = "); Serial.print(Yval); Serial.print(" Switch State is "); Serial.println(Sval); } |
9-Axis IMU LESSON 9: Accurate and Stable Tilt Using Accelerometers, Gyros and a Complimentary Filter
In this lesson we show how a complimentary filter can be used to create the best of both worlds in approximating tilt from data coming from the accelerometers and gyros. The goal of our complimentary filter is to weight our overall result to take advantage the short term accuracy of the gyro measurement, and combine it with the long term stability of the accelerometer. In effect the combination is applying a high pass filter to the gyro and a low pass filter to the accelerometer. Remember that the angles are approximate, and were developed assuming roll and pitch stay under 45 degrees. The trigonometry becomes more difficult when considering higher tilt angles.
To play along at home, you will need an Arduino Nano, and an Adafruit BNO055 Inertial Measurement Sensor.
The code below is for demo purposes only, and should not be used in any real applications. It just demonstrates how a complimentary filter works. Of course, any real systems need to go into much more depth than the simple demo project below.
1 2 3 4 5 6 7 8 9 10 11 12 13 14 15 16 17 18 19 20 21 22 23 24 25 26 27 28 29 30 31 32 33 34 35 36 37 38 39 40 41 42 43 44 45 46 47 48 49 50 51 52 53 54 55 56 57 58 59 60 61 62 63 64 65 66 67 68 69 70 71 72 73 74 75 76 77 78 79 80 81 82 83 84 85 86 87 88 89 90 91 | #include <Wire.h> #include <Adafruit_Sensor.h> #include <Adafruit_BNO055.h> #include <utility/imumaths.h> #include <math.h> float thetaM; float phiM; float thetaFold=0; float thetaFnew; float phiFold=0; float phiFnew; float thetaG=0; float phiG=0; float theta; float phi; float dt; unsigned long millisOld; #define BNO055_SAMPLERATE_DELAY_MS (100) Adafruit_BNO055 myIMU = Adafruit_BNO055(); void setup() { // put your setup code here, to run once: Serial.begin(115200); myIMU.begin(); delay(1000); int8_t temp=myIMU.getTemp(); myIMU.setExtCrystalUse(true); millisOld=millis(); } void loop() { // put your main code here, to run repeatedly: uint8_t system, gyro, accel, mg = 0; myIMU.getCalibration(&system, &gyro, &accel, &mg); imu::Vector<3> acc =myIMU.getVector(Adafruit_BNO055::VECTOR_ACCELEROMETER); imu::Vector<3> gyr =myIMU.getVector(Adafruit_BNO055::VECTOR_GYROSCOPE); thetaM=-atan2(acc.x()/9.8,acc.z()/9.8)/2/3.141592654*360; phiM=-atan2(acc.y()/9.8,acc.z()/9.8)/2/3.141592654*360; phiFnew=.95*phiFold+.05*phiM; thetaFnew=.95*thetaFold+.05*thetaM; dt=(millis()-millisOld)/1000.; millisOld=millis(); theta=(theta+gyr.y()*dt)*.95+thetaM*.05; phi=(phi-gyr.x()*dt)*.95+ phiM*.05; thetaG=thetaG+gyr.y()*dt; phiG=phiG-gyr.x()*dt; Serial.print(acc.x()/9.8); Serial.print(","); Serial.print(acc.y()/9.8); Serial.print(","); Serial.print(acc.z()/9.8); Serial.print(","); Serial.print(accel); Serial.print(","); Serial.print(gyro); Serial.print(","); Serial.print(mg); Serial.print(","); Serial.print(system); Serial.print(","); Serial.print(thetaM); Serial.print(","); Serial.print(phiM); Serial.print(","); Serial.print(thetaFnew); Serial.print(","); Serial.print(phiFnew); Serial.print(","); Serial.print(thetaG); Serial.print(","); Serial.print(phiG); Serial.print(","); Serial.print(theta); Serial.print(","); Serial.println(phi); phiFold=phiFnew; thetaFold=thetaFnew; delay(BNO055_SAMPLERATE_DELAY_MS); } |