
In today’s video we show how to run your GPS tracker remotely by saving the program as main.py, and powering from the Sunfounder Breadvolt power supply. We also show how to prevent the problem of main.py locking up the serial port. We do this by adding a ‘kill switch’, that terminates the main.py program, so the log file can be transferred to your PC.
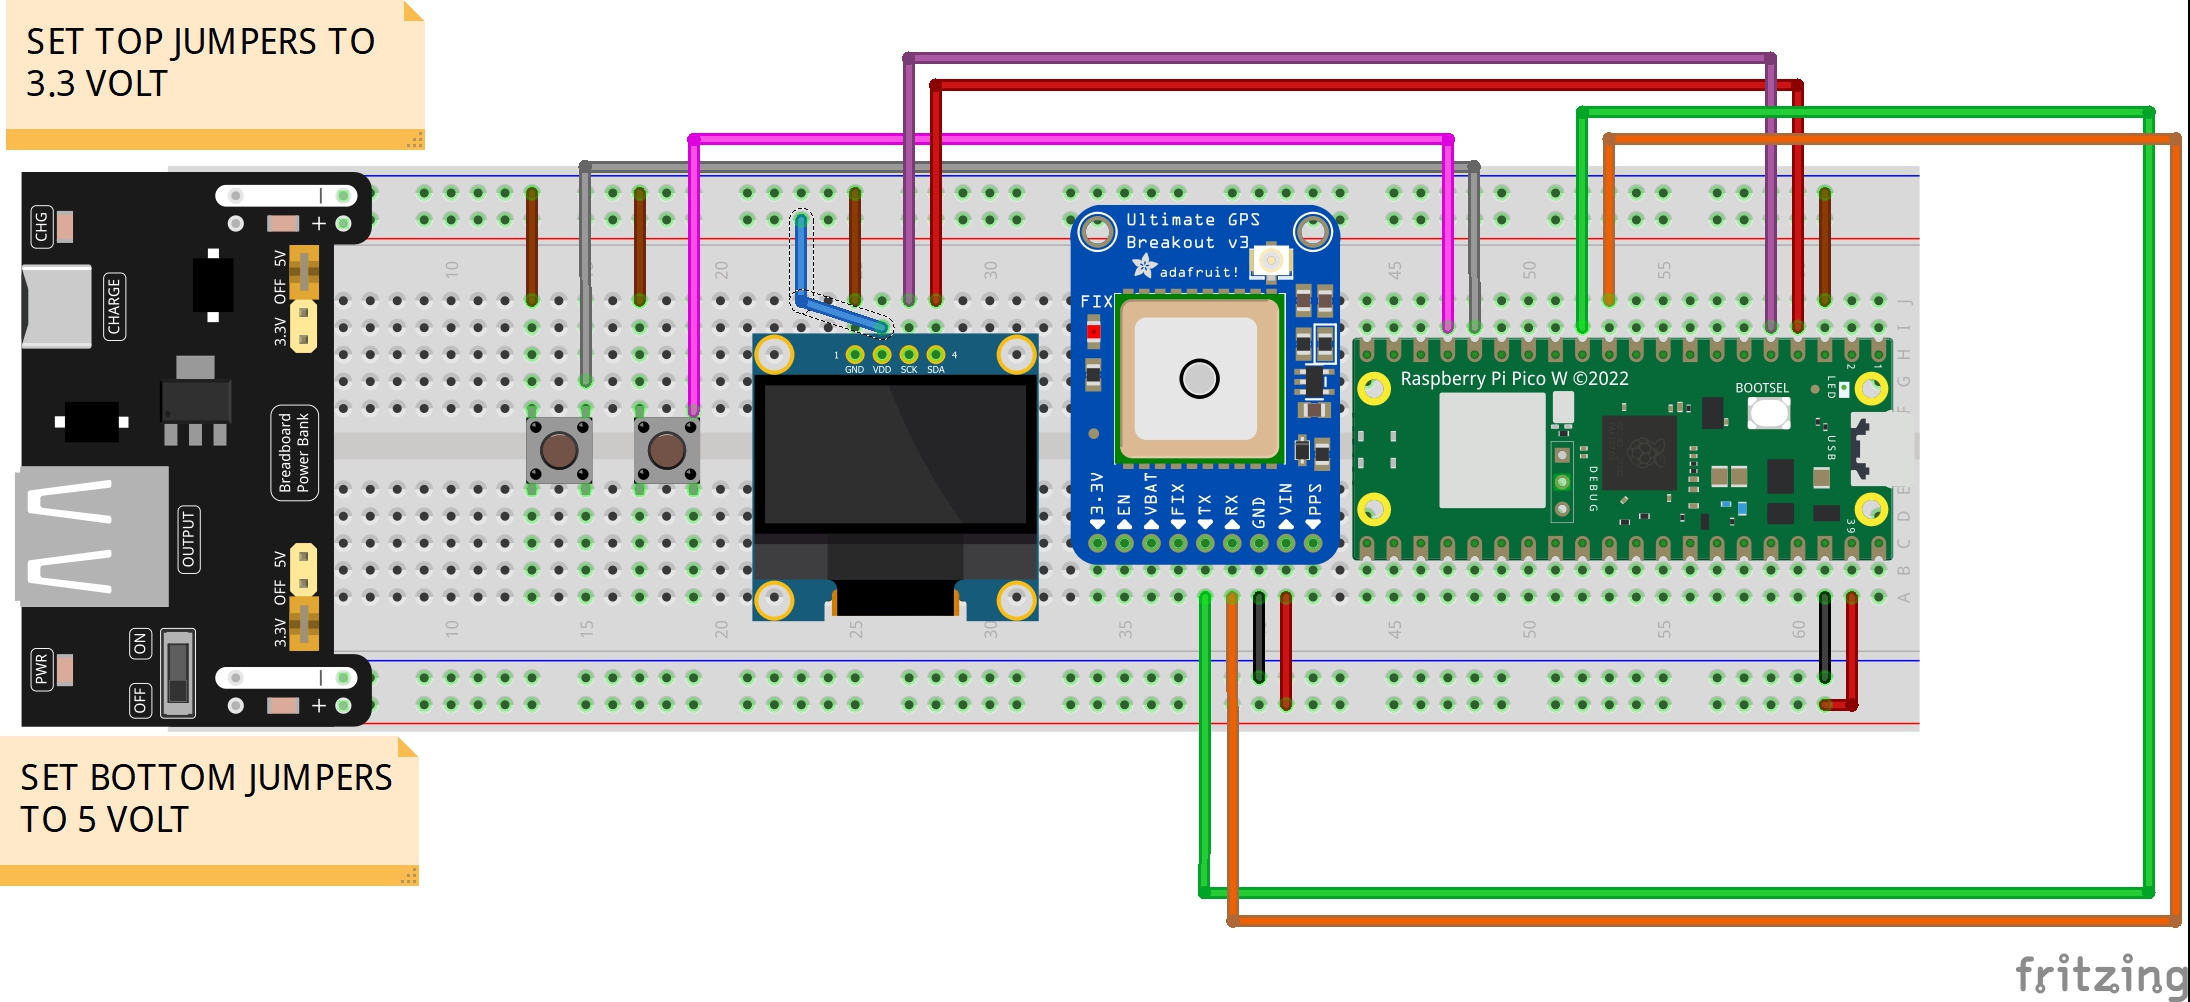
This is the schematic used for today’s lesson.
For your convenience, this is the code we developed in today’s video.
1 2 3 4 5 6 7 8 9 10 11 12 13 14 15 16 17 18 19 20 21 22 23 24 25 26 27 28 29 30 31 32 33 34 35 36 37 38 39 40 41 42 43 44 45 46 47 48 49 50 51 52 53 54 55 56 57 58 59 60 61 62 63 64 65 66 67 68 69 70 71 72 73 74 75 76 77 78 79 80 81 82 83 84 85 86 87 88 89 90 91 92 93 94 95 96 97 98 99 100 101 102 103 104 105 106 107 108 109 110 111 112 113 114 115 116 117 118 119 120 121 122 123 124 125 126 127 128 129 130 131 132 133 134 135 136 137 138 139 140 141 142 143 144 145 146 147 148 149 150 151 152 153 154 155 156 157 158 159 160 161 162 163 164 165 166 167 168 169 170 171 172 173 174 175 176 177 178 179 180 181 182 183 184 185 186 187 188 189 190 191 192 193 194 195 196 197 198 199 200 201 202 203 204 205 206 207 208 209 210 211 212 213 214 215 216 217 218 219 220 221 222 223 224 225 226 227 228 229 230 231 232 233 234 235 236 237 238 239 240 241 242 243 244 245 246 247 248 249 250 251 252 253 254 255 256 257 258 259 260 261 262 263 264 265 266 267 268 269 270 271 272 273 274 275 276 277 278 279 280 281 282 283 284 285 286 287 288 289 290 291 292 293 294 295 296 297 298 299 300 301 302 303 304 305 306 307 308 309 310 311 312 313 314 315 316 317 318 319 320 321 322 | from machine import Pin,I2C,UART import time import _thread from ssd1306 import SSD1306_I2C import math import sys i2c2 = I2C(1, sda=Pin(2), scl=Pin(3), freq=400000) dsp = SSD1306_I2C(128,64,i2c2) butOnePin = 12 butOne = Pin(butOnePin, Pin.IN, Pin.PULL_UP) butOneUp = 0 butOneDown = 0 butOneOld = 1 tStart=time.time() try: while time.time()-tStart<5: dsp.fill(0) dsp.text("Ultimate GPS",0,0) dsp.text("Press Button",0,26) dsp.text("To Cleanly",0,36) dsp.text("Quit",0,46) dsp.show() butOneValue = butOne.value() if butOneValue==0: dsp.fill(0) dsp.text("Ending",0,0) dsp.show() time.sleep(1) x=1/0 with open('log.txt', 'w') as file: # Open log.txt in write mode ('w') pass utcCorrect = 3 earthRadius = 6371000 sysState = 0 dataLock = _thread.allocate_lock() keepRunning = True GPS = UART(1, baudrate=9600, tx=machine.Pin(8), rx=machine.Pin(9)) # Reset GPS GPS.write(b'$PMTK314,-1*04\r\n') #The following line ensures that the GPS reports the GPVTG NMEA Sentence GPS.write(b"$PMTK314,0,1,1,1,1,1,1,0,0,0,0,0,0,0,0,0,0,0,0*28\r\n") NMEAdata = { 'GPGGA' : "", 'GPGSA' : "", 'GPRMC' : "", 'GPVTG' : "" } GPSdata = { 'latDD' : 0, 'lonDD' : 0, 'heading' : 0, 'fix' : False, 'sats' : 0, 'knots' : 0, 'time' : '00:00:00', 'date' : '00/00/0000', 'alt' : 0.0 } def calculateDistance(lat1,lon1,lat2,lon2): lat1=lat1*2*math.pi/360 lon1=lon1*2*math.pi/360 lat2=lat2*2*math.pi/360 lon2=lon2*2*math.pi/360 theta = 2*math.asin(math.sqrt( math.sin((lat2-lat1)/2)**2 + math.cos(lat1)*math.cos(lat2)*math.sin((lon2-lon1)/2)**2 )) distance = earthRadius * theta return distance def calculateHeading(lat1,lon1,lat2,lon2): lat1=lat1*2*math.pi/360 lon1=lon1*2*math.pi/360 lat2=lat2*2*math.pi/360 lon2=lon2*2*math.pi/360 deltaLon=lon2-lon1 xC=math.sin(deltaLon)*math.cos(lat2) yC=math.cos(lat1)*math.sin(lat2)-math.sin(lat1)*math.cos(lat2)*math.cos(deltaLon) beta = math.atan2(xC,yC) betaDeg = beta*360/2/math.pi return betaDeg def gpsThread(): print("Thread Running") global keepRunning,NMEAdata GPGGA = "" GPGSA = "" GPRMC = "" GPVTG = "" while not GPS.any(): pass while GPS.any(): junk = GPS.read() print(junk) myNMEA = "" while keepRunning: if GPS.any(): myChar=GPS.read(1).decode('utf-8') myNMEA = myNMEA + myChar if myChar == '\n': myNMEA = myNMEA.strip() if myNMEA[1:6] == "GPGGA": GPGGA = myNMEA if myNMEA[1:6] == "GPGSA": GPGSA = myNMEA if myNMEA[1:6] == "GPRMC": GPRMC = myNMEA if myNMEA[1:6] == "GPVTG": GPVTG = myNMEA if GPGGA != "" and GPGSA!="" and GPRMC!="" and GPVTG!="": dataLock.acquire() NMEAdata = { 'GPGGA' : GPGGA, 'GPGSA' : GPGSA, 'GPRMC' : GPRMC, 'GPVTG' : GPVTG } dataLock.release() myNMEA = "" print("Thread Terminated Cleanly") def parseGPS(): readFix=int(NMEAmain['GPGGA'].split(',')[6]) if readFix !=0: GPSdata['fix'] = True latRAW = NMEAmain['GPGGA'].split(',')[2] latDD = int(latRAW[0:2]) + float(latRAW[2:])/60 if NMEAmain['GPGGA'].split(',')[3] == 'S': latDD = -latDD GPSdata['latDD']= latDD lonRAW=NMEAmain['GPGGA'].split(',')[4] lonDD=int(lonRAW[0:3]) + float(lonRAW[3:])/60 if NMEAmain['GPGGA'].split(',')[5] == 'W': lonDD = -lonDD GPSdata['lonDD'] = lonDD heading = float(NMEAmain['GPRMC'].split(',')[8]) GPSdata['heading'] = heading knots = float(NMEAmain['GPRMC'].split(',')[7]) GPSdata['knots'] = knots sats = int(NMEAmain['GPGGA'].split(',')[7]) GPSdata['sats'] = sats utcTime = NMEAmain['GPGGA'].split(',')[1] utcDate = NMEAmain['GPRMC'].split(',')[9] # utcTime = "013445.000" # utcDate = "010125" # Extract year from UTC date (format: DDMMYY), prepend '20' for full year (e.g., '25' → '2025') myYear = '20' + utcDate[4:] # Extract month from UTC date (e.g., '01' for January) myMonth = utcDate[2:4] # Extract day from UTC date (e.g., '01' for 1st) myDay = utcDate[0:2] # Calculate hours by adding UTC offset to UTC hours, convert to string myHours = str(int(utcTime[0:2]) + utcCorrect) # Extract minutes from UTC time (e.g., '34' from '013445.000') myMin = utcTime[2:4] # Extract seconds from UTC time (e.g., '45' from '013445.000') mySec = utcTime[4:6] # Define array of maximum days per month (index 0-11 for months 1-12: Jan to Dec) maxDays = ['31', '28', '31', '30', '31', '30', '31', '31', '30', '31', '30', '31'] # Check if year is a leap year (simplified: divisible by 4); if so, set February to 29 days if int(myYear) % 4 == 0: maxDays[1] = '29' # Check if hours exceed 24 (for positive UTC offsets, e.g., UTC 22:00 + 5 = 27:00) if int(myHours) >= 24: # Subtract 24 from hours to wrap around to next day (e.g., 27 → 3) myHours = str(int(myHours) - 24) # Pad hours with leading zero if single digit (e.g., '3' → '03') if len(myHours) < 2: myHours = '0' + myHours # Increment day to account for crossing midnight (e.g., 30 → 31) myDay = str(int(myDay) + 1) # Check if day exceeds maximum days for the current month (e.g., June 31 > 30) if int(myDay) > int(maxDays[int(myMonth) - 1]): # Reset day to 1 for the next month myDay = '01' # Increment month (e.g., June → July) myMonth = str(int(myMonth) + 1) # Check if month exceeds 12 (e.g., December → January) if int(myMonth) > 12: # Reset month to January myMonth = '01' # Increment year (e.g., 2025 → 2026) myYear = str(int(myYear) + 1) # Pad day with leading zero if single digit (e.g., '1' → '01') if len(myDay) < 2: myDay = '0' + myDay # Pad month with leading zero if single digit (e.g., '7' → '07') if len(myMonth) < 2: myMonth = '0' + myMonth # Check if hours are negative (for negative UTC offsets, e.g., UTC 01:00 - 5 = -4) if int(myHours) < 0: # Add 24 to hours to wrap around to previous day (e.g., -4 → 20) myHours = str(int(myHours) + 24) # Pad hours with leading zero if single digit (e.g., '3' → '03') if len(myHours) < 2: myHours = '0' + myHours # Decrement day to account for crossing midnight backward (e.g., 01 → 00) myDay = str(int(myDay) - 1) # Check if day is less than 1 (e.g., January 1 → December 31) if int(myDay) < 1: # Decrement month (e.g., January → December) myMonth = str(int(myMonth) - 1) # Check if month is less than 1 (e.g., January → December of previous year) if int(myMonth) < 1: # Set month to December myMonth = '12' # Decrement year (e.g., 2025 → 2024) myYear = str(int(myYear) - 1) # Set day to maximum days of the new month (e.g., December → 31) myDay = maxDays[int(myMonth) - 1] # Pad day with leading zero if single digit (e.g., '1' → '01') if len(myDay) < 2: myDay = '0' + myDay # Pad month with leading zero if single digit (e.g., '7' → '07') if len(myMonth) < 2: myMonth = '0' + myMonth # Combine hours, minutes, seconds into time string (e.g., '20:34:45') myTime = myHours + ':' + myMin + ':' + mySec # Combine month, day, year into date string (e.g., '12/31/2024') myDate = myMonth + '/' + myDay + '/' + myYear # Store local time in GPSdata dictionary GPSdata['time'] = myTime # Store local date in GPSdata dictionary GPSdata['date'] = myDate GPSdata['alt'] = float(NMEAmain['GPGGA'].split(',')[9]) def dispOLED(): global sysState,latitude1,longitude1,latitude2,longitude2 dsp.fill(0) if GPSdata['fix'] == False: dsp.text("Waiting for Fix . . .",0,0) if GPSdata['fix'] == True: if sysState%5== 0: dsp.fill(0) dsp.text("Ultimate GPS",0,0) dsp.text(GPSdata['date'][0:5] + ' '+GPSdata['time'],0,16) dsp.text("LAT: "+str(GPSdata['latDD']),0,26) dsp.text("LON: "+str(GPSdata['lonDD']),0,36) dsp.text("SATS: "+str(GPSdata['sats']),0,46) dsp.text("Press Btn LOG",0,56) if sysState%5==1: lat=str(GPSdata['latDD']) lon=str(GPSdata['lonDD']) latLon=lat+','+lon+'\n' try: with open('log.txt', 'a+') as file: file.write(latLon) file.flush() # Force write to disk time.sleep(0.05) # Give filesystem time to settle except Exception as e: print("File write error:", e) dsp.fill(0) dsp.text("Logging Data",0,0) dsp.text(GPSdata['date'][0:5] + ' '+GPSdata['time'],0,16) dsp.text("P1 lat "+str(lat),0,26) dsp.text("P1 lon "+str(lon),0,36) dsp.text("To Stop Logging",0,56) if sysState%5==2: dsp.fill(0) dsp.text("Logging Stopped",0,0) dsp.text(GPSdata['date'][0:5] + ' '+GPSdata['time'],0,16) dsp.text("LAT: "+str(GPSdata['latDD']),0,26) dsp.text("LON: "+str(GPSdata['lonDD']),0,36) dsp.show() sysState=0 dsp.show() def butOneIRQ(pin): global butOneUp,butOneDown,butOneOld,sysState butOneValue = butOne.value() if butOneValue==0: butOneDown=time.ticks_ms() if butOneValue==1: butOneUp = time.ticks_ms() if butOneOld==1 and butOneValue==0 and butOneDown-butOneUp>50: sysState = sysState + 1 print('Button One Triggered') butOneOld=butOneValue butOne.irq(trigger=Pin.IRQ_FALLING | Pin.IRQ_RISING , handler = butOneIRQ) _thread.start_new_thread(gpsThread,()) time.sleep(3) try: while True: dataLock.acquire() NMEAmain = NMEAdata.copy() dataLock.release() parseGPS() if GPSdata['fix'] == False: print("Waiting for Fix . . .") if GPSdata['fix'] == True: print("Ultimate GPS Tracker Report: ") print(GPSdata['time'],GPSdata['date']) print("Lat and Lon: ",GPSdata['latDD'],GPSdata['lonDD']) print("Knots: ",GPSdata['knots']) print("Heading: ",GPSdata['heading']) print("Elevation: ",GPSdata['alt']) print("Sats: ",GPSdata['sats']) print() dispOLED() time.sleep(1) except KeyboardInterrupt: print("\nStopping Program . . . Cleaning Up UART") keepRunning = False time.sleep(1) GPS.deinit() time.sleep(1) dsp.fill(0) dsp.show() print("Exited Cleanly") |
