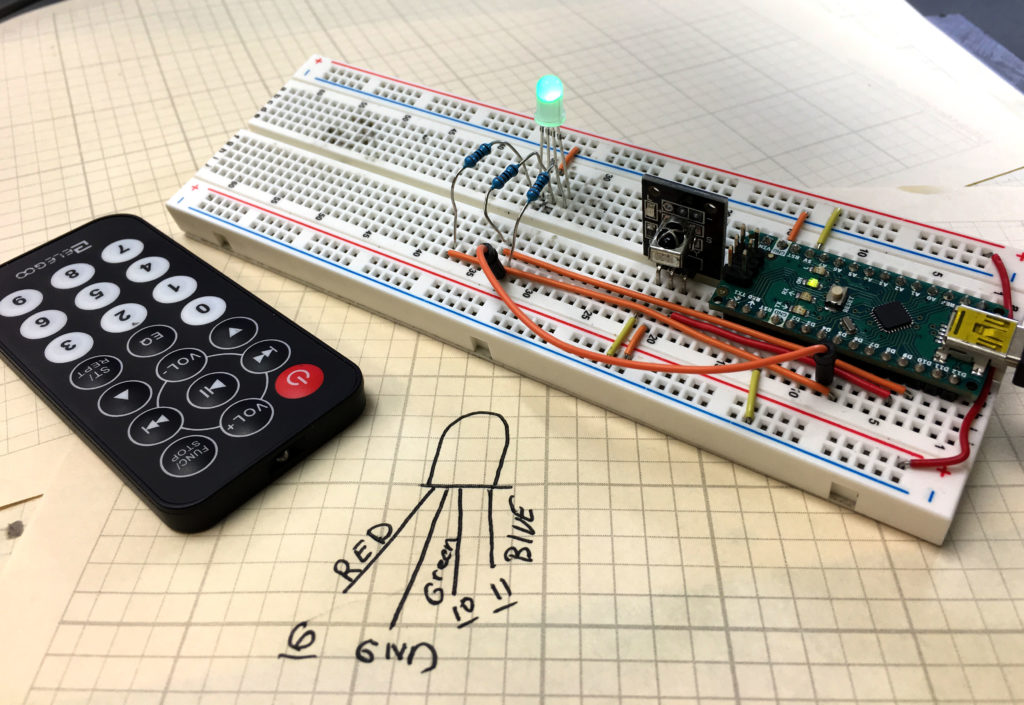
In this video we give you a homework assignment to create a dimmable RGB LED. You must set color and brightness using the IR remote. In Tutorial 68 we will take you through the build, and show you the solution. I hope you will really try your best to do it on your own before you check out my solution.
Category Archives: Arduino
Arduino Tutorial 66: Controlling DC Motor, Speed and Direction with a Remote

In this lesson we develop a project that allow Remote Control of the speed and direction of a DC Motor. We use an Arduino Nano, and components from the Elegoo Kit. Also, to facilitate a clean build, we use Straight Jumper Wires.
The motor is connected according to this schematic:

Also, the remote control receiver is connected as follows: R on Remote to 5V, G on Remote to Ground, and Y on the Remote to Arduino Digital Pin 9. Go back and check out Tutorial 65 if you need more details on the Remote Module Connections.
In this video we will take you step by step through the build and coding for the project.
The code below is the software we developed in the video.
1 2 3 4 5 6 7 8 9 10 11 12 13 14 15 16 17 18 19 20 21 22 23 24 25 26 27 28 29 30 31 32 33 34 35 36 37 38 39 40 41 42 43 44 45 46 47 48 49 50 51 52 53 54 55 56 57 58 59 60 61 62 63 64 65 66 67 68 69 70 71 72 73 74 75 76 77 78 79 80 81 82 83 84 85 86 87 88 89 90 91 92 93 94 95 96 97 98 99 100 101 102 103 104 105 106 107 108 109 110 111 112 113 114 115 116 117 118 119 120 121 122 123 124 125 126 127 128 129 130 131 132 133 134 135 136 137 138 139 140 141 142 143 144 145 146 147 148 149 150 | #include <IRremote.h> int IRpin=9; IRrecv IR(IRpin); decode_results cmd; String myCom; int speedPin=5; int dir1=4; int dir2=3; int mSpeed=255; void setup() { Serial.begin(9600); IR.enableIRIn(); pinMode(speedPin,OUTPUT); pinMode(dir1,OUTPUT); pinMode(dir2,OUTPUT); digitalWrite(dir1,HIGH); digitalWrite(dir2,LOW); } void loop() { while (IR.decode(&cmd)==0){ } delay(1500); IR.resume(); if (cmd.value==0xFF6897){ myCom="zero"; Serial.println(myCom); } if (cmd.value==0xFF30CF){ myCom="one"; Serial.println(myCom); } if (cmd.value==0xFF18E7){ myCom="two"; Serial.println(myCom); } if (cmd.value==0xFF7A85){ myCom="three"; Serial.println(myCom); } if (cmd.value==0xFF10EF){ myCom="four"; Serial.println(myCom); } if (cmd.value==0xFF38C7){ myCom="five"; Serial.println(myCom); } if (cmd.value==0xFF5AA5){ myCom="six"; Serial.println(myCom); } if (cmd.value==0xFF42BD){ myCom="seven"; Serial.println(myCom); } if (cmd.value==0xFF4AB5){ myCom="eight"; Serial.println(myCom); } if (cmd.value==0xFF52AD){ myCom="nine"; Serial.println(myCom); } if (cmd.value==0xFFA25D){ myCom="pwr"; Serial.println(myCom); } if (cmd.value==0xFF629D){ myCom="v+"; Serial.println(myCom); } if (cmd.value==0xFFE21D){ myCom="fun"; Serial.println(myCom); } if (cmd.value==0xFF22DD){ myCom="rew"; Serial.println(myCom); } if (cmd.value==0xFF02FD){ myCom="play"; Serial.println(myCom); } if (cmd.value==0xFFC23D){ myCom="ff"; Serial.println(myCom); } if (cmd.value==0xFFE01F){ myCom="dn"; Serial.println(myCom); } if (cmd.value==0xFFA857){ myCom="v-"; Serial.println(myCom); } if (cmd.value==0xFF906F){ myCom="up"; Serial.println(myCom); } if (cmd.value==0xFF9867){ myCom="eq"; Serial.println(myCom); } if (cmd.value==0xFFB04F ){ myCom="st"; Serial.println(myCom); } if (myCom=="pwr"){ digitalWrite(dir1,LOW); digitalWrite(dir2,HIGH); analogWrite(speedPin,255); } if (myCom=="fun"){ digitalWrite(dir1,LOW); digitalWrite(dir2,HIGH); analogWrite(speedPin,0); } if (myCom=="ff"){ digitalWrite(dir1,LOW); digitalWrite(dir2,HIGH); analogWrite(speedPin,mSpeed); } if (myCom=="rew"){ digitalWrite(dir1,HIGH); digitalWrite(dir2,LOW); analogWrite(speedPin,mSpeed); } if (myCom=="up"){ mSpeed=mSpeed+15; if (mSpeed>255){ mSpeed=255; } analogWrite(speedPin,mSpeed); } if (myCom=="dn"){ mSpeed=mSpeed-15; if (mSpeed<0){ mSpeed=0; } analogWrite(speedPin,mSpeed); } } |
Arduino Tutorial 65: Creating Useful Commands from IR Remote Buttons

In this lesson we show you how to map button pushes on the Infrared Remote Control to useful functions in the Arduino. This code can serve as the basis for using the remote control in many different applications.
We are building this with parts from our Elegoo Kit , and our actual build is using an Arduino Nano, which allows the project to be built on a single breadboard. You can get the neat jumper wires HERE.
The code developed in the video is available below:
1 2 3 4 5 6 7 8 9 10 11 12 13 14 15 16 17 18 19 20 21 22 23 24 25 26 27 28 29 30 31 32 33 34 35 36 37 38 39 40 41 42 43 44 45 46 47 48 49 50 51 52 53 54 55 56 57 58 59 60 61 62 63 64 65 66 67 68 69 70 71 72 73 74 75 76 77 78 79 80 81 82 83 84 85 86 87 88 89 90 91 92 93 94 95 96 97 98 99 100 101 102 103 104 105 | #include <IRremote.h> int IRpin=9; IRrecv IR(IRpin); decode_results cmd; String myCom; void setup() { Serial.begin(9600); IR.enableIRIn(); } void loop() { while (IR.decode(&cmd)==0){ } delay(1500); IR.resume(); if (cmd.value==0xFF6897){ myCom="zero"; Serial.println(myCom); } if (cmd.value==0xFF30CF){ myCom="one"; Serial.println(myCom); } if (cmd.value==0xFF18E7){ myCom="two"; Serial.println(myCom); } if (cmd.value==0xFF7A85){ myCom="three"; Serial.println(myCom); } if (cmd.value==0xFF10EF){ myCom="four"; Serial.println(myCom); } if (cmd.value==0xFF38C7){ myCom="five"; Serial.println(myCom); } if (cmd.value==0xFF5AA5){ myCom="six"; Serial.println(myCom); } if (cmd.value==0xFF42BD){ myCom="seven"; Serial.println(myCom); } if (cmd.value==0xFF4AB5){ myCom="eight"; Serial.println(myCom); } if (cmd.value==0xFF52AD){ myCom="nine"; Serial.println(myCom); } if (cmd.value==0xFFA25D){ myCom="pwr"; Serial.println(myCom); } if (cmd.value==0xFF629D){ myCom="v+"; Serial.println(myCom); } if (cmd.value==0xFFE21D){ myCom="fun"; Serial.println(myCom); } if (cmd.value==0xFF22DD){ myCom="rew"; Serial.println(myCom); } if (cmd.value==0xFF02FD){ myCom="play"; Serial.println(myCom); } if (cmd.value==0xFFC23D){ myCom="ff"; Serial.println(myCom); } if (cmd.value==0xFFE01F){ myCom="dn"; Serial.println(myCom); } if (cmd.value==0xFFA857){ myCom="v-"; Serial.println(myCom); } if (cmd.value==0xFF906F){ myCom="up"; Serial.println(myCom); } if (cmd.value==0xFF9867){ myCom="eq"; Serial.println(myCom); } if (cmd.value==0xFFB04F ){ myCom="st"; Serial.println(myCom); } } |
Arduino Tutorial 64: Understanding and Using the Infrared (IR) Remote to Control a Project

The Elegoo Kit contains a simple IR module and remote which allow you to add remote control to your arduino project. In this lesson we show you how to connect the remote, and then how to send signals to the arduino using the remote unit. This video takes you through the process step by step.
The code below will get you started, and then you can expand the code to map all the buttons to simple string commands.
1 2 3 4 5 6 7 8 9 10 11 12 13 14 15 16 17 18 19 20 21 22 23 24 25 26 27 28 | #include <IRremote.h> //Make sure to install the library int IRpin=9; IRrecv IR(IRpin); decode_results cmd; String myCom; void setup() { Serial.begin(9600); IR.enableIRIn(); } void loop() { while (IR.decode(&cmd)==0){ } Serial.println(cmd.value,HEX); delay(1500); IR.resume(); if (cmd.value==0xFF6897){ myCom="zero"; Serial.println(myCom); } if (cmd.value==0xFFA25D){ myCom="pwr"; Serial.println(myCom); } } |
We are building this with parts from our Elegoo Kit , and our actual build is using an Arduino Nano, which allows the project to be built on a single breadboard. You can get the neat jumper wires HERE.
Arduino Tutorial 63: Dimensional Analysis Example Problems
Dimensional Analysis is one of the most important tools in the Engineers tool kit. In today’s lesson we take you through it step-by-step with example problems.