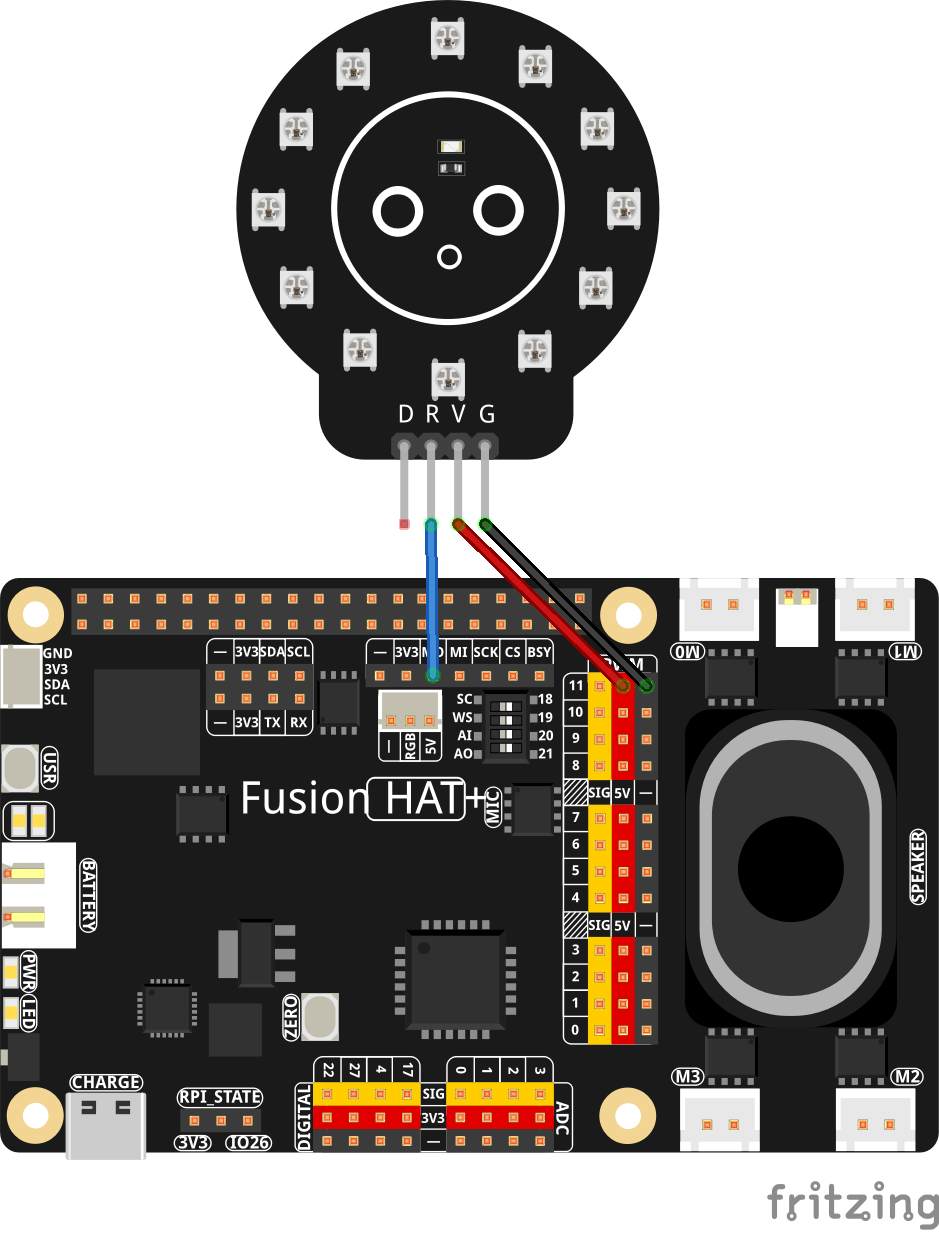
In Lesson 45 of our AI on the Edge series, we take our Fusion AI Lab Kit to the next level by adding a 12-pixel NeoPixel ring. This lesson bridges the gap between pure AI processing and vibrant physical output, showing how your edge AI projects can communicate visually with the real world in a beautiful and engaging way.
We begin by setting up the NeoPixel ring using the SPI interface on the SunFounder Fusion Hat. After importing the necessary libraries (time, board, neopixel_spi, colorsys, and math), we create a simple and reusable hsv2rgb() function that converts Hue values (0.0 to 1.0) into RGB colors that the NeoPixels can understand. This function becomes the foundation for smooth rainbow effects later in the lesson.The lesson starts with basic pixel control. We manually light up each of the 12 pixels one at a time using different colors (red, green, blue, cyan, magenta, yellow, etc.). This slow, deliberate approach lets you clearly see how individual pixel addressing works and helps students understand the coordinate system of the ring.Next, we explore full-ring control by making the entire ring blink between bright red and blue. We then move into motion with a running green pixel moving across a red background — a great introduction to animation techniques. This is followed by a more advanced chasing effect where a blue pixel chases a green pixel around a dim red background.One of the highlights of this lesson is the gentle pulsating aqua effect. Using a sine wave (math.sin), we create a smooth breathing/pulsing animation where the brightness of the color rises and falls naturally. This technique produces a very professional and visually pleasing result that students can easily adapt for future projects.
Finally, we create a rainbow effect. First, we display a uniform rainbow where all 12 pixels show the same color that cycles smoothly through the entire spectrum.
We finish the lesson by assigning the homework. The homework is for you to create the classic running rainbow (what I like to call a “Runbow”), where the colors flow continuously around the ring — one of the most popular and impressive NeoPixel animations.
This lesson reinforces important programming concepts including loops, functions, color theory (HSV vs RGB), timing control, and animation techniques, while giving students an exciting visual payoff. The skills learned here open the door to creating stunning visual feedback for future AI projects — whether it’s status indicators, emotional displays, or attention-grabbing outputs from your edge AI models.
|
1 2 3 4 5 6 7 8 9 10 11 12 13 14 15 16 17 18 19 20 21 22 23 24 25 26 27 28 29 30 31 32 33 34 35 36 37 38 39 40 41 42 43 44 45 46 47 48 49 50 51 52 53 54 55 56 57 58 59 60 61 62 63 64 65 66 67 68 69 70 71 72 73 74 75 76 77 78 79 80 81 82 83 84 85 86 87 88 89 90 91 92 93 94 95 96 97 98 99 100 101 102 103 104 105 106 107 108 109 110 111 112 113 114 115 116 117 118 119 120 121 122 123 124 125 126 127 128 129 130 131 132 133 134 135 136 137 138 |
# ==================================================================== # DISCLAIMER: # This code is provided as-is for educational and experimental # purposes only. The author makes no representations or warranties of # any kind concerning the safety, suitability, or accuracy of this # code. Use at your own risk. The author assumes no liability for any # damages, system failures, security breaches, or network issues # resulting from the use or implementation of this script. # ==================================================================== import time import board import neopixel_spi as neopixel import colorsys import math def hsv2rgb(h): r, g, b = colorsys.hsv_to_rgb(h, 1, 1) return (int(r*255),int(g*255),int(b*255)) spi = board.SPI() LED_COUNT = 12 PO = neopixel.GRB strip = neopixel.NeoPixel_SPI(spi, LED_COUNT,pixel_order=PO, auto_write = False) strip.fill(0) strip.show() strip[0] = (255,0,0) strip.show() ts=.1 time.sleep(ts) strip[1] = (0,255,0) strip.show() time.sleep(ts) strip[2] = (0,0,255) strip.show() time.sleep(.1) strip[3] = (0,255,255) strip.show() time.sleep(ts) strip[4] = (255,0,255) strip.show() time.sleep(.1) strip[5] = (255,255,0) strip.show() time.sleep(.1) strip[6] = (255,100,0) strip.show() time.sleep(ts) strip[7] = (128,0,255) strip.show() time.sleep(.1) strip[8] = (0,255,128) strip.show() time.sleep(.1) strip[9] = (255,0,128) strip.show() time.sleep(ts) strip[10] = (128,255,0) strip.show() time.sleep(ts) strip[11] = (0,128,255) strip.show() time.sleep(.1) ts2=5 for i in range(5): strip.fill((255,0,0)) strip.show() time.sleep(ts2) strip.fill((0,0,255)) strip.show() time.sleep(ts2) strip.fill((255,0,0)) strip.show() ts3=1 time.sleep(ts3) ts4=.3 for lap in range(3): for i in range(12): strip[i] = (0,255,0) strip.show() time.sleep(ts4) strip[i] = (255,0,0) strip.fill((40,0,0)) strip.show() time.sleep(ts3) for lap in range(4): for i in range(12): greenPos = i bluePos = (i + 6)%12 strip[greenPos] = (0,255,0) strip[bluePos] = (0,0,255) strip.show() time.sleep(ts4) strip[greenPos] = (40,0,0) strip[bluePos] = (40,0,0) for laps in range(6): for step in range(360): brightness= (math.sin(step*3.1415/180)+1)/2 r = 0 g = int(255*brightness) b = int(50*brightness) strip.fill((r,g,b)) strip.show() time.sleep(.005) for laps in range(5): for step in range(100): hue = step/100 color = hsv2rgb(hue) strip.fill(color) strip.show() time.sleep(ts) strip.fill(0) strip.show() |
In this class we are using this as our standard components. You should already have the core circuit built and should already have the OLED connected. Today you will add the NeoPixel array.
Our core circuit is:

Last week we also added the SSD1306 OLED Display.
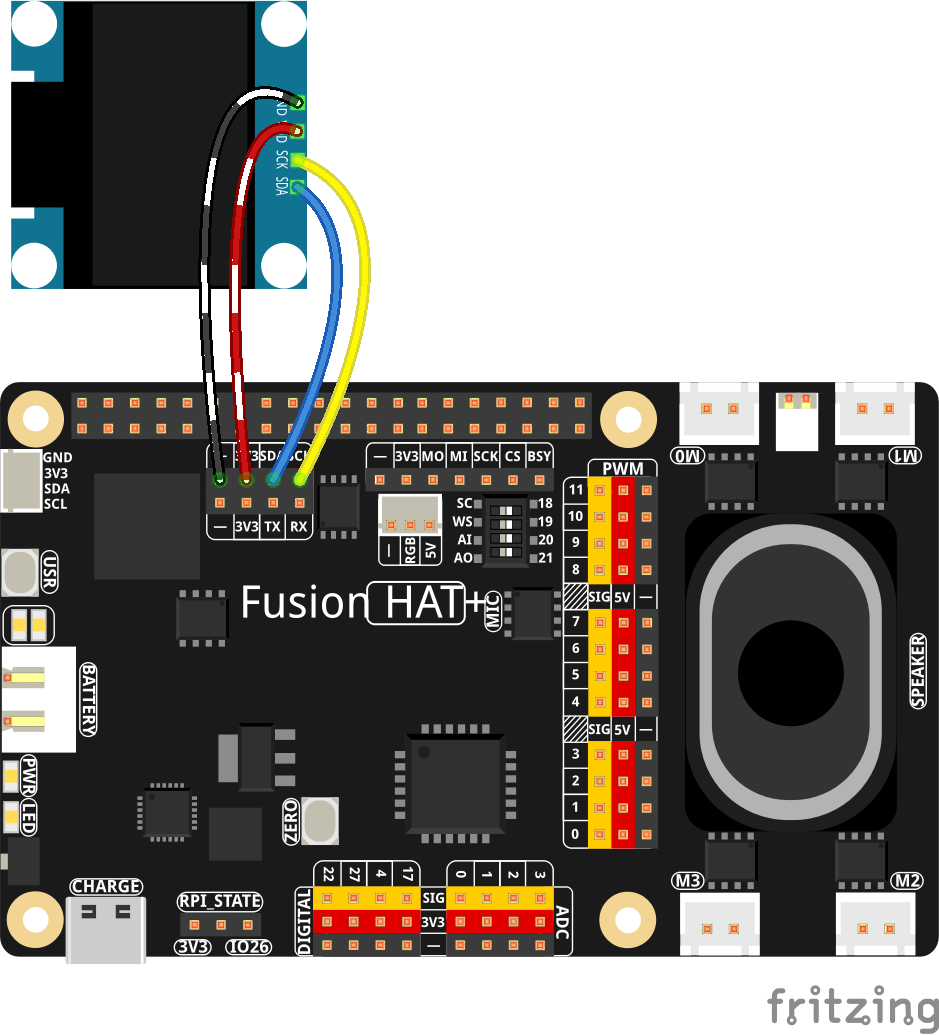
And finally today we add the NeoPixel ring from the Fusion AI Lab Kit.