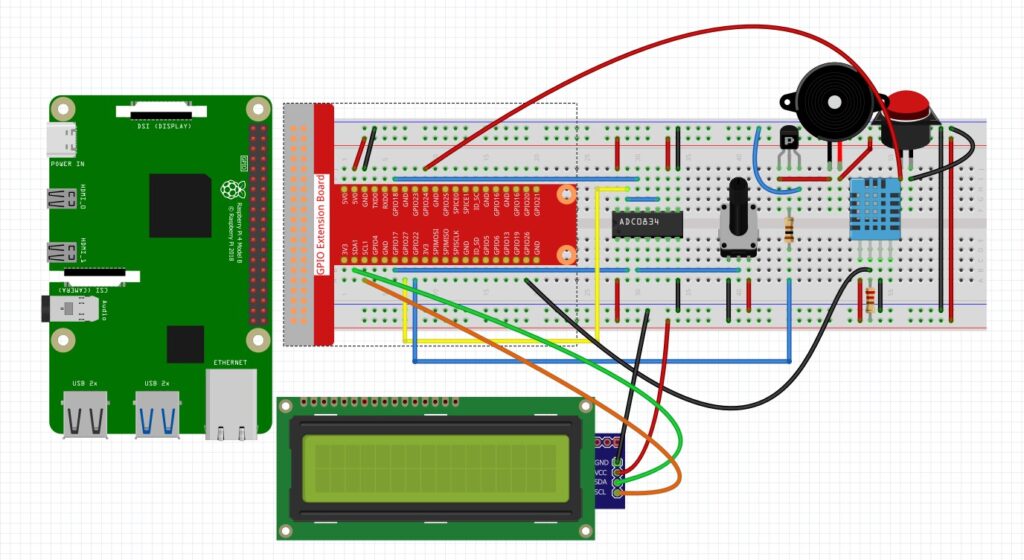
In this video lesson we show how to create a programmable temperature alarm using the Raspberry Pi, the DHT11 sensor, the ADC0834, a potentiometer and a buzzer. The results are displayed on a LCD1602 LCD display with a i2c connection. The device operates in either program mode or monitor mode. Pressing the button puts you in programming mode. In this mode you turn the potentiometer until your desired set temperature is reached. Then pressing the button again will switch you to monitor mode. In monitor mode the current temperature and humidity are displayed on the LCD. When the temperature exceeds your setpoint, the buzzer will release an audible alarm. Below is the schematic for our build.
Tag Archives: Raspberry Pi
AI on the Jetson Nano LESSON 62: Create a Streaming IP Camera from a Raspberry Pi Zero W
In this lesson we learn to make a streaming IP camera with a Raspberry Pi Zero W, and Raspberry Pi camera. The Pi will create a RTP stream, which can then be read by a Jetson Nano on the same network. We use OpenCV to read the frames on the NVIDIA Jetson Nano side.
This is the command to launch the Raspberry Pi camera, and start the RTP stream. This command works well for the Raspberry Pi Camera, version 1.
1 | raspivid -t 0 -w 1296 -h 730 -fps 30 -b 2000000 -awb auto -n -o - | gst-launch-1.0 -v fdsrc ! h264parse ! rtph264pay config-interval=1 pt=96 ! gdppay ! tcpserversink host=0.0.0.0 port=8554 |
For the Version 2 Camera, I recommend:
1 | raspivid -t 0 -w 1280 -h 720 -fps 30 -b 2000000 -awb auto -n -o - | gst-launch-1.0 -v fdsrc ! h264parse ! rtph264pay config-interval=1 pt=96 ! gdppay ! tcpserversink host=0.0.0.0 port=8554 |
This is the Gstreamer code on the Jetson Nano side to grab the RTP Frames. On host= below, be sure to use the IP address of your Raspberry Pi.
1 | camSet2=' tcpclientsrc host=10.1.37.28 port=8554 ! gdpdepay ! rtph264depay ! h264parse ! nvv4l2decoder ! nvvidconv flip-method='+str(flip)+' ! video/x-raw,format=BGRx ! videoconvert ! video/x-raw, width='+str(dispW)+', height='+str(dispH)+',format=BGR ! appsink drop=true sync=false ' |
Comparison of Raspberry Pi Zero Model W and Onion Omega 2+
There is a lot happening in the Maker Space! We have just watched two new major releases of embedded microprocessor platforms . . . the Raspberry Pi Zero Model W and the Onion Omega 2+. Both these platforms are impressive in that they both offer a small package with onboard WiFi for $10. This combination of features, price and size opens up a new world of possibilities for compact, portable projects.
After reviewing both of these platforms, we choose the Raspberry Pi Zero model W as the platform we will be pursuing at this point. The video above gives a head to head comparison of the two platforms, and the rational behind our decision.
Raspberry Pi Announces Release of the WiFi Version of the Pi Zero. The New Model W
We are very excited to see that Raspberry Pi has announced the release of the WiFi model of the Raspberry Pi zero, which has onboard Bluetooth and WiFi. Anticipated price is $10. We believe this new model will be a game changer, and will accelerate the development of exciting new prototypes and products. As of this morning, I have not found any supplier with the devices in stock, but will order one as soon as I can find a supplier. I plan to do some tutorials and projects as soon as I can get my hands on one of these. Please share your thougts below.
Review of the Raspberry Pi Zero
I was extremely excited to learn of the Raspberry Pi Zero. It is a trimmed down version of wildly popular the Raspberry Pi, and one designed for embedded operation. In getting the Pi Zero I was really impressed with its small size and low cost. It has a small HDMI output, and two micro-usb inputs (one is OTG). The Pi Zero is about the size of a stick of gum, and is priced at $5. While I was impressed with just about everything associated with the Pi Zero, in my mind it has one fatal flaw. It has neither an Ethernet Port, nor on board Wifi. To really use the Pi Zero for any of the applications I would be interested in, Wifi or an Ethernet connection would have to be added. Making this more difficult is the issue of the Micro USB connection. I am not aware of any micro-USB wifi units. Hence, we must buy a cable that goes from micro-USB to USB, and then get a USB Wifi Dongle. The cost of the cable alone will likely be more than the Pi Zero itself, and destroys the small form factor provided by the Zero.
So, as much as I love the Pi 3, and as much as I wanted to love the Pi zero, I am going to have to give it the thumbs down. I understand when you make something small and cheap, you have to give up things. But, I with they would have dropped the HDMI output and one of the USB connectors, and provided on board Wifi. I am hopeful they will at some point release an upgraded Pi Zero with on board Wifi. Then I would pursue development on this platform.