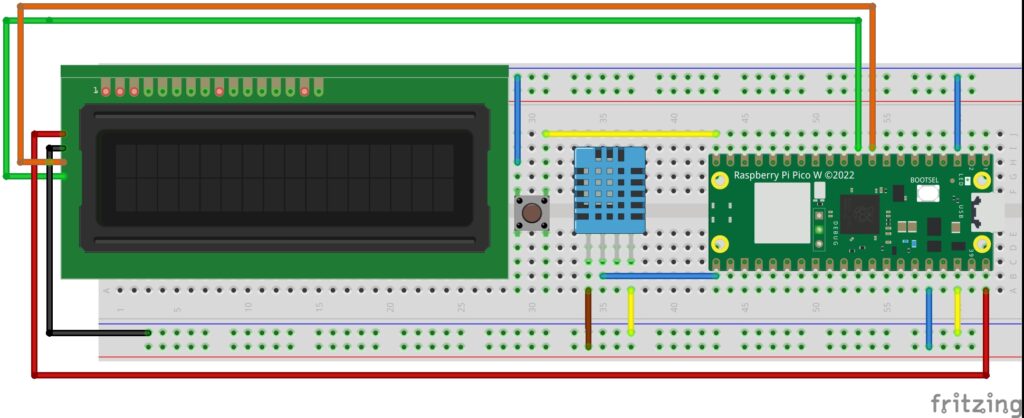
In this video lesson we show how to create a simple project where the Raspberry Pi Pico W is connected to a DHT11 temperature and humidity sensor. The Pico measures the temperature and humidity from the sensor, and then displays it both on the Computer Screen, and on the LCD display we have connected to the Pico. The display toggles between showing degrees C and degrees F via a pushbutton. The schematic for the circuit is shown below:

Below is the software we developed for this project. Note you must first install the LCD library, which we show how to do HERE.
|
1 2 3 4 5 6 7 8 9 10 11 12 13 14 15 16 17 18 19 20 21 22 23 24 25 26 27 28 29 30 31 32 33 34 35 36 37 |
from machine import Pin import utime as time from dht import DHT11 from lcd1602 import LCD lcd=LCD() dataPin=16 myPin=Pin(dataPin,Pin.OUT,Pin.PULL_DOWN) sensor=DHT11(myPin) butPin=15 myButton=Pin(butPin,Pin.IN,Pin.PULL_UP) tempUnitC=True buttonState=1 buttonStateOld=1 print('My Sensor Data') while True: buttonState=myButton.value() if buttonStateOld==0 and buttonState==1: tempUnitC= not tempUnitC try: sensor.measure() except: pass tempC=sensor.temperature() tempF=tempC*9/5+32 hum=sensor.humidity() if tempUnitC==True: print("\r",'Temp= ',tempC,chr(176)+'C ', 'Humidity= ',hum,'%',end=' ') lcd.write(0,0,'Temp: '+str(tempC)+'\xDF'+'C ') lcd.write(0,1,"Humidity: "+str(hum)+'%') if tempUnitC==False: print("\r",'Temp= ',tempF,chr(176)+'F ', 'Humidity= ',hum,'%',end=' ') lcd.write(0,0,'Temp: '+str(tempF)+'\xDF'+'F') lcd.write(0,1,"Humidity: "+str(hum)+'%') time.sleep(.1) buttonStateOld=buttonState |