Tag Archives: GPS

Beaglebone Black GPS Tracker LESSON 5: Displaying Data from GPS in Google Earth

Example of GPS Data displayed in Google Earth

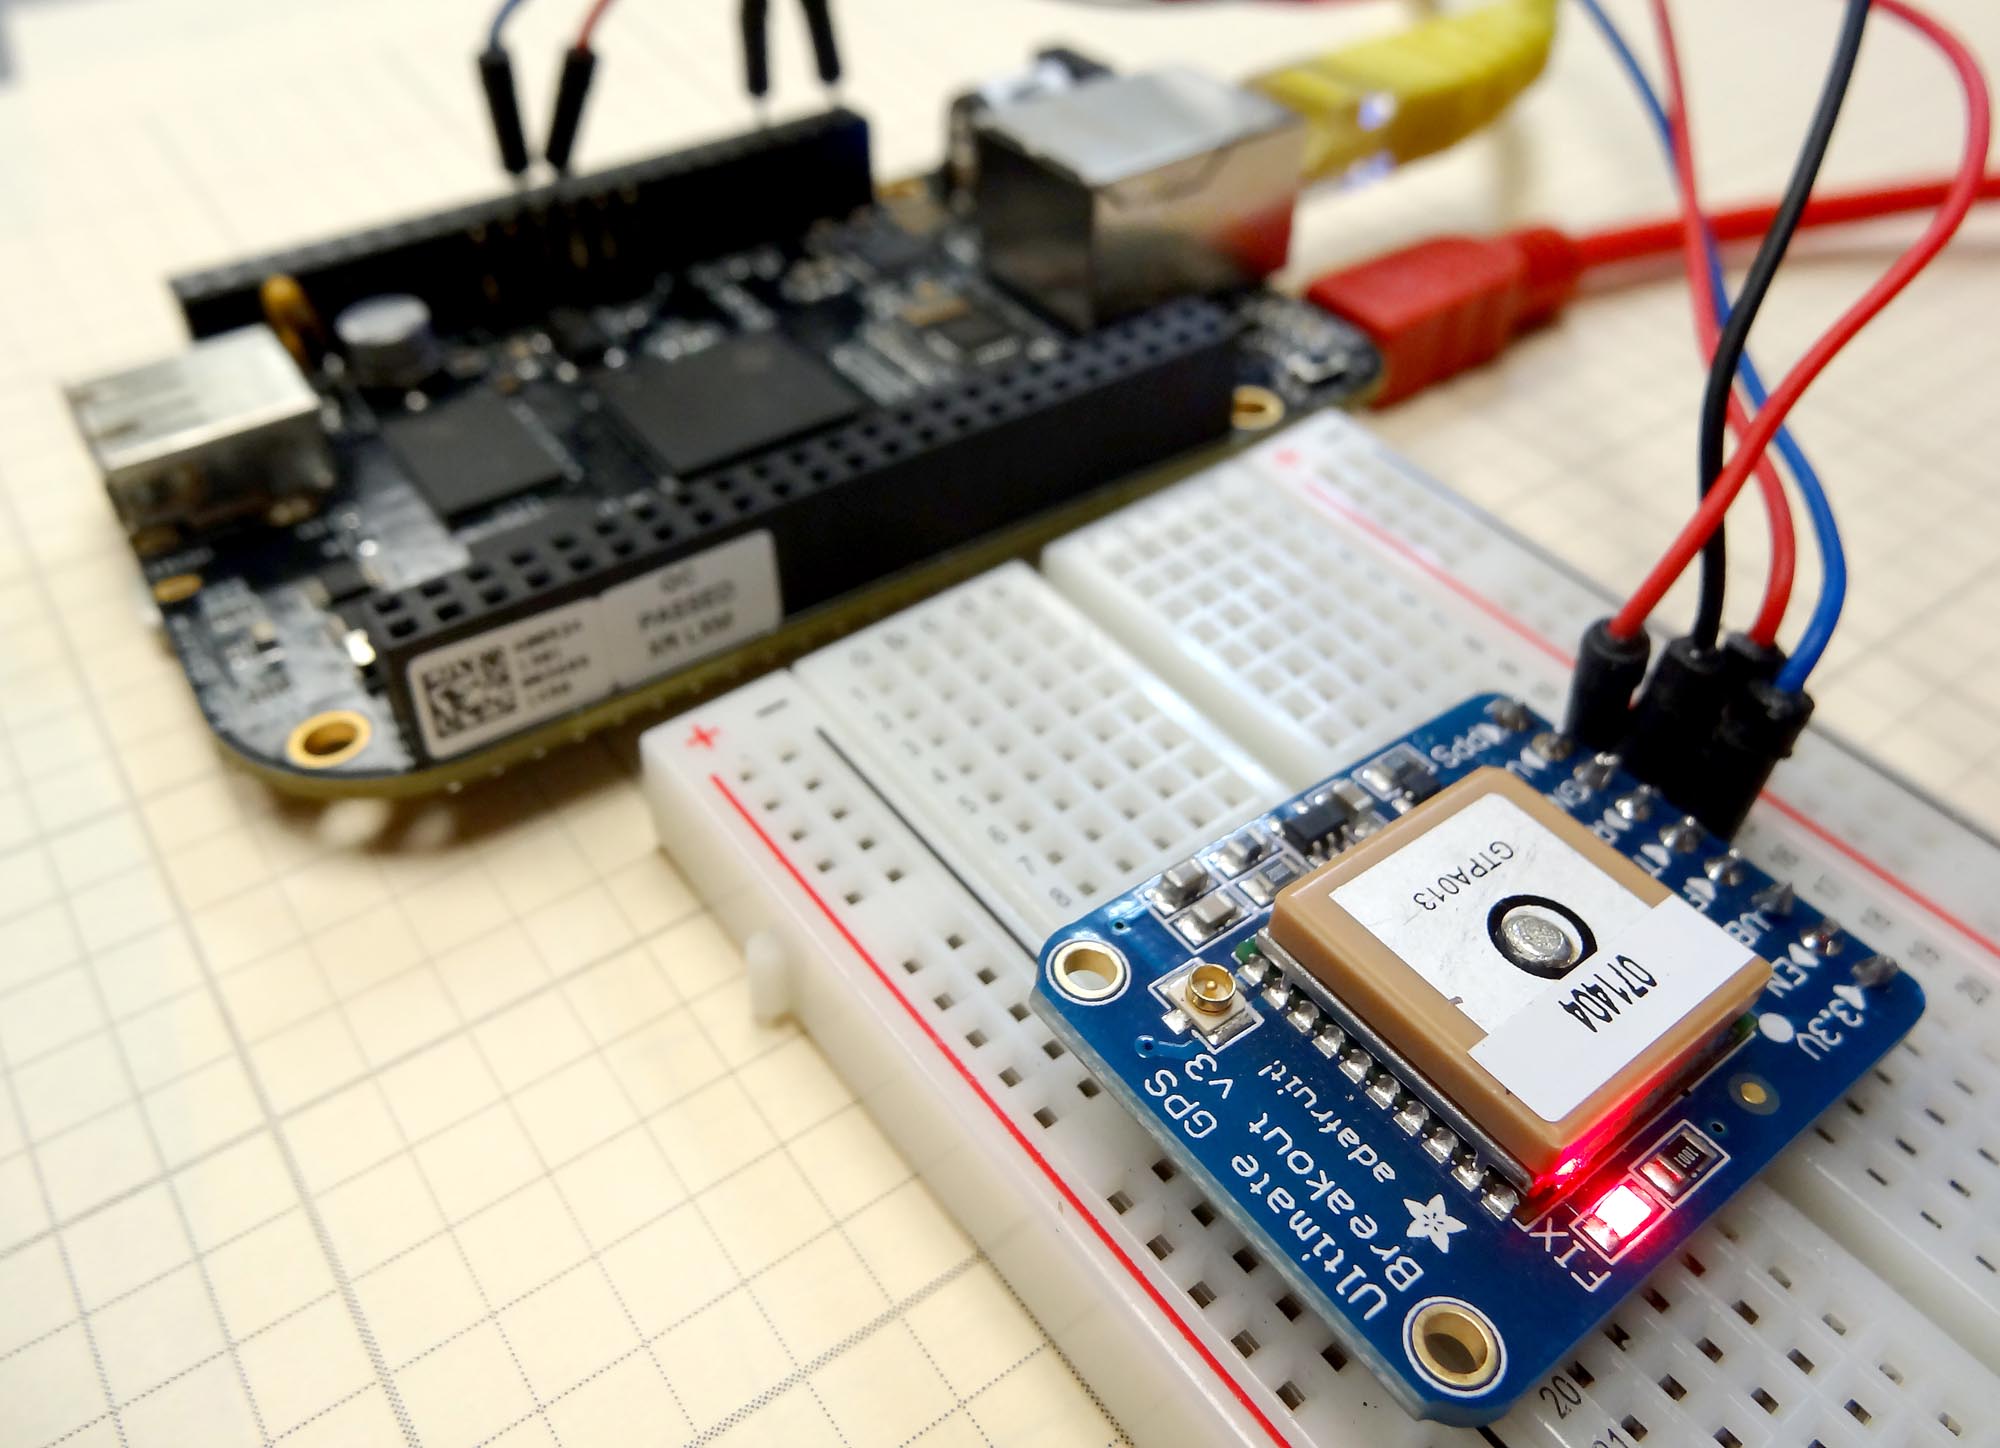
In the earlier lessons in this series we learned how to hook the Adafruit Ultimate GPS up to the Beaglebone Black. In these lessons we got the hardware working, got to the point we could take data, and then got the NMEA sentences parsed, so that we could display understandable data for Latitude, Longitude, and Altitude. In this lesson we will show you how to create a GPS tracker, by logging your GPS data to a file on the Beaglebone Black. Then when you get back home, you can load the data into google earth to see an interactive view of where you have been.

The video shows step-by-step how to get the code working, starting with the code we developed in Lesson 3. We end up with the following program:

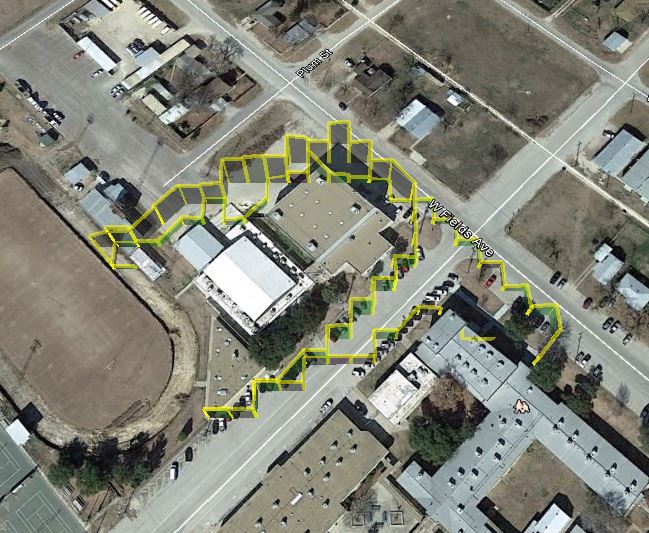
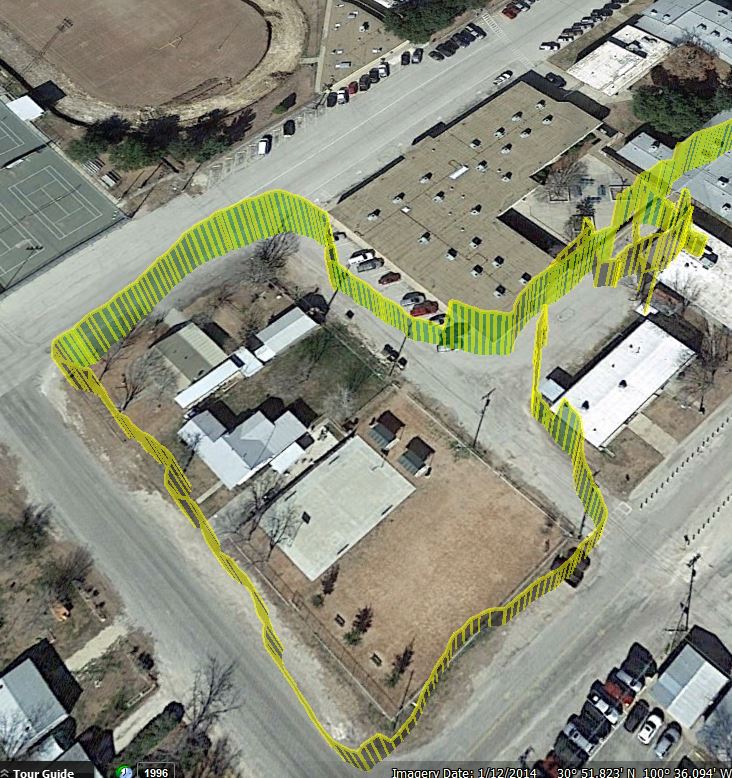
 This program should create a file on the Beaglebone Black, and track your longitude, latitude and altitude.

In order to view the file on Google Earth, you will want to put a KMZ wrapper on the coordinates. A reasonable KMZ wrapper is below. Simply take your coordinates from the program above, and paste them in the file below, in the area between <coordinates> and </coordinates>


Beaglebone Black GPS Tracker LESSON 3: Parsing the NMEA Sentences in Python

Beaglebone Black connected to the Adafruit Ultimate GPS

In the first two lessons in this series, you learned how to hook the Beaglebone Black to the Adafruit Ultimate GPS breakout board. We then learned to read NMEA sentences from the GPS, and how to control the data the GPS spits out. In this lesson we will learn to parse the NMEA sentences into useful data. You need to make sure you go back and review the first two lessons, as this one draws heavily on those. Also, you need to start with the code we had developed in LESSON 2. (If you need the gear we are using, you can get the Beaglebone Black HERE, and you can get the Adafruit GPS HERE.)

In this code we move most of the work up into our GPS class. That makes the main part of the program simple and intuitive to use.


Beaglebone Black GPS LESSON 1: Hooking Up the Adafruit Ultimate GPS

Beaglebone Black connected to the Adafruit Ultimate GPS

If you went through our series of 12 lessons on the Beaglebone black you should be familiar with the basics of this microcontroller. We are now ready to move on to more advanced projects. In our earlier lessons on the Arduino, we built a GPS data logger and integrated it with Google Earth using the Arduino Uno and the Adafruit Ultimate GPS Breakout Board. While that was a great project, we finally ran out of horsepower with the arduino, and what we could do was limited by the memory limitations on the Arduino. Also, it is very hard to parse strings in the Arduino IDE, so interpreting the NMEA sentences is a rather large challenge with the limited string functionality in Arduino.

Python on the other hand makes quick work of string manipulation and the Beaglebone Black has plenty of horsepower for any manipulation of the NMEA sentences we might want to do.

In order to play along with this project, you will need a Beaglebone Black Rev C, which you can get HERE, and the Adafruit Ultimate GPS which you can get HERE. The video below takes you through the project step-by-step, as well as the description below.

Once you get your gear, you will want to hook up the following circuit:

Adafruit Ultimate GPS connected to the Beaglebone Black Rev C Microcontroller

Note that we are working off header P9 and we are using P9_1 as ground, P9_7 as VIN, we are using P9_24 as  Tx and P9_26 as Rx. Please note that you can see a detailed Diagram of the Beaglebone Black pinout HERE. Also notice that Tx on the Beaglebone is connected to Rx on the GPS, and Rx on the Beaglebone is connected to Tx on the GPS. Tx is like “talk” and Rx is like “listen, so you want to listen to the pin that is talking, and you want to talk to the pin that is listening.

Our goal in this first lesson is to establish a connection between the GPS and the Beaglebone, and to read in the data streaming from the GPS. We want to get a fix, and verify that we can read and print the NMEA sentences that contain the various position, altitude and velocity data.

The video takes you step-by-step through the code. The following simple code will get you streaming data from the GPS to your terminal window. In future lessons we will break the data down and show you how to get your position from the raw NMEA sentences streaming in.


LESSON 27: Instrument Package

In this lesson we bring together a lot of the material from the first 26 lessons to create an instrument package that could be deployed in a demonstration project. We will wire wrap up an Arduino Nano, a Virtuabotix SD card reader, and the Adafruit Ultimate GPS to create a system that will track and log position and altitude, and save the data in a format that can be displayed on Google Earth.

Wire Wrapping tools and Perforated Board

You will want to place the Adafruit GPS, the SD Card Reader, and the Arduino Nano into a perf board.  Then, you will want to carefully wire wrap the components as follows:

Connecting the Adafruit Ultimate GPS Unit to Arduino
GPS Pin Arduino Pin
Vin 5V
GND GND
RX Pin 2
TX Pin 3


Connecting the SD Card Reader
Sd Card Reader Pin Arduino Pin Details
GND GND Common Ground
3.3 V – (NOT USED)
+5 5V Power
CS 4 Chip Select
MOSI 11 SPI Data
SCK 13 Clock
MISO 12 SPI Data
GND GND Common Ground


Now the code you developed in LESSON 26 should run on this prototype. The code creates a Google Earth friendly set of coordinates. Just put a KML wrapper on the coordinates as described in LESSON 26.  Putting it all together, I took the system outside and walked around, and this is the data track I got.

GPS track generated by my wire wrapped prototype


LESSON 25: Display Your GPS Data as Track on Google Earth

In this lesson we will learn how to take the data we are logging from our GPS, and display it properly on Google Earth. This lesson builds on Lesson 22Lesson 23 and Lesson 24. You will need to complete those lessons before undertaking this lesson. In this series of lessons we are using the Arduino,  Adafruit Ultimate GPS, Virtuabotix SD card reader, and a Battery Clip to power the arduino during your mobile jaunts.  You will need a 9V battery. If you are going to be doing a lot of mobile work, it is probably worth it to invest in a good 9v Rechargable battery system.

Adafruit Ultimate GPS

When you get your gear gathered up, you will be ready to get this project going. First, hook the GPS and Card Reader up as we did in Lesson 23. We will start with the software that we used in Lesson 23. This software correctly reads data from the GPS and then logs the data into two data files on the SD card. The problem, though, we did not really do any fine tuning of the data file we were creating.

Displaying Data from Adafruit Ultimate GPS as track on Google Earth

In this lesson we want to create a data file that we can display as a track in Google Earth. In order for this to work, we have to save the data in the manner a KML file wants to see. We have to save the data as:

Decimal Longitude, Decimal latitude, Altitude

I find it works to not use a line ending, but put a single white space after the Altitude.  That is, delimit with commas as shown above, but then use one white space to delimit between successive lines of data.

Lesson 24 explained in great detail how to interpret the NMEA sentences. The challenge here is that the Arduino is very poor at parsing strings. The NMEA sentence would be easy to parse in Python, because Python is so good at easily manipulating strings. Since it is tedious to manipulate strings in Arduino, we are going to try and parse the data using numbers and math, not strings. To explain this, I will give an example for Latitude, and Longitude will work in a similar manner. The latitude data we get from the parsed data from the Adafruit GPS looks like this:

3051.8007

From lesson 24, we know that this represents 30 degrees and 51.8007 minutes. In order to parse this in Arduino using just numbers I do the following. First create three variables deg, degWhole, and degDec. The variable deg will hold the final answer, degWhole holds the whole part of the number, and degDec whole the part to the right of the decimal. Adding degWhole to degDec gives you deg, your final answer. So, lets assume x = 3051.8007, our Latitude from the GPS.

 Dividing by 100 moves the decimal to the left two spots, and taking the int removes anything to the right of the decimal. Then converting back to float gives us a round number with no values to the right of the decimal. For 3051.8007 it turns it into 30.0, the whole number part of degrees. Now to get the fractional part, we need to take minutes and divide by 60. This will always be a number less than one. To get fractional part of the latitude in degrees, we do the following:

 We have to multiply degWhoe by 100 to get the decimal moved back to the right by 2. Then we subtract that number from the original latitude, and we are left with minutes. Then divide by 60 and we have converted minutes to a fraction of a degree. We now have the whole part and the fractional part of the answer, so we just add those together:

 We now have a nice decimal number, deg, which is the decimal representation of our Latitude. We have one more thing to deal with. If the GPS is reporting ‘N’, leave the number positive. If the GPS is reporting ‘S’ (that we are in the Southern Hemisphere),  you need to make your latitude number negative. Similarly, when you are doing your longitude, you need to make the longitude negative if you are in the Western Hemisphere.

Finally, when you write the file, Google Earth will want you to store the data as:

Longitude, Latitude,altitude

It is curious that this is reverse from what you would do if you were entering coordinates into the Google Earth search bar. That wants Latitude first.

In any event, with the parsing and formatting described above, you can create a file that is almost ready to read into Google Earth. The code below will create your coordinates in the correct format for KML, which Google Earth will read. Please watch the video for a complete description of the code.

 The final thing we have to do is to put a “wrapper” around the coordinates to turn the coordinates into a .kml file Google Earth will like. I just do this manually. I open the text file on the SD card created by the code above, and then just paste it into this KML wrapper, and save the file with a .kml extension. The KML wrapper is as follows:

 Just paste your coordinate data in the file above between <coordinates> and </coordinates>, save with a .kml extension, and you should be able to open it with Google Earth and see your track. Good luck!