
In this lesson we show you how to do digital writes to the GPIO pins from python. If you do not already have a Beaglebone Black Rev C, you can order one HERE.
In order to do this lesson, we need to go back and review the pinout diagram from LESSON 1.
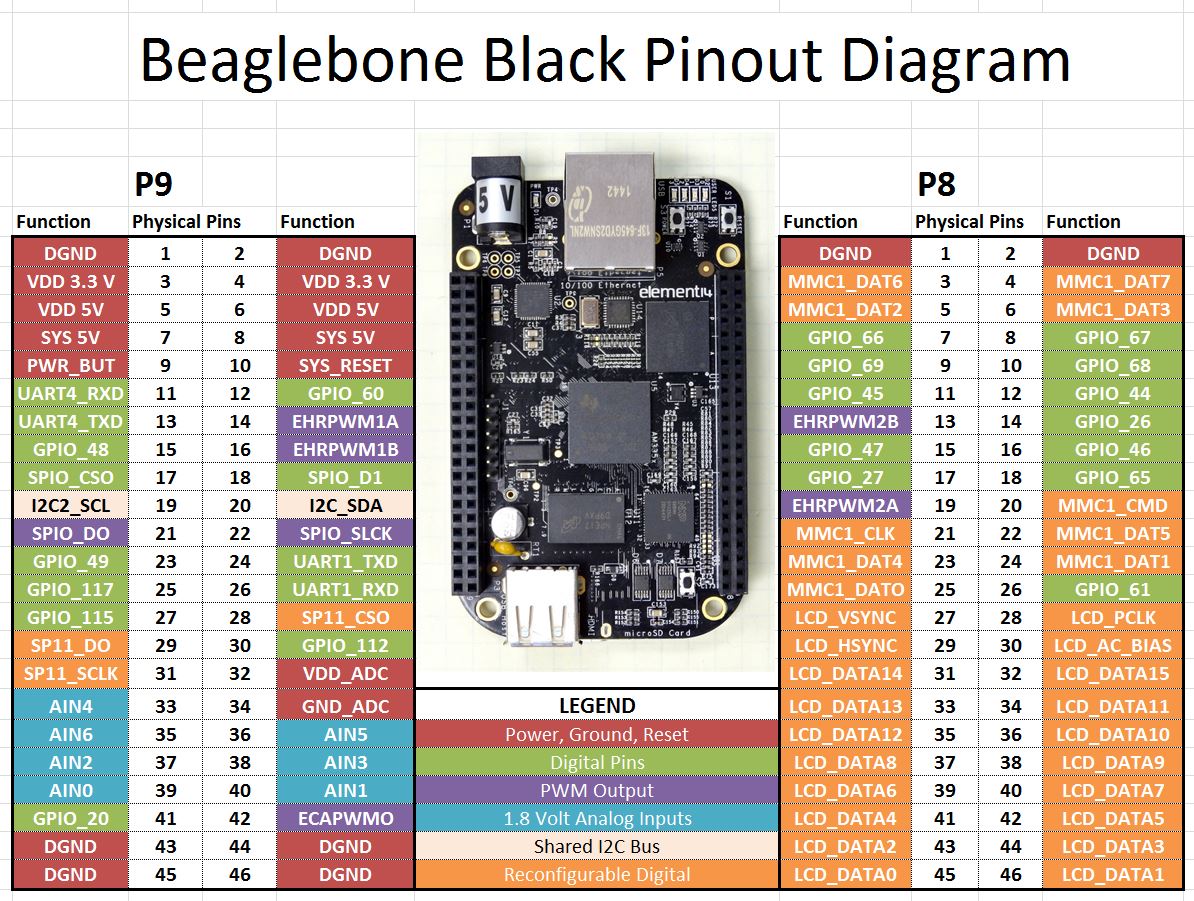
In Python, we reference pins by first specifying which header we want (P8 or P9) and then which physical Pin. For Example, to specify pin 12 on the left header, we would refer to it as “P9_12”. For digital output, we should use one of the pins above that is shaded green.
To talk to the GPIO pins in Python, we must first import a library. The latest versions of the Beaglebone Black Rev C. are shipping with the library already installed. If you have an earlier version, you need to update to the latest operating system. You can visit the beagleboard.org web site to download the latest operating system. If you get an error when you try and load the library, you know that either you have typed the command in wrong, or you need to update your operating system. In python to import the library you need to include the line:
|
1 |
import Adafruit_BBIO.GPIO as GPIO |
Once you have imported the library, you then need to setup your pin as an output pin:
|
1 |
GPIO.setup("P9_12", GPIO.OUT) |
Now if you want to set that pin high you can use the command:
|
1 |
GPIO.output("P8_10", GPIO.HIGH) |
To set the pin low you can use the command:
|
1 |
GPIO.output("P8_10", GPIO.LOW) |
After you are done working with the pin, you should “cleanup” to free the pin up:
|
1 |
GPIO.cleanup() |
These are all the commands you need in order to set the pin “HIGH” or “LOW”. Remember that in the High state, the Beaglebone Black outputs 3.3 Volts.
We can bring things together to make a simple program that will turn the pin on and off in three second intervals. Try and play around yourself with this code. Then try different GPIO pins.
|
1 2 3 4 5 6 7 8 9 10 |
import Adafruit_BBIO.GPIO as GPIO #import GPIO Library outPin="P9_12" #set outPin to "P9_12" GPIO.setup(outPin,GPIO.OUT) #make outPin an Output from time import sleep #so we can use delays for i in range(0,5): #loop 5 times GPIO.output(outPin, GPIO.HIGH) # Set outPin HIGH sleep(3) #Pause GPIO.output(outPin, GPIO.LOW) # Set outPin LOW sleep(3) #Wait GPIO.cleanup() #Release your pins |