In Lesson 28 and Lesson 29 we showed how to use simple software interrupts to do quick and easy tasks like turning an LED on or off. We emphasized the importance of just doing simple tasks, and to get in and out of the interrupt function as quickly as possible. It is sometimes necessary to do more sophisticated functions. For example, the Adafruit Ultimate GPS immediately begins sending serial data on powerup. Making matters worse, it sends big bursts of data, and then waits, and then later sends bursts of data again. The data that is sent needs to not just be read, but you must parse the data to make sense of it. Hence, you end up needing to do sophisticated functions to parse the data, but at the same time you have to make sure you do not miss any of the new incoming data. This requires a more thoughtful and sophisticated interrupt strategy.
First off, we will need a better software interrupt library. You should erase the TimerOne library you installed in Lesson 28, and replace it with the one here:
This is a follow on to lesson 28, to address some of the questions that come up. It is important to understand that all functions are not well suited for use with software interrupts. You must be mindful of timing. Key to being successful with Arduino Software Interrupts is the function called needs to be small and very fast. When the interrupt calls the function, you need to get in and out of that function as quick as you can. Hence, you should avoid doing printing in the function called by the interrupt. You should try and avoid working with serial data, because things can get lost if you are not careful. Also, you should know that you can not use a delay in the function.
For most beginner programmers, interrupts should just be used to call short functions, with minimal lines of code, that can be run quickly.
In this lesson we will show you how to take your arduino programs to the next level by learning to program software interrupts. The challenge with the Arduino platform is that you can only have one program or “thread” running at a time. Hence, something simple like blinking two LED’s at the same time at different rates can not be done because only one line of code is executed at a time. Much more powerful projects can be achieved if we learn how to get around this by programming interrupts. An interrupt can be thought of like an alarm clock. You set the alarm clock, and then when the alarm goes off, no matter where your program is in the execution code, it stops what it is doing, and then runs and executes the interrupt code. In order to use software interrupts, you must load a new library. The TimerOne interrupt library can be downloaded here:
Click on the TimerOne-r11.zip link, and it will download a zip folder to your computer. Find your Arduino Library folder (Video above explains how if you do not know how). In your Arduino Library folder create a new folder called TimerOne. Take the CONTENTS of the zip folder you just downloaded and put it in your TimerOne library folder. Remember that when you install a new library, you have to close and reopen the Arduino IDE for it to find the new library.
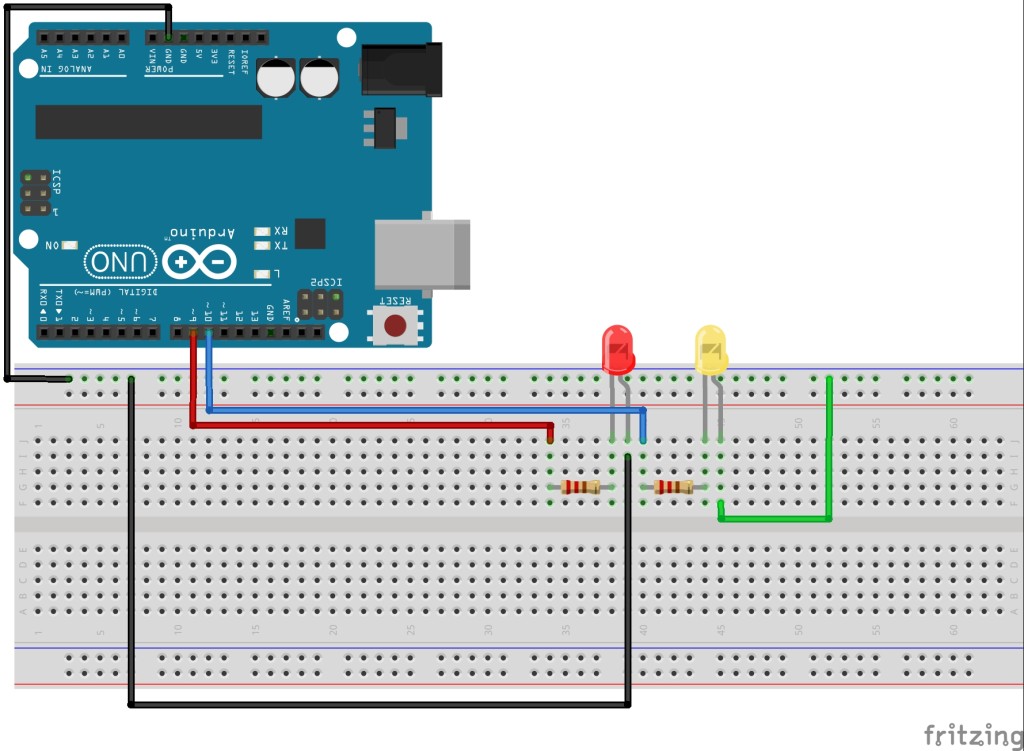
Now you will want to build a simple circuit to allow control of a yellow and red LED. The current limiting resistors in the circuit should be between 200 and 500 ohms. So, lets build the following circuit:
Make sure to connect the long legs of the LED to the control pins.
Now we are ready to create our first interrupts. First matter of business is your program should load the interrupt library:
Arduino
1
#include <TimerOne.h>
This should be at the top of your code, and will load the library.
To create an interrupt, you need to first now initialize the interrupt, specifying what time frame you want it to “interrupt” on, and then what you want it to do when the interrupt alarm goes off. You would typically set these two things up in the Void Setup. Consider this sample code:
Arduino
1
2
Timer1.initialize(100000);
Timer1.attachInterrupt(BlinkYellow);
If you place this code in the void setup, it will do two things. The first is it will initialize an interrupt that will go off every .1 seconds. Understand the units for the Timer1.initialize command are in microseconds, so 100,000 microseconds would create an interrupt every .1 seconds. Now you have to tell arduino what to do when the interrupt goes off. This is done with the Timer1.attachInerrupt command. In the code above, you can see that the command is telling the arduino that every time the interrupt goes off, it should pause what it is doing, go and run the BlinkYellow function, and then afterwords return to whatever it was doing.
So, lets pull all this together to crate a program that will blink a Red LED slowly, 1 second on, followed by one second off, and then at the same time blink a yellow LED quickly using the Timer1 interrupt. The following code would do just that.
Arduino
1
2
3
4
5
6
7
8
9
10
11
12
13
14
15
16
17
18
19
20
21
22
23
24
25
26
27
28
29
30
31
32
33
34
35
36
37
38
#include <TimerOne.h>
StringLEDStatus="OFF";
intYellowLED=10;
intRedLED=9;
voidsetup()
{
// Initialize the digital pin as an output.
// Pin 13 has an LED connected on most Arduino boards
pinMode(YellowLED,OUTPUT);
pinMode(RedLED,OUTPUT);
Timer1.initialize(100000);
Timer1.attachInterrupt(BlinkYellow);
Serial.begin(9600);
}
voidloop()
{
digitalWrite(RedLED,HIGH);
delay(1000);
digitalWrite(RedLED,LOW);
delay(1000);
}
voidBlinkYellow()
{
if(LEDStatus=="ON"){
digitalWrite(YellowLED,LOW);
LEDStatus="OFF";
return;
}
if(LEDStatus=="OFF"){
digitalWrite(YellowLED,HIGH);
LEDStatus="ON";
return;
}
}
Making The World a Better Place One High Tech Project at a Time. Enjoy!