
We are now ready to learn how to “read” values from the Raspberry Pi GPIO pins. In order to demonstrate this, we will show a simple example using buttons. If you ordered the Raspberry Pi kit we recommend, you already have everything you need, or you can pick your kit up HERE. To start with, you need to put together a simple circuit that connects two push buttons to your Raspberry Pi. Connect according to this schematic.
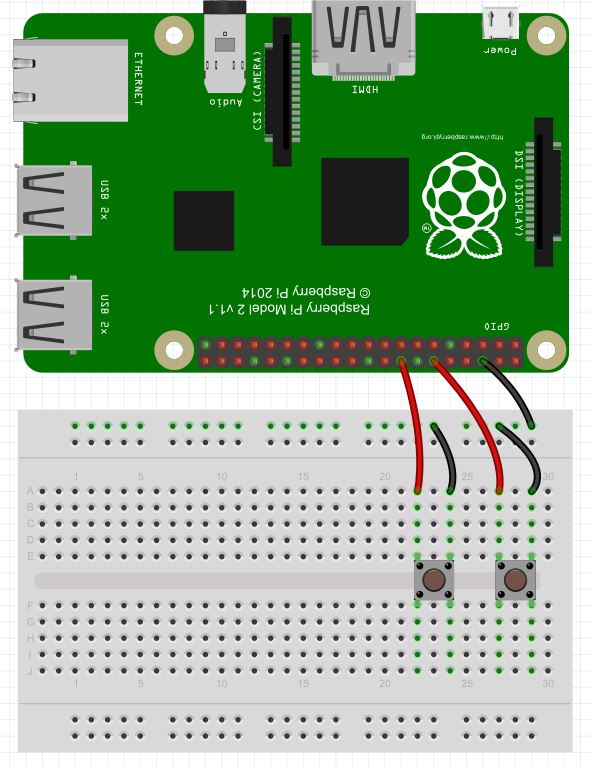
Note that one leg of each button is connected to the ground rail on the breadboard, that is connected to the Pi ground at physical pin 6. Then we connect the left leg of the left button to physical pin 16, and the left leg of the right button to physical pin 12.
In order to read the state of these buttons, that is, whether they are being pressed or not, we need to write a python program. To begin with we must import GPIO library and specify that we want to
|
1 2 3 |
from time import sleep # Import time library import RPi.GPIO as GPIO # Import RPi Library GPIO.setmode(GPIO.BOARD) # Specify We Want to reference Physical pins |
Now we are ready to set the pin modes on the pins we are using. We are using pins 12 and 16. We will set up variables so that we can reference the pins by descriptive variables.
|
1 2 3 4 |
button1=16 # Descriptive Variable for pin 16 button2=12 # Descriptive Variable for pin 12 GPIO.setup(button1,GPIO.IN,pull_up_down=GPIO.PUD_UP) # Set button1 as input and Activate pull up resistor GPIO.setup(button2,GPIO.IN,pull_up_down=GPIO.PUD_UP) # Set button2 as input and Activate pull up resisor |
Note in our GPIO.setup commands, we are not just defining the pins as inputs, we are also activating pullup resistors with
|
1 |
pull_up_down=GPIO.PUD_UP |
With this command, the raspberry pi places a pullup resistor between the designated pin and the 3.3 V rail. This means that if we simply read the pin, we will read a “1”, “True”, or “High”, since the pin will see the rail through the pullup resistor. If we connect the pin to ground by pressing a button or switch, the pin will then read a “0”, “False” or “Low” because it will be a straight connection to ground, and as current flows through the pullup resistor, the 3.3 Volts will drop across the pullup resistor. Hence, the pin sees 0 volts.
The result is that with the pullup resistor activated, the pin will always report a “1” until something connects the pin to ground, and then it will read a “0”. This configuration should work for most things, but if you are getting unpredictable results which can result from electrical noise, then try using external pullup resistors.
Now we are ready to read the values from the pins.
|
1 2 3 4 5 6 7 8 |
while(1): # Create an infinite loop if GPIO.input(button1)==0: # button1 will report 0 if it is pressed print "Button 1 Pressed" sleep(.1) # delay if GPIO.input(button2)==0: # button 2 will report 0 if it is presses sleep(.1) print "Button 2 Pressed" |
Notice that we read from the pin using the GPIO.input command. Also note that for reliable results you need to usually put a small delay in your code. This will help debounce the button, and will also give more stable results.
OK, so our final code is as follows:
|
1 2 3 4 5 6 7 8 9 10 11 12 13 14 |
from time import sleep import RPi.GPIO as GPIO GPIO.setmode(GPIO.BOARD) button1=16 button2=12 GPIO.setup(button1,GPIO.IN,pull_up_down=GPIO.PUD_UP) GPIO.setup(button2,GPIO.IN,pull_up_down=GPIO.PUD_UP) while(1): if GPIO.input(button1)==0: print "Button 1 Pressed" sleep(.1) if GPIO.input(button2)==0: sleep(.1) print "Button 2 Pressed" |
This code will sit and monitor the buttons, and when one is pressed it will report that that button has been pressed.