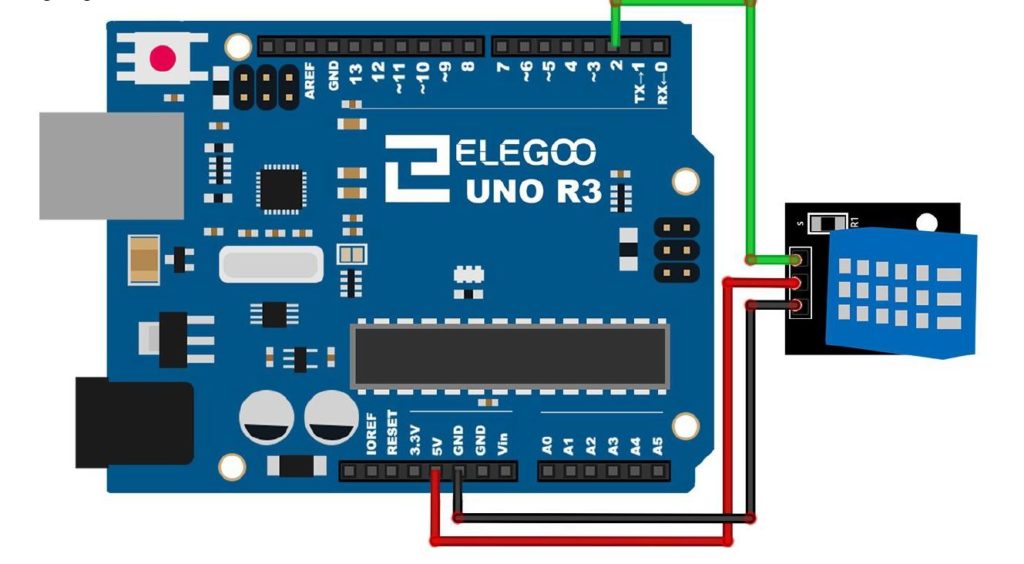
In this lesson we show how to measure Temperature and Humidityusing the DHT11 sensor. This is a relatively simple sensor to use, but you will have to download and install a library. In our earlier lessons, we have used libraries before, but this is the first time you will have to download a library. The library I used was downloaded from HERE. The video explains in detail how to install the library, but in a nutshell you download the library from clicking the link on that page. Then you need to open the downloaded zip file, and then drag and drop the contents of the zip file to your desktop. Next you must determine where your arduino library folder is. You can do that by going to the arduino IDE, and under “file” select preferences. This will show you your “Sketchbook Location”, and that folder will contain your libraries folder. The folder you dragged and dropped onto your desktop should be dragged and dropped now into this library folder. The video shows you how to do this if this description is not clear. Now you will need to connect the sensor, according to this schematic:

The video develops the code to use this sensor step-by-step, but the code is included below for your convenience.
1 2 3 4 5 6 7 8 9 10 11 12 13 14 15 16 17 18 19 20 21 22 23 24 25 26 27 28 29 30 31 32 33 | #include "DHT.h" #define Type DHT11 int sensePin=2; DHT HT(sensePin,Type); float humidity; float tempC; float tempF; int setTime=500; int dt=1000; void setup() { // put your setup code here, to run once: Serial.begin(9600); HT.begin(); delay(setTime); } void loop() { humidity=HT.readHumidity(); tempC=HT.readTemperature(); tempF=HT.readTemperature(true); Serial.print("Humidity: "); Serial.print(humidity); Serial.print("% Temperature "); Serial.print(tempC); Serial.print(" C "); Serial.print(tempF); Serial.println(" F "); delay(dt); } |
