In lesson 32 we introduced you to the concept of Arduino Functions. Functions are little blocks of code that allow you to break a complicated task down into small logical chunks of code. All the parts of the program shared the same set of variables. This is the easiest way to do functions, but is really not a good way of doing it. As programs get more complicated, with more functions, unexpected problems can arise if all the parts of the program are sharing the same variables. One function might inadvertently change a variable in use by another function causing unexpected problems. The best way to write modular code is to use local variables.
In Arduino, if a variable is declared at the top of the program, before the void setup, all parts of the program can use that variable. Hence, it is called a Global variable. On the other hand, if the variable is declared between a set of curly brackets, the variable is only recognized within that scope . . . that is, it will only be recognized and can only be used between that set of curly brackets.
For example, if a variable is declared in the void setup, it will not be recognized and can not be used in the void loop, because the void loop is within its own set of curly brackets.
Similarly, if there are two for loops inside the void loop, each for loop has its own set of curly brackets. If a variable is declared inside the first for loop, it will not be recognized inside the other for loop, and will not be recognized in the other parts of the void loop.
This might sound like a hassle, but using local variables really helps you stay out of trouble. The best way to do functions is to use local variable, and inside each function, the variables are declared that are needed by that function. Watch the video and I will give you clear examples of using local and global variables.
In this lesson we will learn more about working with stings. A string is literally a string or sequence of characters. The word “Hello” is a string of characters. Stings allow your computer program to interact with the world in a way that the world understands, so it is important for us to learn a little more about strings.
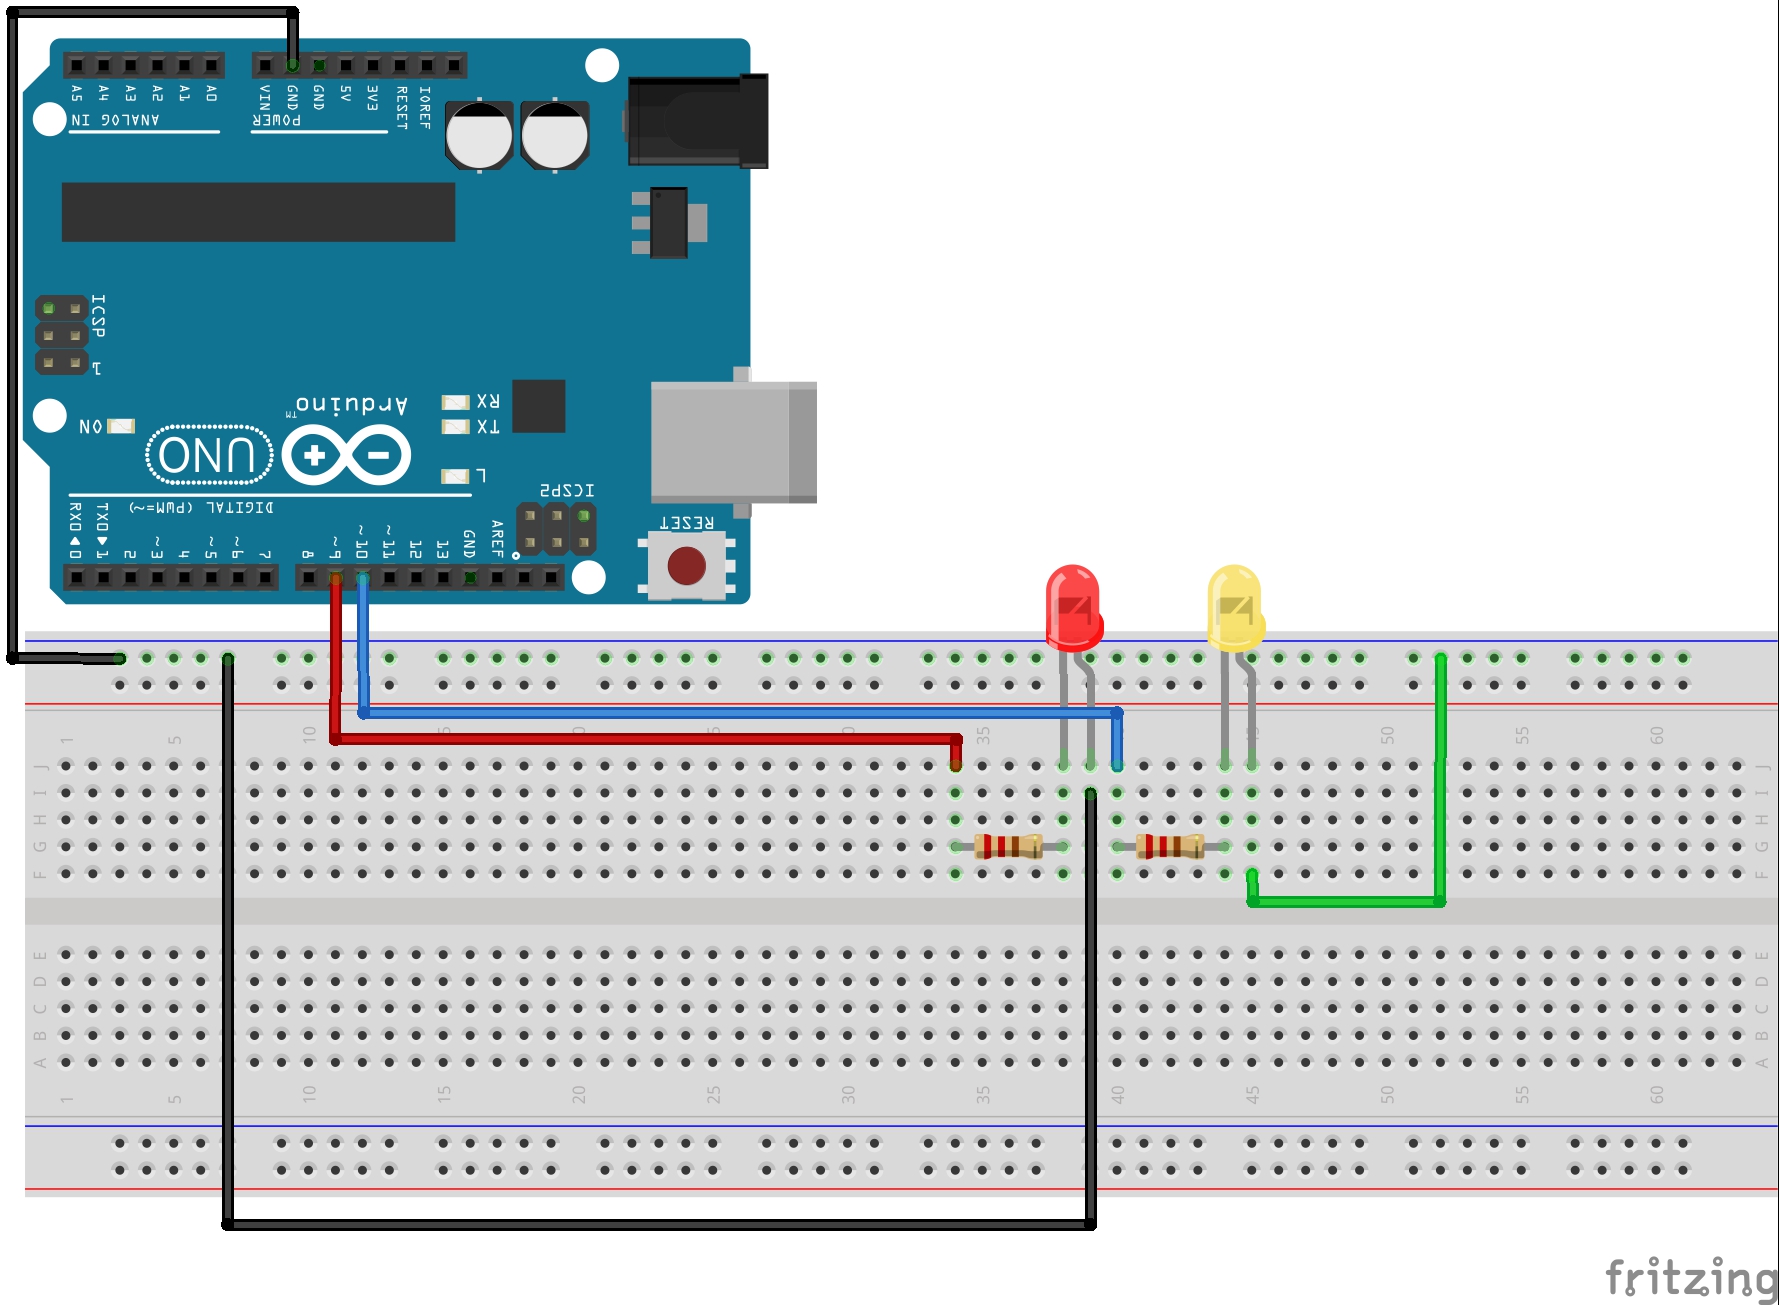
In this lesson we will be using the same circuit we developed in Arduino Lesson 3. If you need help setting the circuit up, please visit lesson 3. Hopefully you still have the circuit set up, as we have used it for the last two lessons. The circuit schematic and code we have been working with is presented below.
This circuit will allow you to independently control two Light Emitting Diodes from the arduino microcontroller
This is the code that will run this circuit.
Arduino
1
2
3
4
5
6
7
8
9
10
11
12
13
14
15
16
17
18
19
20
21
22
23
24
25
26
27
28
29
30
31
32
33
34
35
36
37
38
intredLEDPin=9;//Declare redLEDPin an int, and set to pin 9
intyellowLEDPin=10;//Declare yellowLEDPin an int, and set to pin 10
intredOnTime=250;//Declare redOnTime an int, and set to 250 mseconds
intredOffTime=250;//Declare redOffTime an int, and set to 250
intyellowOnTime=250;//Declare yellowOnTime an int, and set to 250
intyellowOffTime=250;//Declare yellowOffTime an int, and set to 250
intnumYellowBlinks=5;//Number of times to blink yellow LED
intnumRedBlinks=5;//Number of times to blink red LED
voidsetup(){
Serial.begin(115200);
pinMode(redLEDPin,OUTPUT);// Tell Arduino that redLEDPin is an output pin
pinMode(yellowLEDPin,OUTPUT);//Tell Arduino that yellowLEDPin is an output pin
}
voidloop(){
Serial.println("The Red LED is Blinking");
for(intj=1;j<=numRedBlinks;j=j+1){// Start our for loop
Serial.print(" You are on Blink #: ");
Serial.println(j);
digitalWrite(redLEDPin,HIGH);//Turn red LED on
delay(redOnTime);//Leave on for redOnTime
digitalWrite(redLEDPin,LOW);//Turn red LED off
delay(redOffTime);//Leave off for redOffTime
}
Serial.println(" ");
Serial.println("The Yellow Yellow is Blinking");
for(intj=1;j<=numYellowBlinks;j=j+1){// Start our for loop
Serial.print(" You are on Blink #: ");
Serial.println(j);
digitalWrite(yellowLEDPin,HIGH);//Turn yellow LED on
delay(yellowOnTime);//Leave on for yellowOnTime
digitalWrite(yellowLEDPin,LOW);//Turn yellow LED off
delay(yellowOffTime);//Leave off for yellowOffTime
}
Serial.println(" ");
}
In the code above, notice that we are using stings in some of our print statements. For example the line of code above the for loop for blinking the red LED reads as:
Arduino
1
Serial.println("The Red LED is Blinking");
The text in quotes is your string, and in this case is “The Red LED is Blinking”. As you can see a string is just a string of characters. We can use strings to present meaningful words and thoughts to the user. We are not limited to just using strings as we have above, but we can actually create variables to hold strings. For example, in the code above one of the strings we print for the user to see is “The Red LED is Blinking”. It would be possible for us to create a variable called redMessage, and set redMessage to “The Red LED is Blinking”. In order to do this, we would need to declare the variable redMessage a string. We can do that up at the top of the program before the void setup, which would make it a global variable. The code would look like this:
Arduino
1
2
StringredMessage="The Red LED is Blinking";
StringyellowMessage="The Yellow LED is Blinking";
With this code we declare two new variables of type String. In addition to declaring the variables we initialize them to their respective values. By doing this we can modify our print statements in the original code to print the Strings by printing the variables we have assigned them to.
Arduino
1
Serial.println("The Red LED is Blinking");
can be replaced with
Arduino
1
Serial.println(redMessage);
Notice when we print the variable, we do not use quotes around it. When we say to print redMessage, it will print the string that was assigned to redMessage.
By assigning strings to variables instead of using them directly it makes it much easier to modify and use your code. Try and get in the habit of assigning strings to variables.
When we have string variables, it is possible to concatenate, or combine stings together.
For example, lets say we declare and initialize two variables:
Arduino
1
2
3
4
5
6
7
8
Stringst1="Hello";//Create a Strign st1 and set to "Hello "
Stringst2="World";//Create a String st2 and set to "World"
Stringst3;//Declare a String st3 but dont assign value to it yet.
// Now In your void loop add this
st3=st1+st2;//Combine st1 and st2 into a new variable st3
Serial.println(st3);// Print out st3
It is a good practice to try to assign strings to variables and then use the variables.
Making The World a Better Place One High Tech Project at a Time. Enjoy!