Tag Archives: Beaglebone Black

Beaglebone Black GPS Tracker LESSON 4: Easily Transfer Files Between Beaglebone and PC

One of the things that surprised me about the Beaglebone Black is that it does not come with any simple, direct way to transfer files back and forth with a PC. For our GPS project, we will need to transfer our logged GPS data from the Beaglebone Black to the PC. What I have found is the easiest way to transfer files is using WINscp. You can download this software at:

http://winscp.net/eng/download.php

Download and install the software, which takes just a few minutes. One downloaded, launch the program. You will see a window like this:

WINscp
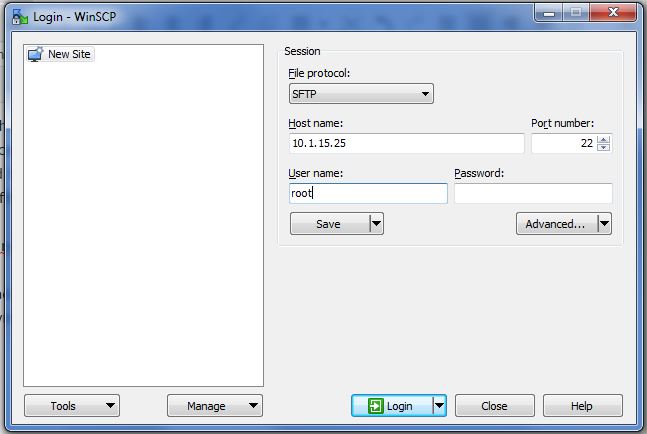
Login Screen for WINscp

Under  host name, you will want to put the IP address of your Beaglebone Black. If you do not know the IP address, we explain how to get it in LESSON 2.

For the default Beaglebone Black configuration, the username is root, and there is no password. Fill in these blanks, and then click “Login”.

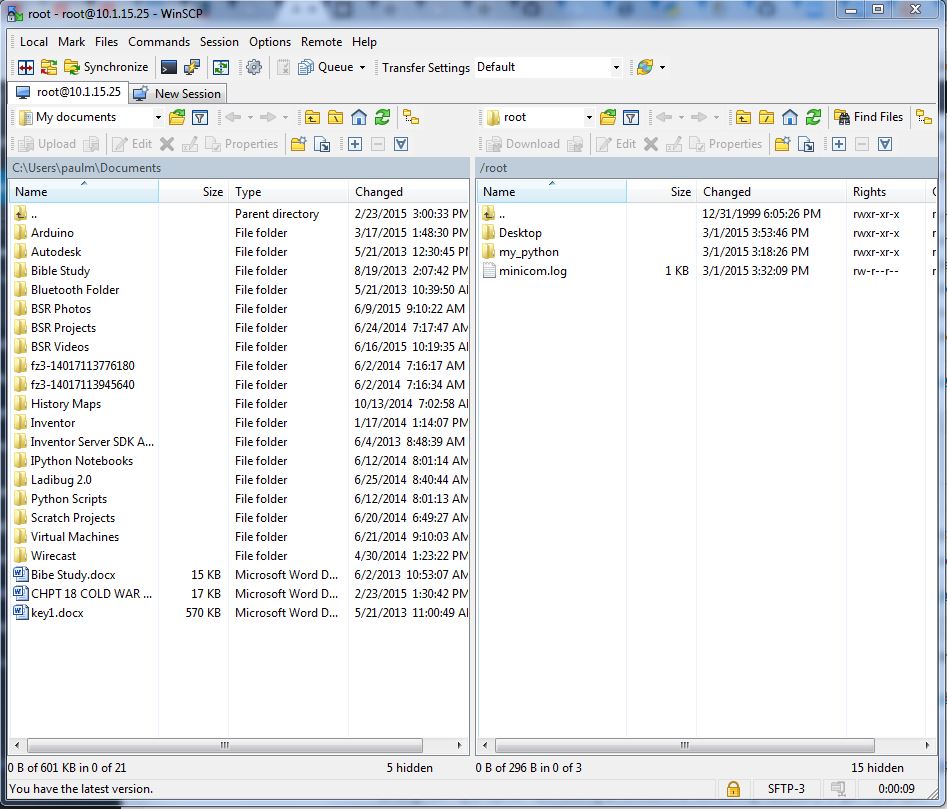
That should take you to this screen:

WINscp
WINscp Dashboard

At this point the right panel is a view of your Beaglebone Black files. You can navigate by clicking on the folders. An the left is your PC files. You can drag and drop files between the two panels to transfer them to and from the PC and Beaglebone Black.

Beaglebone Black GPS Tracker LESSON 3: Parsing the NMEA Sentences in Python

Beaglebone GPS
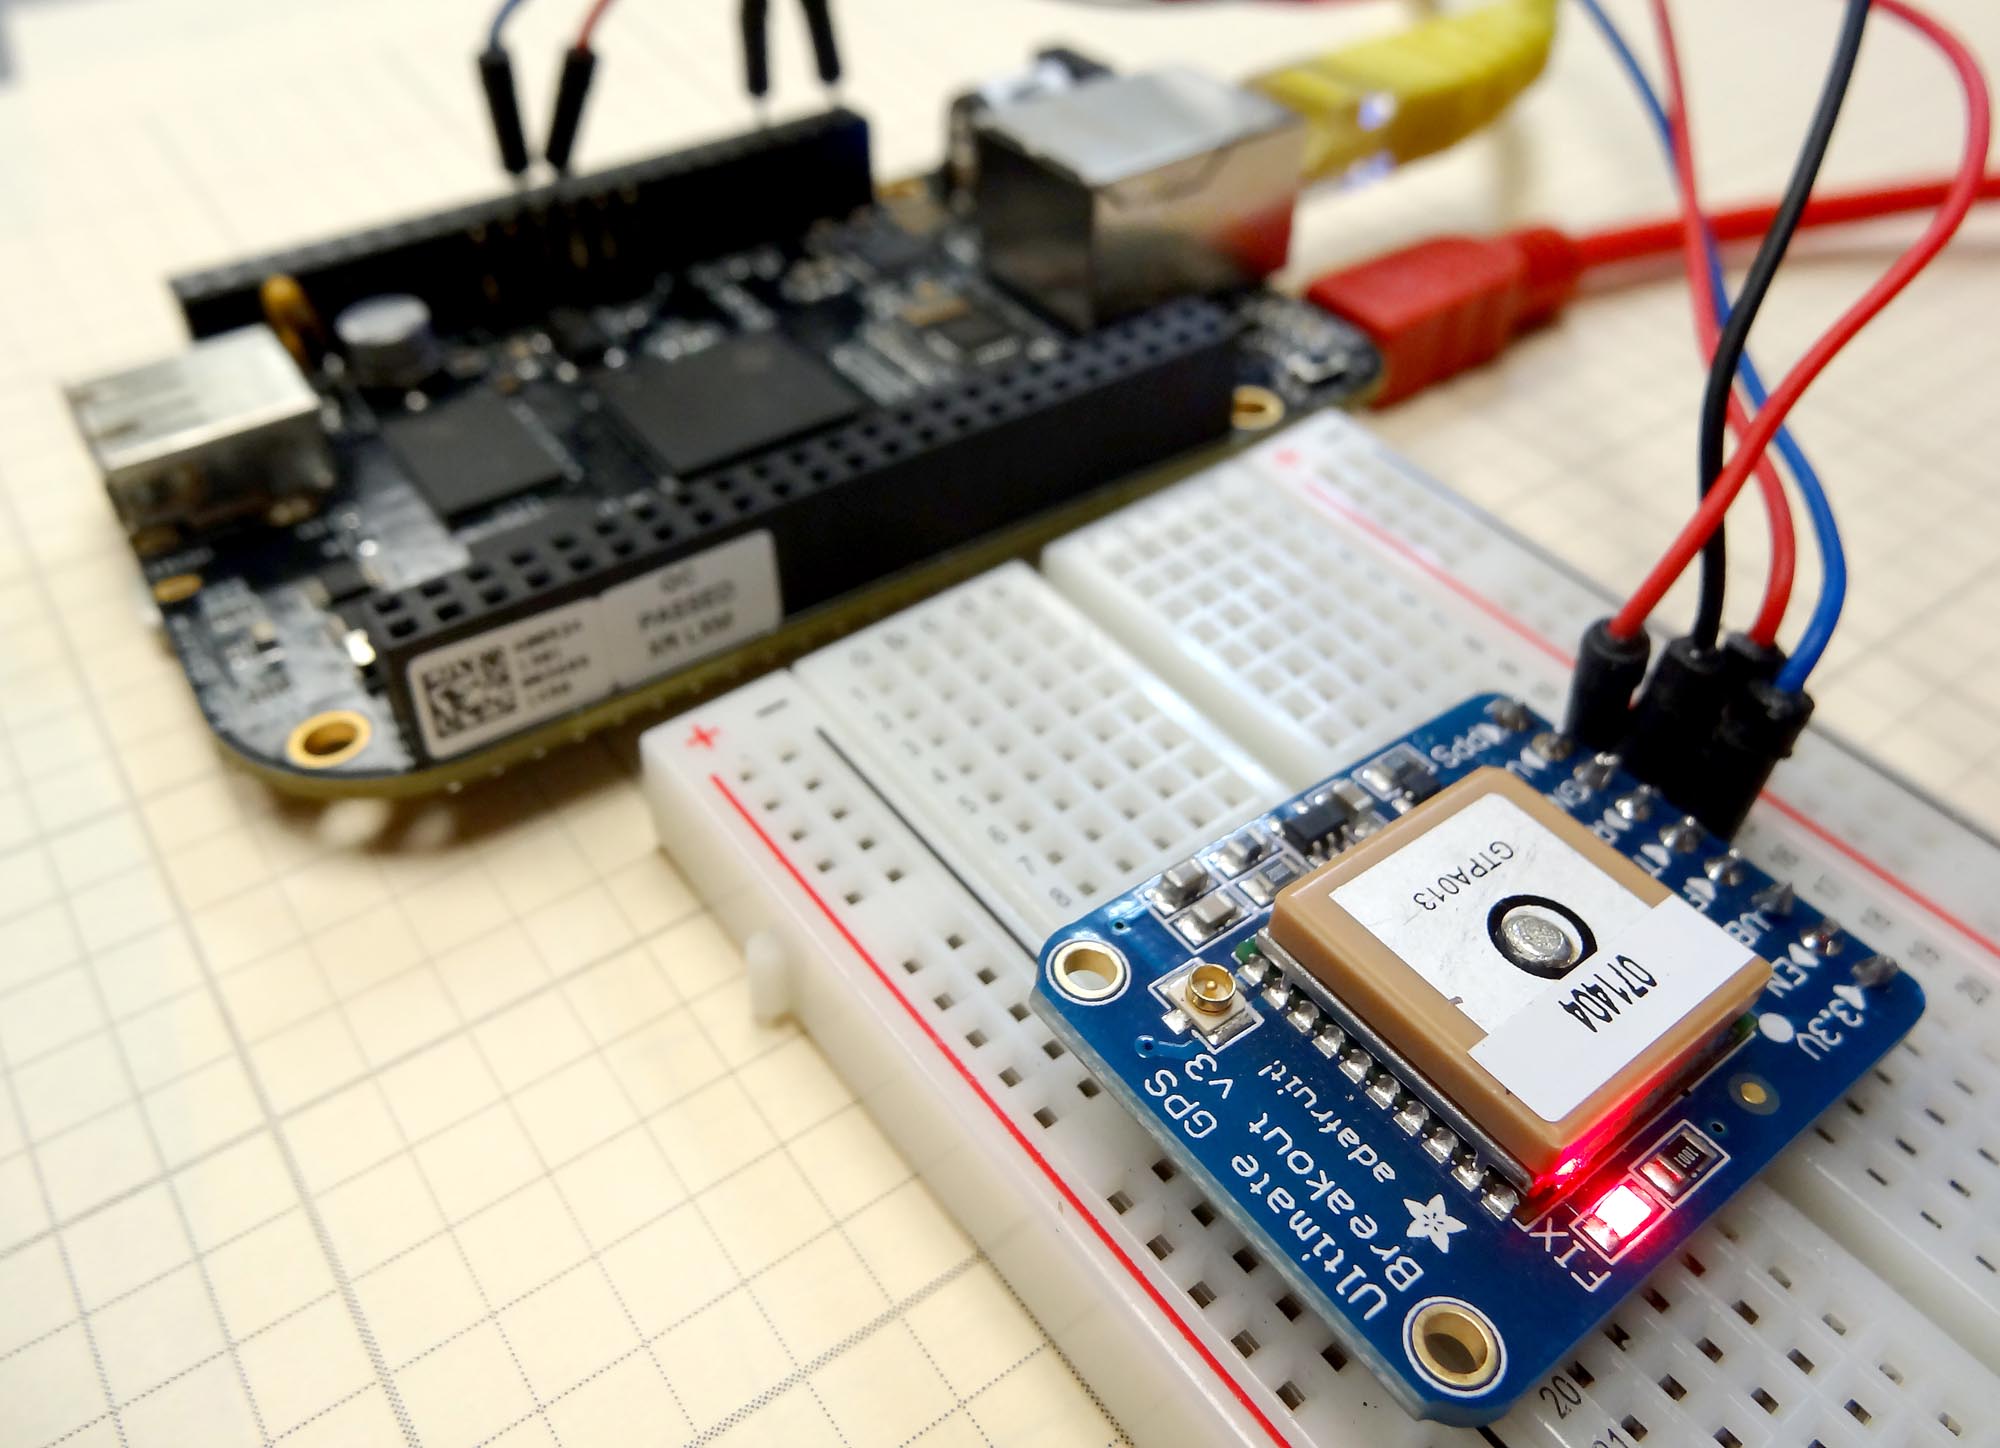
Beaglebone Black connected to the Adafruit Ultimate GPS

In the first two lessons in this series, you learned how to hook the Beaglebone Black to the Adafruit Ultimate GPS breakout board. We then learned to read NMEA sentences from the GPS, and how to control the data the GPS spits out. In this lesson we will learn to parse the NMEA sentences into useful data. You need to make sure you go back and review the first two lessons, as this one draws heavily on those. Also, you need to start with the code we had developed in LESSON 2. (If you need the gear we are using, you can get the Beaglebone Black HERE, and you can get the Adafruit GPS HERE.)

In this code we move most of the work up into our GPS class. That makes the main part of the program simple and intuitive to use.


Beaglebone Black GPS LESSON 2: Sending Commands to the Adafruit GPS Module

Adafruit GPS
Adafruit Ultimate GPS Connected to the Beaglebone Blak

In lesson 1 we showed you how to connect the Adafruit Ultimate GPS breakout board to the Beaglebone Black and how to read the NMEA sentences streaming off the GPS over the UART pins. In this lesson we will show you how to send commands to the GPS to better tailor its operation for our needs. There are a number of commands that can be sent to it. Some of the things we we can control are the baud rate it communicates at, and the rate that it takes and sends data. We can also influence which NMEA sentences it sends.  In this video we will go over the different commands we can use.

To review, you should connect the GPS as follows:

Beaglebone GPS
Adafruit Ultimate GPS connected to the Beaglebone Black Rev C Microcontroller

The video explains the code step-by-step, but here it is for your reference.

This code sets the GPS to communicate at baud rate of 57600, and set it to read and report 5 readings a second. It then sets the GPS to only report the $GPRMC and the $GPGGA sentences. It then constantly reads and reports the NMEA sentences.

Beaglebone Black GPS LESSON 1: Hooking Up the Adafruit Ultimate GPS

Beaglebone GPS
Beaglebone Black connected to the Adafruit Ultimate GPS

If you went through our series of 12 lessons on the Beaglebone black you should be familiar with the basics of this microcontroller. We are now ready to move on to more advanced projects. In our earlier lessons on the Arduino, we built a GPS data logger and integrated it with Google Earth using the Arduino Uno and the Adafruit Ultimate GPS Breakout Board. While that was a great project, we finally ran out of horsepower with the arduino, and what we could do was limited by the memory limitations on the Arduino. Also, it is very hard to parse strings in the Arduino IDE, so interpreting the NMEA sentences is a rather large challenge with the limited string functionality in Arduino.

Python on the other hand makes quick work of string manipulation and the Beaglebone Black has plenty of horsepower for any manipulation of the NMEA sentences we might want to do.

In order to play along with this project, you will need a Beaglebone Black Rev C, which you can get HERE, and the Adafruit Ultimate GPS which you can get HERE. The video below takes you through the project step-by-step, as well as the description below.

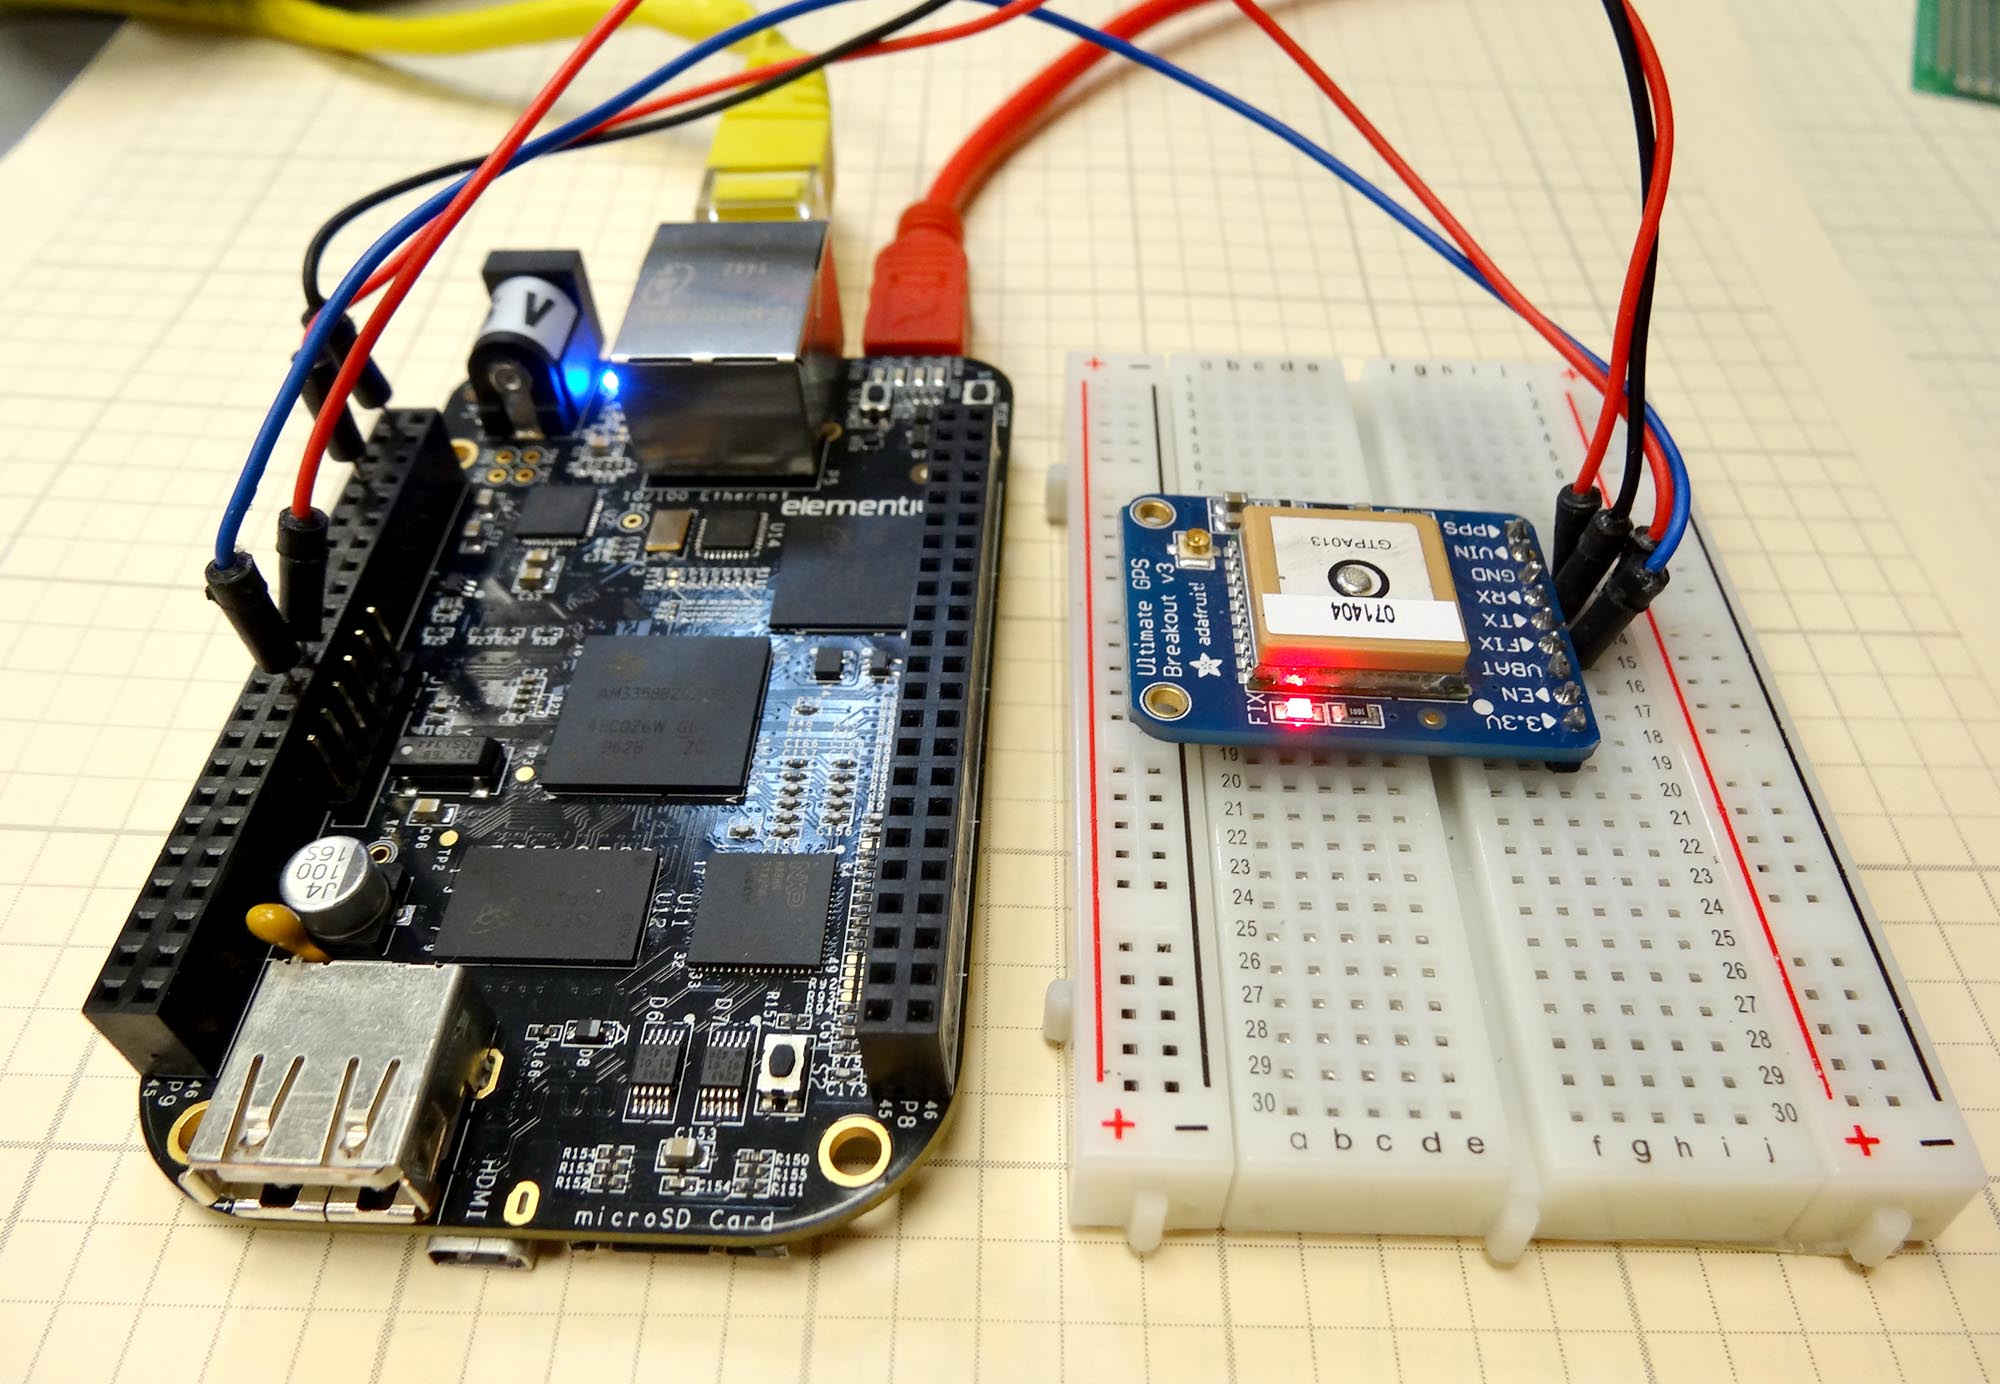
Once you get your gear, you will want to hook up the following circuit:

Beaglebone GPS
Adafruit Ultimate GPS connected to the Beaglebone Black Rev C Microcontroller

Note that we are working off header P9 and we are using P9_1 as ground, P9_7 as VIN, we are using P9_24 as  Tx and P9_26 as Rx. Please note that you can see a detailed Diagram of the Beaglebone Black pinout HERE. Also notice that Tx on the Beaglebone is connected to Rx on the GPS, and Rx on the Beaglebone is connected to Tx on the GPS. Tx is like “talk” and Rx is like “listen, so you want to listen to the pin that is talking, and you want to talk to the pin that is listening.

Our goal in this first lesson is to establish a connection between the GPS and the Beaglebone, and to read in the data streaming from the GPS. We want to get a fix, and verify that we can read and print the NMEA sentences that contain the various position, altitude and velocity data.

The video takes you step-by-step through the code. The following simple code will get you streaming data from the GPS to your terminal window. In future lessons we will break the data down and show you how to get your position from the raw NMEA sentences streaming in.


Beaglebone Black LESSON 12: Control a Servo from Python Using PWM

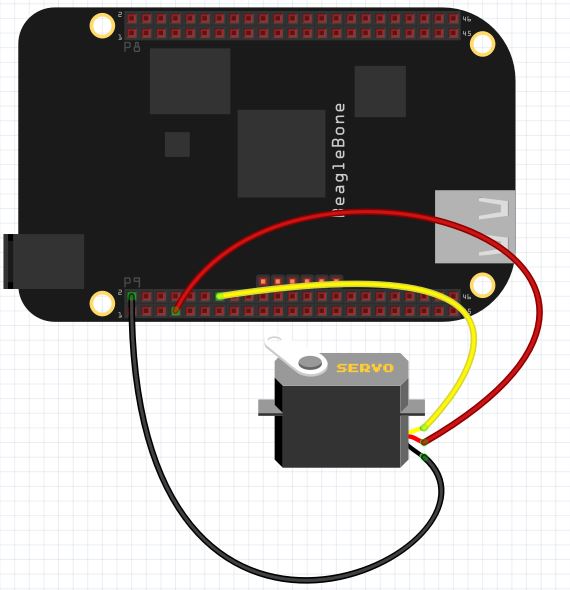
This lesson will show how to use Python running on the Beaglebone Black to control the position of a servo. First, I am using a small servo that I have verified can be powered from the Beaglebone Black without drawing too much current. All servos are different, so if you are unsure of the current requirements of your servo, it is safest to power it from an external 5 Volt power source. You can still control it through the control line connected to the Beaglebone Black, just make sure the servo and Beaglebone have a common ground.

Beaglebone Black Servo
Control of Servo From Beaglebone Black.

Most all servos have three wires; Power, Control, and Ground. For my servo, Control is Yellow, Power is Red, and Ground is Black. If you have a different servo, check the data sheet to see what colors are Control, Power and Ground on your servo. Note we are using pin P9_2 as ground, P9_7 as 5V power, and P9_14 as our control pin.

We will be controlling the position of the servo using PWM. We will have to play around with our individual servo to determine precisely what signal pulse width will result in the servo being in the full left position, and what pulse width will result in the servo being in the full right position.

For most servos, full left is somewhere around 1 milliseconds, and the pulse width that will give us full right position is about 2 milliseconds. These are ballpark numbers, and we will have to play around with things to find the exact values for our servo.

We will set up a 50 Hz PWM signal. A 50 Hz signal has a period of:

period = 1/frequency = .02 seconds = 20 miliseconds.

Hence, if we want to get to about the full left position we would want a duty cycle of about 5%. Because 20 milliseconds x .05 = 1 milliseconds. This one millisecond pulse width should put the servo about in the full left position. Similarly for the full right position, we would want a duty cycle of 10%, because that would give us a pulse width of 2 milliseconds, since:

PulseWidth = Period x DutyCycle

PulseWidth = 20 x .1 = 2 milliseconds.

We can use the following code to determine precisely for our servo what dutyCycle will give the precise full left and full right positions.

For my servo, running a 50 Hz PWM singnal, I find that a duty cycle of 2% puts it in the full left position and a duty cycle of 12% puts it in the full right position.

Now we would like to be able to just specify an angle we want and have it go to that angle. If we want an angle of 0 degrees we would apply a 2% duty cycle. This value is for my servo. You will have to play around with your servo and the code above to find what this number is for you. But for me, I have the point:

(0,2)

That is to say when I desire an angle of 0 on the servo, I should apply a dutyCycle of 2 to the PWM pin. Similarly, when I desire 180 degrees, I should apply a dutyCycle of 12. (Again, this number might vary for your servo). For my servo, I get the point:

(180, 12)

We can fit a line to these points, which would then allow us to calculate the dutyCycle for any desired angle. The slope from the two points above would be:

m=(y2-y1)/(x2-x1)=(12-2)/(180-0) = 10/180= 1/18

Using the point slope form of the line, we would get

y-y1 = m (x- x1)

y – 2 = 1/18( x – 0)

y= 1/18*x + 2

Now putting in our actual variable names we get:

dutyCycle = 1/18*desiredAngle + 2

You can develop the same type equation just using the values suitable for your servo from the experiment above.

Now we can use this code to smoothly move the servo to any desired position.